SHERER ARCHITECTS

Categories
Uncategorized

Top 7 Architecture Firms Charleston SC to Elevate Your Projects in 2025

Exploring Charleston’s Dynamic Architecture Landscape

Charleston’s built environment blends deep history with modern innovation. Finding the right architecture firms charleston sc often means sifting through scattered directories and outdated portfolios. This roundup speeds your search by spotlighting seven top websites and platforms tailored for: commercial real estate developers, adaptive reuse investors, general contractors, and property owners.

You’ll learn how to:

  • Compare firm listings across AIA Charleston’s Member Directory, Houzz, Clutch, LS3P, Liollio Architecture, The Middleton Group, and Goff D’Antonio Associates
  • Navigate interface features with screenshots and direct links for each resource
  • Analyze specialty filters for commercial projects, historic preservation, and adaptive reuse
  • Access pricing insights and best practices for initial consultations

Each entry includes a brief platform overview, key interface highlights, and practical tips to streamline outreach. Whether you need gallery-driven inspiration or B2B ratings, this listicle helps you pinpoint the most efficient route from research to hire.

By focusing on actionable insights and real-world examples, you’ll bypass generic advice and go straight to tools that solve your specific problem: connecting with top Charleston architecture talent without wasted time. Scroll down to explore the platforms that bring your next project to life.

Each profile includes a comparison table of filter options, screenshot previews, direct links, and consult fee ranges where available. Use these insights to match project scale and budget with the ideal design partner. No more guesswork or endless searching – hiring Charleston firms becomes a streamlined process.

1. AIA Charleston – Member Firm Directory

AIA Charleston’s Member Firm Directory is the go-to resource for finding licensed, locally active architecture firms in Charleston SC. Managed by the local American Institute of Architects section, it offers a professionally curated listing of residential, commercial, civic, and specialty practitioners.
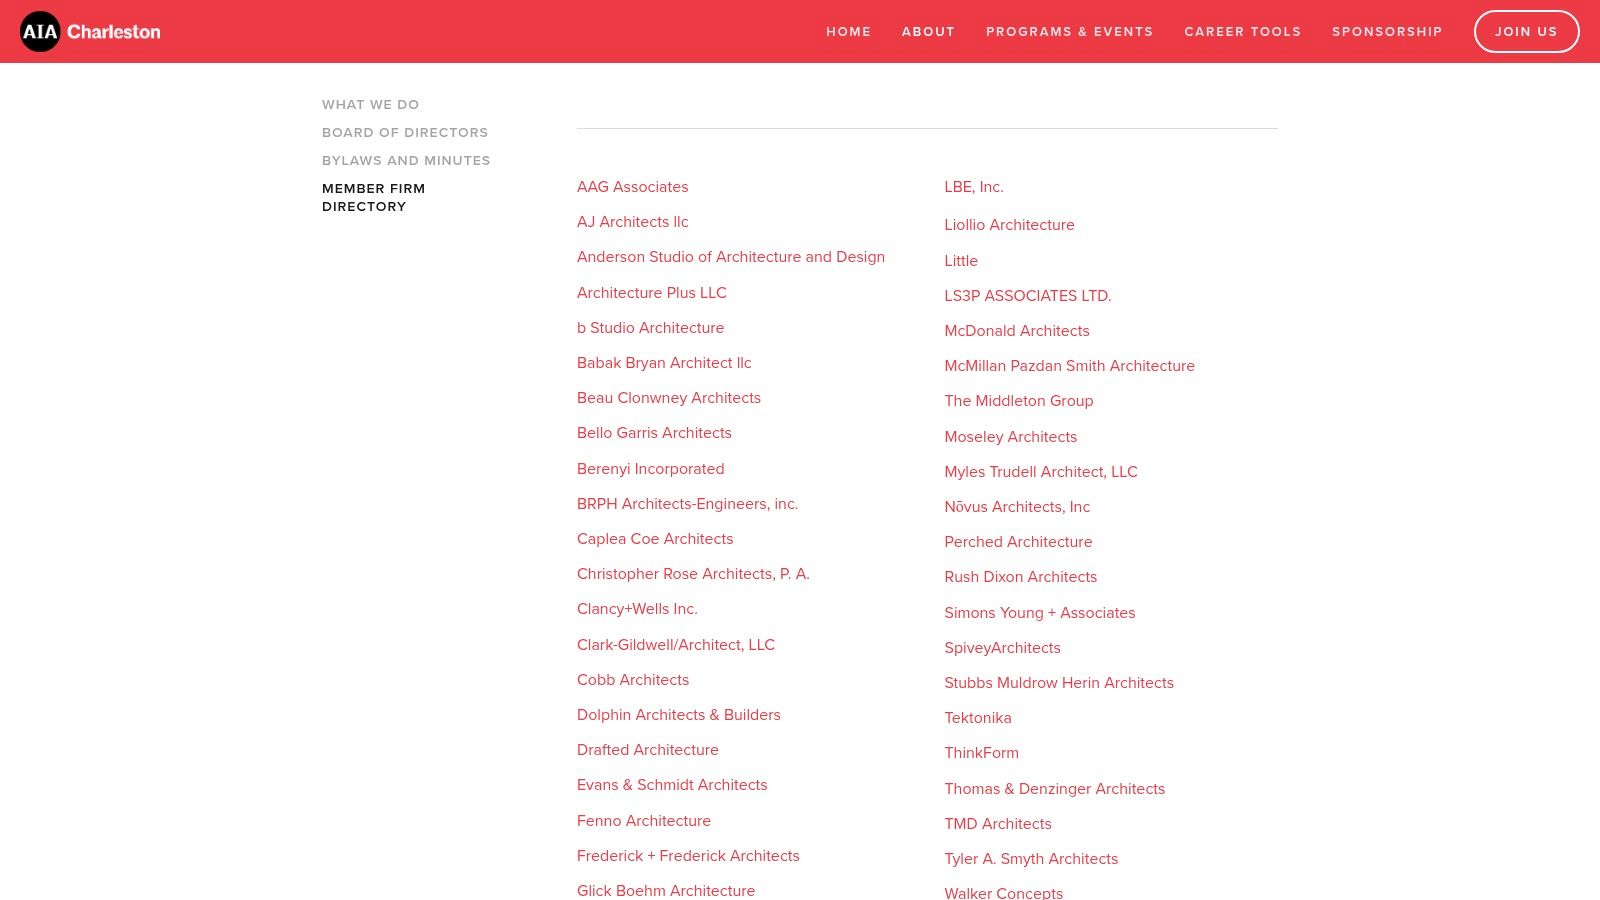
AIA Charleston – Member Firm Directory

H3 Key Features

  • Curated Listings
    All firms are vetted members of AIA Charleston, ensuring up-to-date licensing and local expertise.
  • Direct Links
    One-click access to firm websites, email addresses, and phone numbers.
  • Comprehensive Coverage
    Includes firms specializing in historic preservation, adaptive reuse, commercial design, and residential projects.
  • Professional Credibility
    Association-run directory boosts confidence for developers, owners, and contractors.

H3 How to Search and Filter

  1. Use the alphabetical index to jump to firm names starting with A–Z.
  2. Browse by specialty (historic, commercial, residential) via dropdown menus.
  3. Click “View Details” on any firm to see project galleries and contact forms.
  4. Bookmark individual listings for quick reference in your project RFP process.

H3 Feature Overview

Feature Details
Firm Count Over 100 member firms in the Charleston metro area
Specialties Covered Preservation, adaptive reuse, new construction
Sorting Options Alphabetical, specialty filter, location proximity
Pricing Transparency Firms set their own rates – contact required for quotes

H3 Pros and Cons

Pros

  • High credibility from AIA vetting
  • Simple, uncluttered interface
  • Direct access to each firm’s portfolio and contact details

Cons

  • No price comparisons or standard rate cards
  • Limited advanced filtering compared with large marketplaces
  • Requires direct outreach for availability and proposals

H3 Practical Tips for Developers

  • Create a shortlist of 5–7 firms and request scope-specific proposals.
  • Use the “Project Type” dropdown to narrow results to adaptive reuse or historic work.
  • Note peak seasons (spring/fall) to schedule consultations early.

H3 Access & Pricing

  • Availability: Publicly accessible at no cost
  • Registration: Not required for basic search, optional for newsletter
  • Proposals: Firms set rates individually; prepare a concise RFP to expedite quotes

H3 Why It Stands Out

  • Association-backed credibility assures licensed, local expertise
  • Focused on Charleston SC market — ideal for region-specific code knowledge
  • Quick jump-off links reduce admin time when vetting multiple architecture firms

Visit the directory here: https://aiacharleston.org/firm-directory

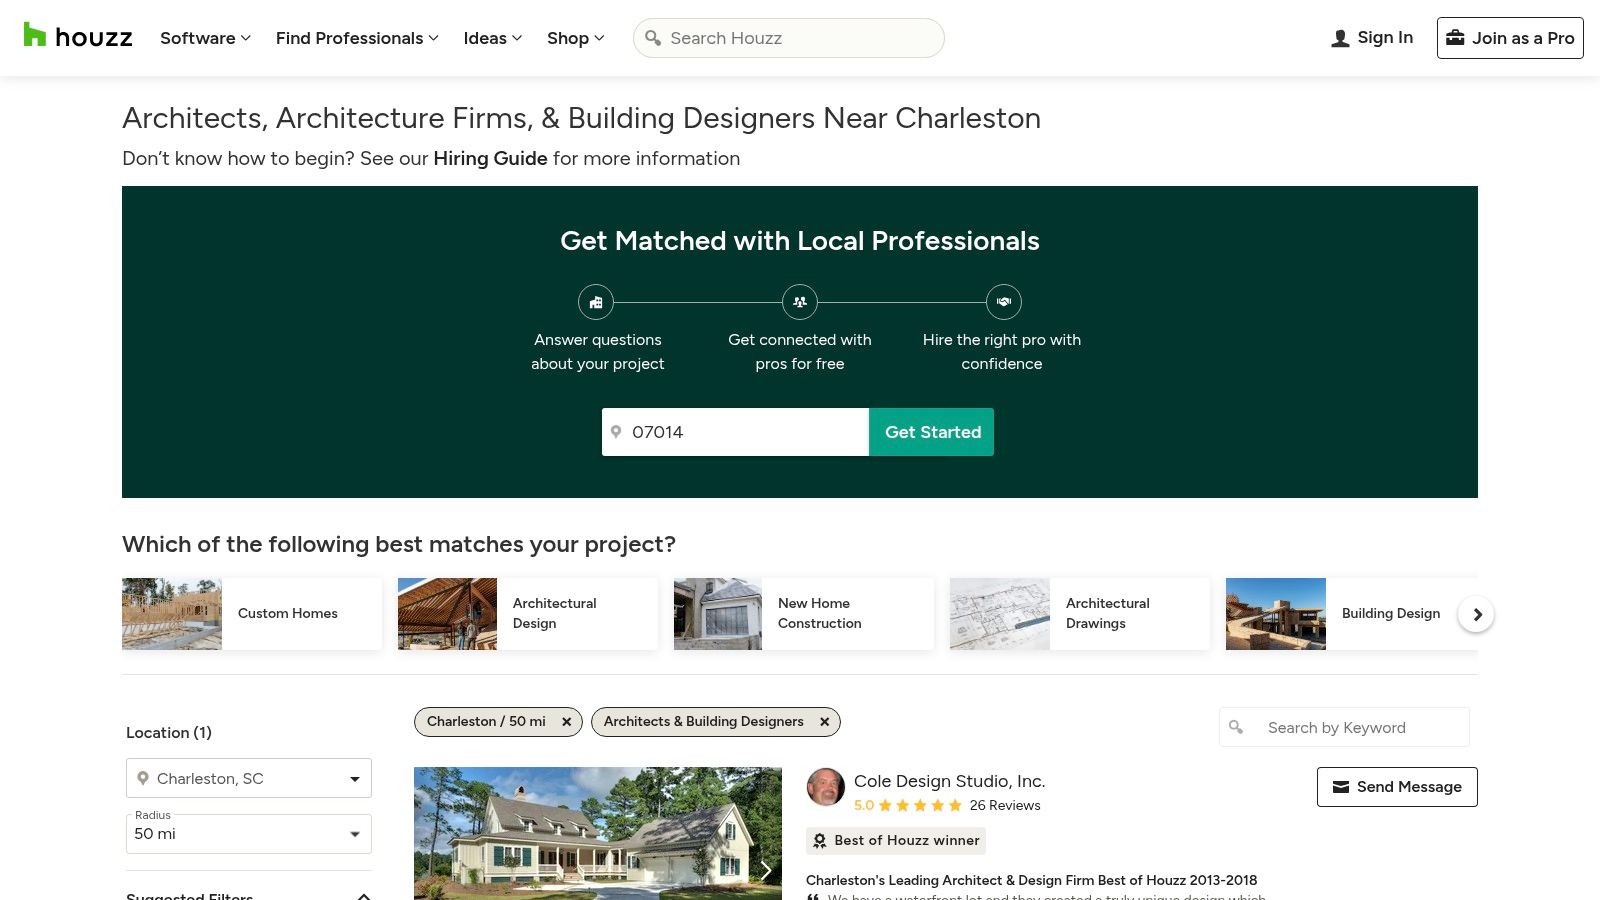
2. Houzz – Charleston, SC Architects & Residential Architecture Firms

Houzz is a visual-centric marketplace connecting homeowners and commercial clients with hundreds of Charleston-area architecture firms. Its focus on portfolio-driven browsing, verified client reviews, and built-in messaging tools makes it a top choice for comparing residential and mixed-use designers. Whether you need modern infill, historic renovation, or upscale custom homes, Houzz simplifies outreach and inspiration gathering for architecture firms Charleston SC.

Houzz – Charleston, SC Architects & Residential Architecture Firms

H3 Key Features

  • Extensive Project Galleries
    High-resolution photos showcase residential, adaptive reuse, and commercial portfolios.
  • Star Ratings & Reviews
    Verified client feedback and badges for response rate, project cost brackets, and tenure.
  • Direct Quote Requests
    “Request a Quote” button lets you message multiple firms with project details instantly.
  • Advanced Filtering
    Narrow by service offered (architecture, interior design), project size, style, and proximity in Charleston SC.

H3 How to Search and Filter

  1. Enter “Charleston, SC” in location field and select “Architect.”
  2. Apply filters: project type (new build, remodel), average build cost, minimum review rating.
  3. Sort listings by Most Reviewed or Highest Rated to vet top firms.
  4. Click “Contact” on each profile to send project specs and timeline in one message thread.

H3 Feature Overview

Feature Details
Portfolio Size Over 250 Charleston SC firm profiles
User Reviews 4.5-star average, with project cost and timeline tags
Messaging Tools Free built-in request form, direct email forwarding
Mobile App iOS and Android apps for browsing and chat on the go

H3 Pros and Cons

Pros

  • Exceptional visual inspiration for new construction and historic preservation
  • Social proof via verified reviews and firm badges
  • Streamlined quoting to multiple firms at once

Cons

  • Emphasis on residential may underrepresent large-scale commercial firms
  • Interface includes sponsored listings and ads
  • Some firm profiles lack full project details

H3 Practical Tips for Developers

  • Compile a list of 8–10 firms and compare sample budgets listed in reviews.
  • Use the “Past Projects” filter to isolate adaptive reuse and preservation specialists.
  • Save favorite profiles to your Houzz project folder for side-by-side portfolio comparison.

H3 Access & Pricing

  • Availability: Publicly accessible with free browsing
  • Registration: Required to send quote requests and save projects
  • Costs: No subscription fees; architecture firms set their own rates upon contact

H3 Why It Stands Out

  • Combines rich visual galleries with real client feedback for confident selection
  • Instant multi-firm quoting accelerates RFP timelines
  • Localized filter options ensure you find top architecture firms Charleston SC with exact expertise

Visit Houzz here: https://www.houzz.com/professionals/architect/charleston-sc-us-probr0-bo~t_11784~r_4574324

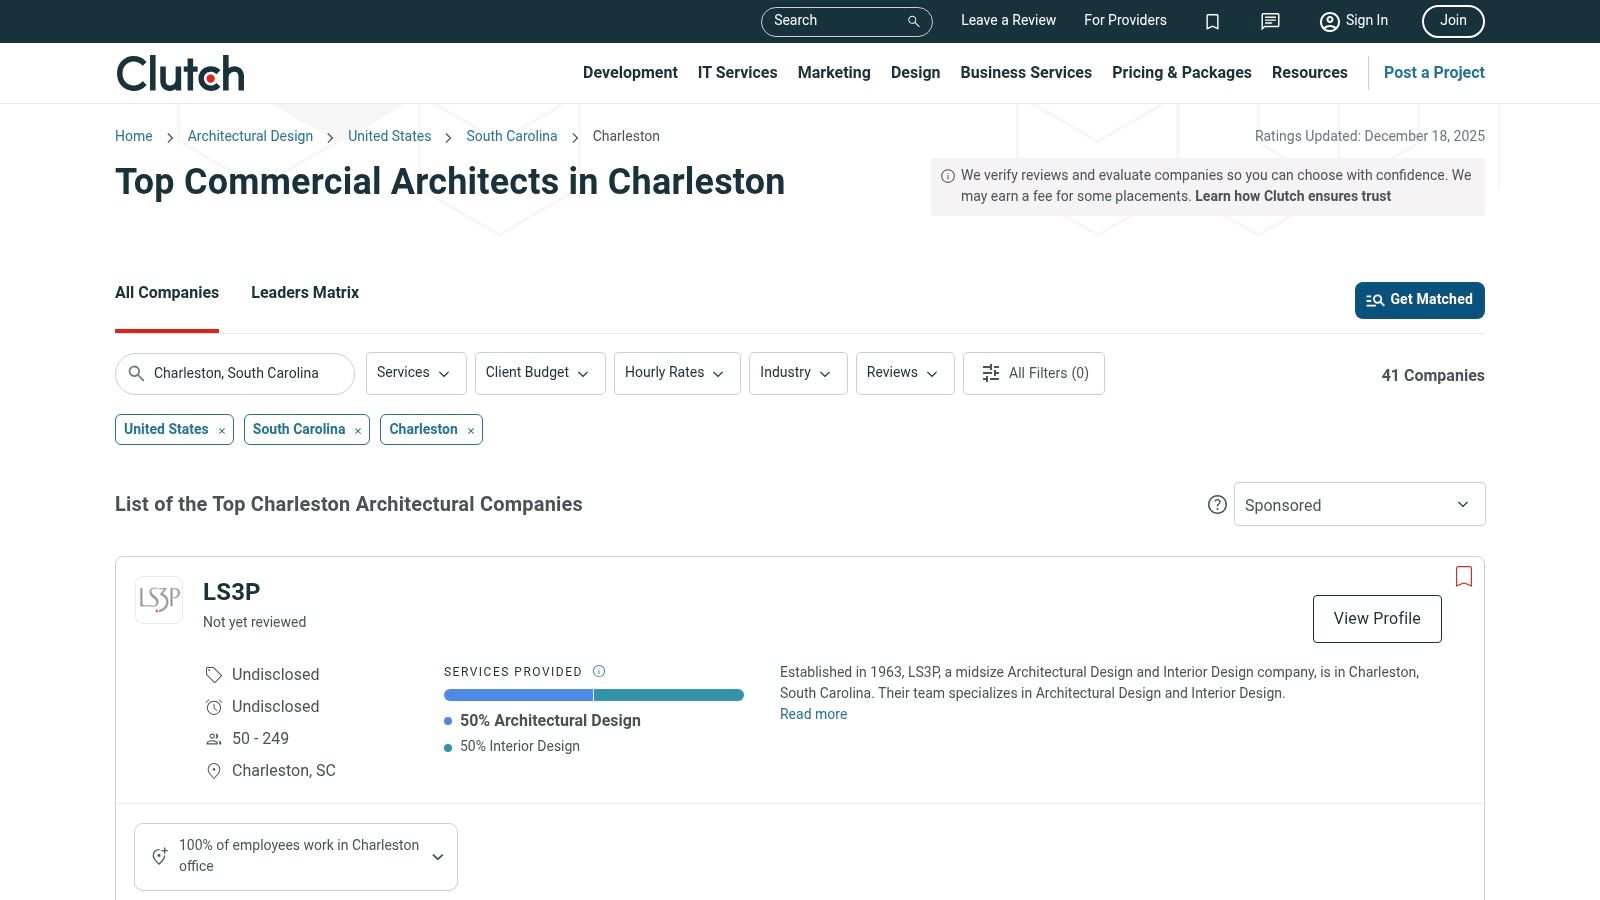
3. Clutch – Top Charleston Architectural Companies (B2B)

Clutch is a leading B2B resource that ranks top architecture firms in Charleston SC based on verified client feedback, project portfolios, and market presence. Commercial real estate developers, property owners, and general contractors can filter by firm size, specialties, and industry focus. The interface highlights key metrics such as average hourly rates and client satisfaction scores for informed shortlist building.

Clutch – Top Charleston Architectural Companies (B2B)

H3 Key Features

  • Ranked firm profiles with verified client reviews and star ratings
  • Service breakdowns by commercial, civic, mixed-use, hospitality, retail
  • Business-focused filters for industry sector, project budget, and team size
  • Portfolio snapshots showcasing representative photos, budgets, and timelines
  • Direct outreach buttons for quick contact, quote requests, and RFP submission

H3 How to Search and Filter

  1. Select “Design” > “Architectural” > “Charleston” at the top navigation.
  2. Apply filters for industry (hospitality, healthcare, retail) and project size.
  3. Sort by “Most Reviewed,” “Highest Rated,” or “Alphabetical” to refine results.
  4. Click on a firm card to view client case studies, service focus, and contact links.

H3 Feature Overview

Feature Details
Company Count Over 50 Charleston-area architecture firms
Specialties Covered Commercial, adaptive reuse, historic preservation, mixed-use
Sorting Options Ratings, reviews count, alphabetic, newest profiles
Average Client Rating 4.8 out of 5 stars
Pricing Transparency Hourly rate ranges and project fees disclosed by firms

H3 Pros and Cons

Pros

  • Fast comparison of credentials for commercial/civic clients
  • Extensive client references and project summaries
  • Business-oriented design filters and sorting

Cons

  • Limited coverage of pure custom-residential studios
  • Some firms have sparse public reviews or incomplete profiles

H3 Practical Tips for Developers

  • Narrow search to firms with adaptive reuse experience by applying that filter first.
  • Bookmark top five firms and download their PDF profiles for side-by-side review.
  • Use the “Get a Quote” button to submit a concise scope document and budget range.

H3 Access & Pricing

  • Availability: Publicly accessible directory at no cost
  • Registration: Optional account for saving favorites and writing reviews
  • Contacting Firms: Instant “Contact” buttons link to email or Clutch messaging

H3 Why It Stands Out

  • Deep B2B focus gives commercial and mixed-use developers the credentials they need
  • Verified feedback adds marketplace credibility and reduces vetting time
  • Unified platform for ratings, portfolio details, and direct outreach speeds RFP cycles

Visit the directory here: https://clutch.co/agencies/design/architectural/charleston

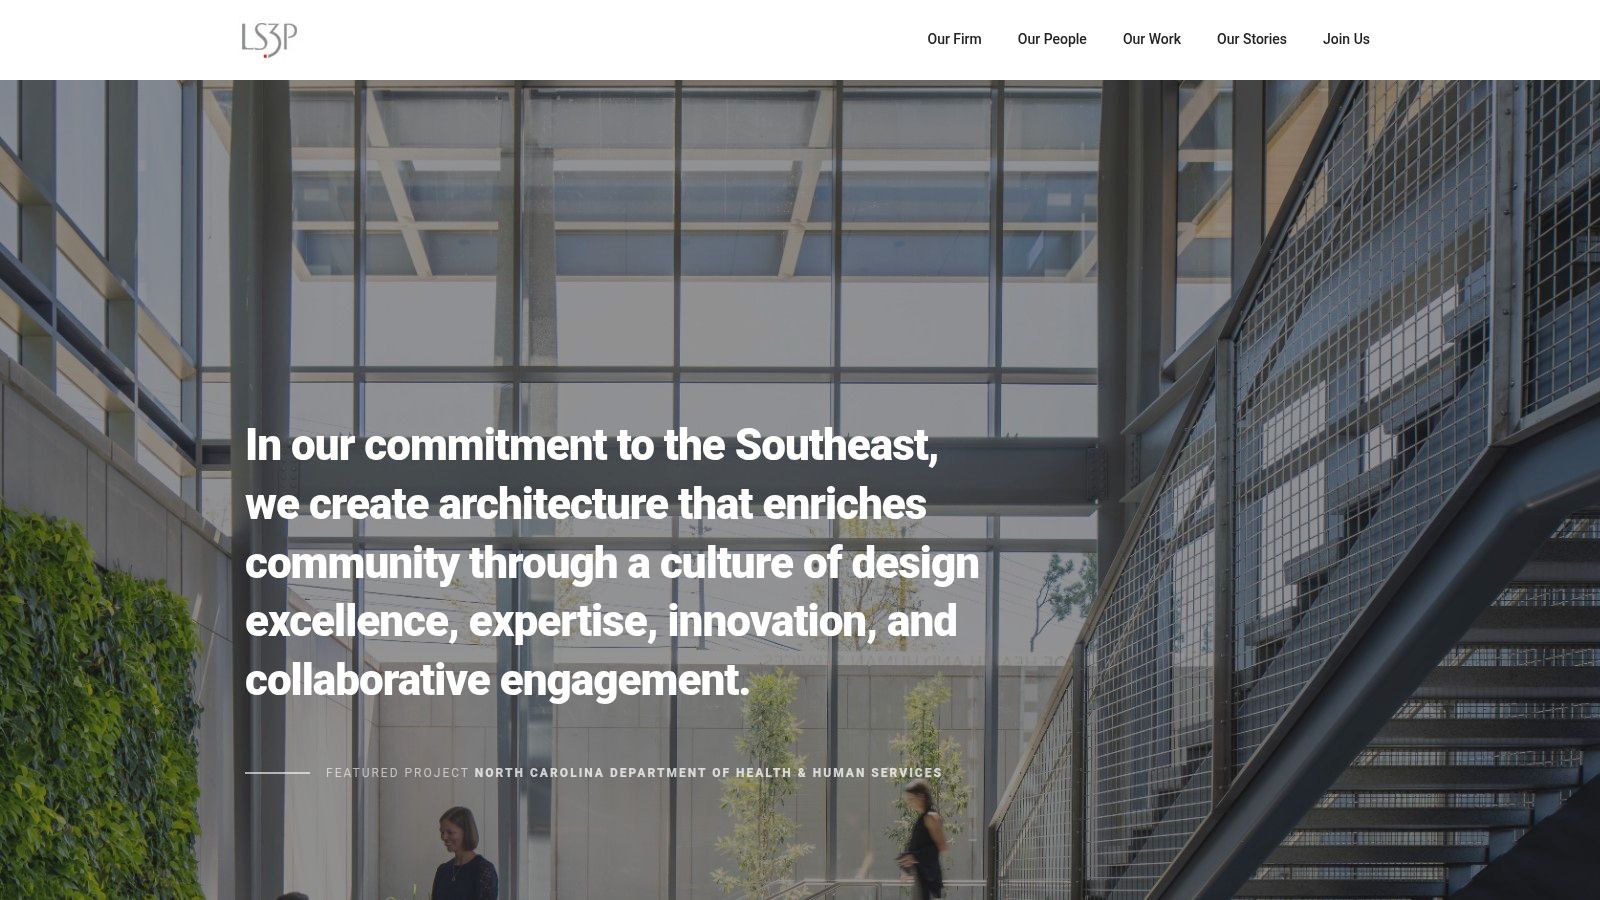
4. LS3P (Charleston Office)

LS3P’s Charleston office provides a regional hub for architecture, interiors, and planning solutions adapted for medium-to-large complexity. Among architecture firms charleston sc, LS3P’s website stands out by showcasing a diverse portfolio spanning education, healthcare, civic, commercial, and mixed-use sectors.

LS3P (Charleston Office)

H3 Key Features

  • Broad sector coverage including education, healthcare, civic, commercial, and mixed-use
  • Integrated service lines for architecture, interior design, and urban planning
  • Named local leadership with direct Charleston office contact details
  • Extensive project portfolio with industry awards and case studies
  • Multi-office resources to support large program scopes

H3 How to Explore Services

  1. Navigate to the “Services” menu and select a sector such as healthcare or education.
  2. Use project filters on the portfolio page to narrow by size, budget, or typology.
  3. Click individual case studies for images, client metrics, and technical details.
  4. Access “Contact” then choose Charleston office for direct inquiries or RFP submission.

H3 Feature Overview

Feature Details
Sector Coverage Education, healthcare, civic, commercial, mixed-use
Service Lines Architecture, interiors, planning
Contact Access Direct Charleston office email and phone
Project Archive 150+ case studies with images and performance data
Awards & Recognition Regional AIA awards, design honors from national publications

H3 Pros and Cons

Pros

  • Deep bench for complex, multi-phase developments
  • Strong local leadership with large firm backing
  • Seamless integration of planning, architecture, and interiors

Cons

  • Designed for medium-to-large budgets and scopes
  • No published pricing; requires formal RFP or proposal
  • May appear overbuilt for small-scale renovations

H3 Practical Tips for Developers

  • Prepare a concise project brief highlighting performance targets and budget.
  • Request sector-specific case study PDFs to evaluate comparable metrics.
  • Leverage joint charrettes to align planning and design teams early.
  • Use the “Team” page to identify key contacts and streamline approvals.

H3 Access & Pricing

  • Availability: Fully public website with open browsing
  • Registration: Not required for portfolio review
  • Pricing: Fee proposals provided post-RFP, tailored to project scope
  • Turnaround: Initial response within 48 hours for RFP inquiries

H3 Why It Stands Out

  • Offers a one-stop solution across architecture, interiors, and planning
  • Deep regional expertise backed by a multi-office network
  • Award-winning project library provides proven performance insights
  • Direct Charleston office access ensures local code and context knowledge

Visit LS3P Charleston office website: https://www.ls3p.com/

5. Liollio Architecture (Charleston)

Liollio Architecture is an award-winning Charleston-based studio focusing on civic, cultural, healthcare, educational and preservation work. The website showcases high-resolution project galleries, case studies and local news updates that highlight their context-driven, community-oriented approach for architecture firms charleston sc.

Liollio Architecture (Charleston)

H3 Key Features

  • Context-Driven Design
    Detailed project narratives explain how local history and environment shape each design.
  • Preservation Expertise
    Dedicated sections for adaptive reuse and historic preservation projects.
  • Public-Sector Focus
    Clear filters for civic, cultural, educational and healthcare portfolios.
  • Award Showcase
    Highlights national and regional awards with press mentions and images.
  • Local AIA Involvement
    Links to AIA Charleston events and ongoing community initiatives.

H3 How to Explore and Engage

  1. Visit the Projects menu and filter by sector (Civic, Cultural, Healthcare).
  2. Click any thumbnail to view high-resolution images and downloadable case studies.
  3. Use the Preservation filter to compare restored vs new construction work.
  4. Navigate to Contact to request a consultation or submit an RFP via form.

H3 Feature Overview

Feature Details
Specialties Covered Civic, cultural, healthcare, educational, historic preservation
Project Gallery High-res images, project briefs, material palettes
Awards & Recognition Design awards from AIA, RIBA and local preservation societies
Location Charleston SC studio; local code and community expertise
Contact Options Email, phone, online RFP form; AIA network referrals

H3 Pros and Cons

Pros

  • Deep Lowcountry and public-sector experience with preservation sensibility
  • Right-sized studio ideal for community and mission-driven clients
  • Local presence and AIA recognitions boost credibility

Cons

  • Limited custom-residential portfolio compared with boutique residential firms
  • No public fee schedules; pricing provided by RFP or consultation
  • Focused primarily on non-residential sectors, limited commercial interiors

H3 Practical Tips for Developers

  • Create a shortlist of 3–5 projects from similar sectors before outreach.
  • Download PDF case studies to review scope, budget ranges and materials.
  • Schedule an on-site meeting to assess team familiarity with local codes.

H3 Access & Pricing

  • Availability: Publicly accessible portfolio and news at no cost
  • Registration: No login required; optional newsletter signup for updates
  • Proposals: Custom fee proposals via online RFP submission

H3 Why It Stands Out

  • Emphasis on community and context drives designs that resonate locally
  • Award-winning civic architecture confirms proven expertise in public-sector projects
  • Direct AIA Charleston connections simplify collaboration for developers

Visit Liollio Architecture here: https://www.liollio.com/

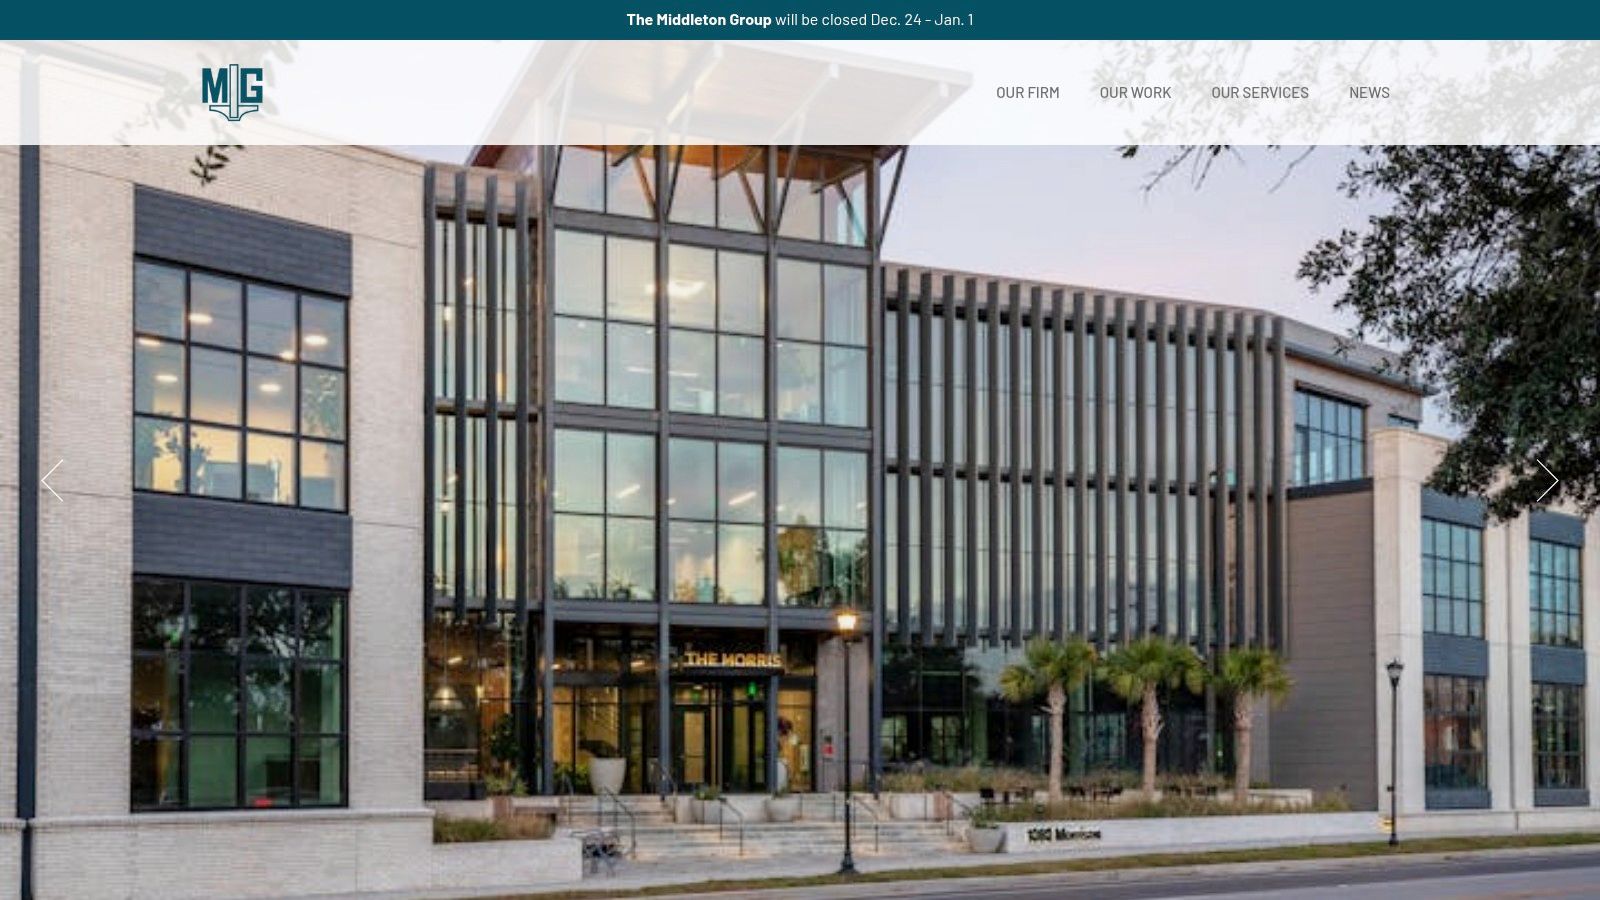
6. The Middleton Group (North Charleston)

The Middleton Group is a woman-owned architecture and interior design firm based in North Charleston’s Park Circle. With expertise in adaptive reuse, commercial, hospitality, medical, education, and residential projects, they blend context-sensitive solutions with modern aesthetics. Verified by AIA South Carolina and the North Charleston Chamber of Commerce, this platform showcases their complete portfolio and service offerings.

The Middleton Group (North Charleston)

H3 Key Features

  • Adaptive Reuse Expertise
    Transforming historic warehouses and mills into modern offices or residential lofts.
  • Full-Service Interiors
    In-house interior design team provides finish selection, FF&E, and space planning.
  • Woman-Owned Certification
    Certified SBE/WBE status for public and private sector projects in South Carolina.
  • Local Engagement
    Active in Park Circle community events and commercial revitalization efforts.
  • Verified Credentials
    Profiles on AIA SC and local chamber sites confirm licensing and project history.

H3 How to Explore Projects and Services

  1. Visit the “Projects” gallery to filter by sector: commercial, residential, hospitality.
  2. Click any thumbnail to view high-resolution images and scope summaries.
  3. Navigate to “Services” to compare architecture-only vs architecture + interior design packages.
  4. Use the contact form for initial consultations or to request a detailed RFP.

H3 Feature Overview

Feature Details
Service Range Architecture, interior design, master planning
Project Types Adaptive reuse, hospitality, medical, education, residential
Firm Size Small-to-midscale teams for personalized client attention
Certification Woman-owned business, AIA SC membership

H3 Pros and Cons

Pros

  • Contemporary, context-sensitive design reflecting Charleston heritage
  • Accessible team size ideal for midscale commercial or residential work
  • Strong local network ensures smooth permitting and contractor coordination

Cons

  • No published standard rates; proposals require consultation
  • Inconsistent web domains (.net vs .com) may confuse new clients
  • Limited advanced filtering on the website for quick service comparison

H3 Practical Tips for Developers

  • Ask for past project budgets to benchmark your RFP scope.
  • Schedule initial meetings in Park Circle to tour local case studies.
  • Leverage their interior design add-on for cohesive finish deliverables.

H3 Access & Pricing

  • Availability: Public website with full project galleries and service descriptions
  • Registration: No sign-up required; contact form initiates proposal process
  • Pricing: Custom quotes based on project type, size, and interior design scope

H3 Why It Stands Out

  • Woman-owned certification appeals to diversity goals in public contracts
  • In-house interior design ensures a one-stop solution for architecture and finishes
  • Deep Park Circle roots facilitate community buy-in and local permitting speed

Visit the website here: https://themiddletongroup.net

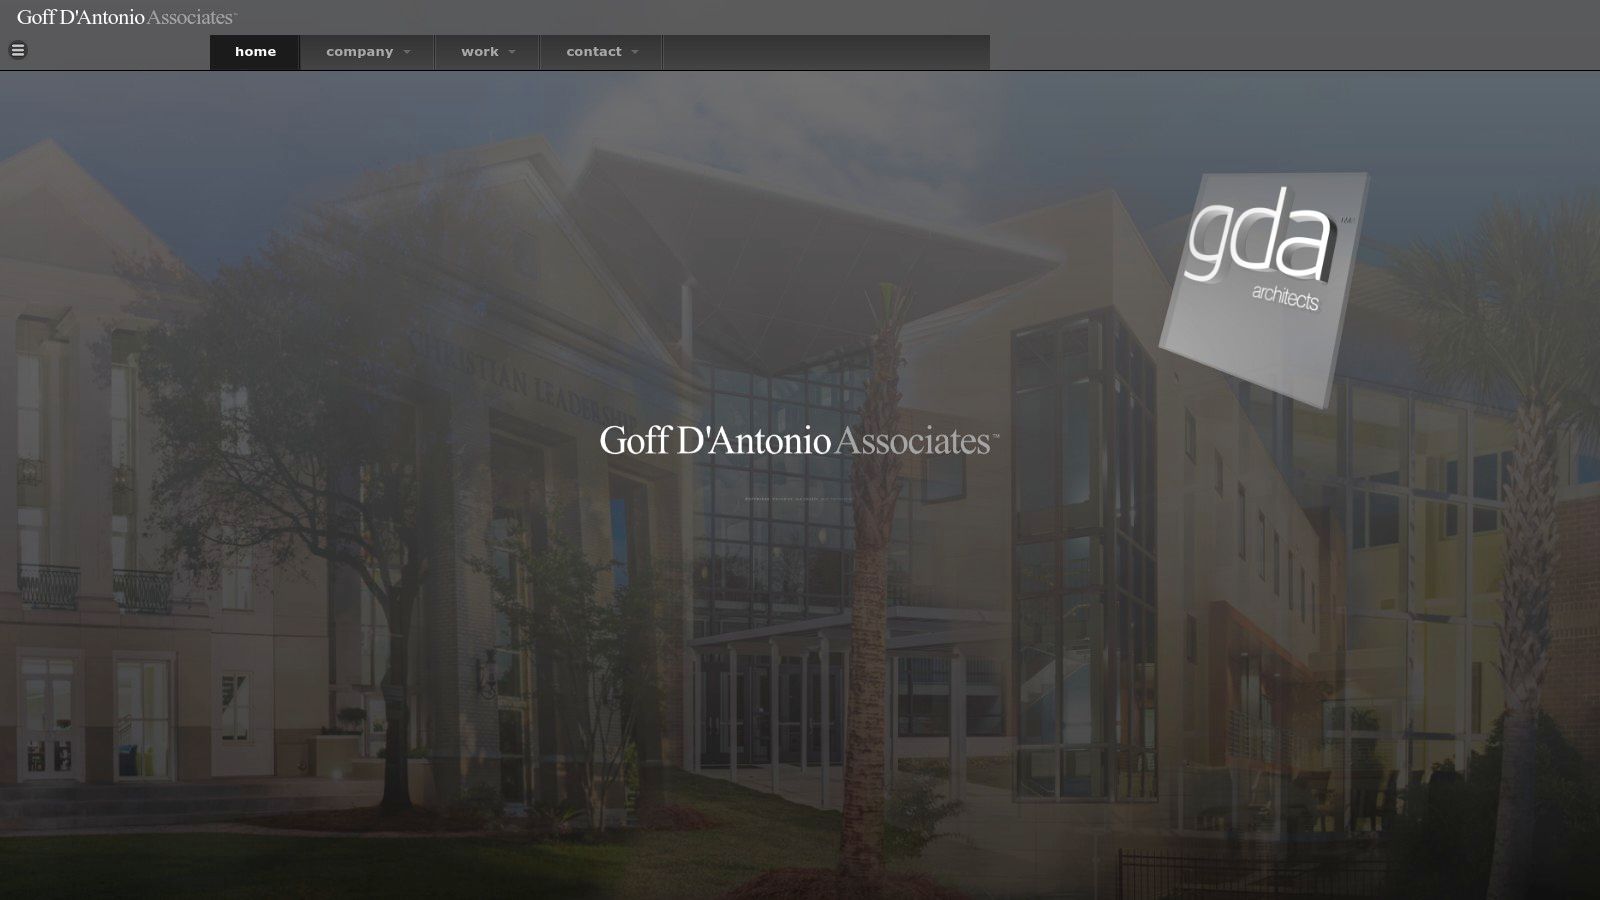
7. Goff D’Antonio Associates (Charleston)

Goff D’Antonio Associates is a longstanding Charleston architecture firm specializing in office, hospitality, civic and renovation projects. The website showcases detailed project pages with awards history and Board of Architectural Review approvals. Clients benefit from direct contact details and a clear demonstration of context-sensitive design rooted in Charleston’s regulatory environment.

Goff D’Antonio Associates (Charleston)

H3 Key Features

  • Local Project Portfolio
    Office, hospitality, public sector and historic renovation examples.
  • Award & BAR Approval Details
    Each project page lists design awards and municipal review outcomes.
  • Direct Contact Options
    Phone number and inquiry form prominently displayed for RFPs.
  • Context-Sensitive Expertise
    Proven track record navigating Charleston design guidelines and preservation codes.

H3 How to Search and Filter

  1. Open the main menu and click “Projects.”
  2. Select categories: Office, Hospitality, Civic or Renovations.
  3. Scan project thumbnails for award icons and BAR approval badges.
  4. Click any project to view scope, images and regulatory notes.
  5. Use the “Contact” button or listed phone to initiate a proposal request.

H3 Feature Overview

Feature Details
Project Count 40+ completed projects across four key sectors
Award Recognition Local design awards, AIA citations, BAR approvals
Contact Methods Direct phone line, email form, office address
Regulatory Experience In-depth knowledge of Charleston Historic Preservation standards

H3 Pros and Cons

Pros

  • Deep familiarity with Charleston’s historic context and review process
  • Award-winning portfolio builds trust among developers
  • Straightforward contact flow reduces lead time

Cons

  • Website is relatively minimal with fewer case studies than larger firms
  • No published pricing; proposals follow a scoping conversation
  • Limited interactive filtering compared to larger platforms

H3 Practical Tips for Developers

  • Prepare a concise project brief highlighting budget and timeline.
  • Reference similar award-winning projects during inquiry to align expectations.
  • Ask for an estimated BAR review timeline to coordinate your permitting schedule.

H3 Access & Pricing

  • Availability: Publicly accessible at no cost
  • Registration: Not required
  • Proposals: Custom quotes provided after initial scoping call

H3 Why It Stands Out

  • Focused on Charleston SC market with deep municipal expertise
  • Transparent display of awards and review outcomes on each project page
  • Direct link to key staff accelerates RFP and pre-design conversations

Visit the website here: https://www.goffdantonio.com/

7-Point Comparison: Charleston, SC Architecture Firms

Source Implementation Complexity 🔄 Resource Requirements ⚡ Expected Outcomes ⭐📊 Ideal Use Cases 💡 Key Advantages ⭐
AIA Charleston – Member Firm Directory Low 🔄 — browse vetted listings and contact firms Low ⚡ — minimal time to search; follow-up required for proposals High credibility; licensed local matches ⭐📊 Finding licensed, locally active practitioners AIA‑curated, vetted listings with direct firm links ⭐
Houzz – Charleston, SC Architects & Residential Architecture Firms Medium 🔄 — browse galleries, filter, message multiple firms Moderate ⚡ — time for portfolio review and messaging Strong visual inspiration; variable firm fit ⭐📊 Homeowner/residential design selection and quote requests Large photo galleries, client reviews, built‑in quote tools ⭐
Clutch – Top Charleston Architectural Companies (B2B) Medium 🔄 — review ranked profiles and references Moderate ⚡ — good for credential vetting and shortlist building High for commercial credentialing and vendor selection ⭐📊 Commercial, civic, and mixed‑use procurements Rankings, client references, business‑oriented filters ⭐
LS3P (Charleston Office) High 🔄 — formal RFPs and multi‑discipline coordination High ⚡ — suited to large budgets and complex program management High-quality delivery for large, complex projects; award history ⭐📊 Medium‑to‑large commercial, healthcare, education, civic projects Scale, multi‑office resources, architecture + interiors + planning ⭐
Liollio Architecture (Charleston) Medium 🔄 — stakeholder coordination for context‑driven work Moderate ⚡ — specialist skills in preservation and public projects Strong context‑sensitive public and preservation outcomes ⭐📊 Preservation, civic, cultural, healthcare, educational projects Deep local preservation expertise; award‑winning studio ⭐
The Middleton Group (North Charleston) Medium 🔄 — consultative process for small‑to‑mid projects Moderate ⚡ — accessible team with interior design capability Good contemporary, context‑sensitive local design outcomes ⭐📊 Adaptive reuse, hospitality, small‑mid commercial, residential Woman‑owned, locally engaged, interior + architecture services ⭐
Goff D’Antonio Associates (Charleston) Low–Medium 🔄 — direct contact and scoped proposals Moderate ⚡ — experienced with municipal review processes Reliable results for historic/contextual renovations and hospitality ⭐📊 Historic renovations, hospitality, public‑sector projects needing BAR approvals Deep familiarity with Charleston review processes; award track record ⭐

Bringing It All Together: Choosing Your Ideal Charleston Architect

As you conclude this roundup of leading architecture firms charleston sc, you have an arsenal of research tools, firm profiles, and hiring tips at your fingertips. This final section crystallizes the most important takeaways, offers clear next steps, and lays out practical factors to weigh when making your selection.

Key Takeaways from Our Firm Profiles

  • AIA Charleston Directory gives you access to certified professionals and member benefits.
  • Houzz reviews showcase homeowner feedback and visual portfolios for residential and smaller commercial projects.
  • Clutch highlights B2B ratings, making it easier to gauge firm performance on larger developments.
  • LS3P, Liollio, The Middleton Group, and Goff D’Antonio each bring local expertise in commercial design and adaptive reuse.
  • Consistent in every profile: strong portfolios, transparent pricing models, and client-centric communication.

Factors to Consider When Evaluating Firms

  1. Project Scope and Specialty
    • Commercial builds vs adaptive reuse projects require different technical skill sets
    • Historic preservation demands local codes knowledge and sensitive restoration practices
  2. Budget and Fee Structure
    • Hourly vs fixed-fee pricing models can affect total project cost
    • Ask for detailed fee breakdowns before signing an agreement
  3. Timeline and Capacity
    • Confirm a firm’s current workload to avoid scheduling delays
    • Look for clear milestone-based schedules in the proposal
  4. Local Knowledge and Network
    • Past Charleston projects indicate familiarity with zoning, historic boards, and subcontractor rates
    • Strong relationships with local craftsmen can streamline approvals and build quality

Actionable Next Steps

  • Narrow your list to two or three firms based on specialty and available budget
  • Request a detailed scope of work and project timeline from each shortlisted firm
  • Review past project case studies for similarities to your scope
  • Conduct in-person or virtual interviews to assess communication styles and team fit

Practical Implementation Tips

  • Use AIA Charleston’s member directory to verify licensure and confirmed project scales
  • Leverage Houzz’s project galleries for real-world before-and-after photos
  • Check Clutch’s client interviews and star ratings for large-scale commercial assignments
  • Ask LS3P or The Middleton Group about their adaptive reuse workflow, from feasibility studies to construction documents
  • Inquire with Liollio or Goff D’Antonio on how they address historic preservation challenges, including material sourcing and regulatory compliance

Blockquote for key insight
“Align your firm choice with project complexity, local codes experience, and proven process documentation.”

Solidify Your Decision with Confidence

By combining directory listings, review platforms, and in-depth firm profiles, you can make an informed decision that aligns with your vision, timeline, and budget. Whether you are a developer planning a new office tower, a landlord upfitting a heritage warehouse, or an investor expanding your portfolio, these steps will streamline your architect selection process.

An Inspiring Final Thought

The right architecture partner does more than draft plans—they shape how your project interacts with Charleston’s rich cultural tapestry. Choose a firm that not only meets your technical requirements but also shares your passion for creating spaces that resonate with people and place.


Ready to bring your Charleston project from concept to completion with an expert on your side? Contact Sherer Architects, LLC today and benefit from over 30 years of regional design leadership. Visit Sherer Architects, LLC to get started.

Categories
Uncategorized

Design for Lean: Learn how design for lean boosts value

Design for Lean isn't just another buzzword for cutting costs. It’s a completely different way of thinking about a project, one that’s laser-focused on maximizing value by systematically hunting down and eliminating waste. It all starts by defining what the client truly values and then engineering the entire workflow—from the first sketch to the final punch list—to deliver exactly that.

The Foundation of Lean Design in Modern Architecture

An engineer wearing a hard hat and a female colleague review design blueprints outdoors.

When developers and property owners hear the word "lean," they often picture a car factory or a fast-moving tech startup. But its core ideas are incredibly powerful when applied to architecture and construction. At its heart, a design for lean approach is a promise: deliver precisely what the client needs with the absolute minimum of wasted resources.

This isn't about using cheaper materials or cutting corners. It's about designing a smarter process that sidesteps the usual pitfalls of budget overruns, infuriating schedule delays, and costly rework.

The entire dynamic of a project shifts when you move from asking "what can we build?" to "what creates the most value for the end-user?" This mindset forces you to systematically target and eliminate the "eight wastes" that plague nearly every construction site, from crews waiting on materials to correcting defects and unnecessary movement of people and equipment.

Core Concepts You Need to Know

To really make lean design work, you have to get comfortable with a few key concepts that will pop up again and again. These aren't just jargon; they represent a fundamental change in how project teams need to think, act, and collaborate.

  • Integrated Project Delivery (IPD): This is a game-changer. IPD is a collaborative framework that contractually binds the owner, architect, and contractor, forcing them to share both the risks and the rewards. It replaces the traditional, often adversarial, relationships with genuine teamwork because everyone's goals are finally aligned.
  • Design for Manufacture and Assembly (DfMA): Think of this as building with precision-engineered components rather than just raw materials. DfMA means designing elements like modular bathroom pods or prefabricated facade panels that can be built efficiently off-site in a controlled environment and then quickly assembled on-site. The boost to quality control and construction speed is immense.

If there's one thing for developers to take away, it's this: embracing lean means doing the heavy thinking upfront. More time invested in collaborative planning and design directly translates to less time, money, and frustration wasted during construction.

The table below breaks down how these foundational lean ideas from manufacturing translate directly into the world of architecture and construction.

Core Lean Principles and Their Architectural Application

Lean Principle Definition in Manufacturing Application in Architecture & Construction
Value Defined solely from the customer's perspective. Understanding the owner's and end-user's core needs (e.g., specific tenant requirements, energy efficiency goals, long-term operational costs).
Value Stream All the steps required to bring a product from concept to customer. Mapping the entire project lifecycle—from initial feasibility studies and design phases to permitting, construction, and handover—to identify and eliminate non-value-adding activities.
Flow Creating a smooth, uninterrupted production process. Ensuring a continuous workflow on-site by removing bottlenecks. This includes just-in-time material delivery, coordinated trade sequencing, and pull planning.
Pull Producing only what is needed, when it is needed by the next step. Using pull planning sessions where downstream trades (like electricians) "pull" work from upstream trades (like framers) only when they are ready, preventing overproduction and waiting.
Perfection The relentless pursuit of continuous improvement. Implementing feedback loops, post-project reviews, and performance metrics to learn from every project and refine processes for the next one.

This isn’t just theory; it’s a practical roadmap to a more efficient and predictable project.

This fusion of lean principles with modern technology is also pushing the industry forward. We're now seeing the rise of Lean 4.0, where digital tools amplify these strategies. By 2025, an estimated 70% of manufacturers will be using Internet of Things (IoT) devices for real-time monitoring. This trend is already shaping how building components are designed and fabricated for minimal waste. You can discover more about these trends and their growing impact on our industry.

Ultimately, a lean approach is about creating a predictable, continuous workflow. It replaces the chaos of constant firefighting with a structured, proactive system that gets ahead of problems before they start. For any developer aiming for profitable and predictable outcomes, it’s no longer just an option—it’s a critical strategy.

Defining Value and Mapping the Workflow

Every truly successful lean project starts by flipping the script. Instead of architects and builders immediately jumping into what they can design, the entire team has to first rally around a much more important question: What does the client truly value?

This isn't about the basic project scope. It’s about digging deep into the business drivers, the day-to-day operational headaches, and the long-term vision that the owner and end-users have for the space.

The only way to do this right is to get everyone in the same room from the get-go. I'm talking about early-stage workshops that include the owner, key stakeholders, architects, engineers, and if you can swing it, even the people who will eventually work in the building. The whole point is to turn vague ideas into solid design criteria.

Think about a common goal like creating "a more collaborative workspace." That sounds nice, but it's not something you can draw on a blueprint. The workshop is where you break that down into something real.

  • Does "collaborative" mean more casual, unbookable huddle rooms?
  • Does it mean designing specific sightlines between departments that need to interact?
  • Are we talking about an acoustic strategy that lets people have lively conversations without disrupting those who need to focus?

Answering these kinds of granular questions creates concrete, measurable objectives. This initial alignment is the absolute foundation of a design for lean approach. It’s how you prevent the expensive, soul-crushing rework that happens when different teams are working off their own assumptions.

The most expensive mistake on any project is perfectly executing a design that fails to deliver what the client actually needed. Defining value isn't a "soft" step; it's the single most important risk mitigation activity you can perform.

From Value to Workflow: The Power of Mapping

Once you’ve got a crystal-clear definition of value, the next move is to map out how you’ll deliver it. We do this with Value Stream Mapping (VSM), a ridiculously powerful tool that creates a visual of the entire project lifecycle, from that first napkin sketch to the final handover.

A VSM is so much more than a simple flowchart. Its real job is to make waste visible. By mapping every single process—including design reviews, permit approvals, information handoffs, and all the time spent just waiting—the team can finally see the non-value-adding activities that cause delays and bloat the budget.

You kick things off by mapping the "current state." Honestly, this is often a rude awakening. You might find that a critical structural review consistently sits in someone's inbox for a week, or that RFIs (Requests for Information) take days to bounce between all the necessary people. These are the classic examples of waste hiding in plain sight.

The magic happens when the team gets together to design the "future state" map. This is where you get to slash and burn, eliminating or simplifying the wasteful steps you just uncovered. Maybe you decide to co-locate key decision-makers during schematic design to kill approval delays. To really tighten up these workflows, you could even explore advanced workflow automation solutions to handle the repetitive, administrative tasks.

This mapping exercise forces a brutally honest conversation about how work actually gets done, not just how the project schedule says it's supposed to. By tackling these bottlenecks before a single shovel hits the ground, you're building a project on a foundation of smooth, predictable flow instead of constant firefighting.

Weaving Collaboration into the Project DNA

Lean projects don’t just happen; they’re built on a bedrock of genuine collaboration. The old way of doing things—architects tossing drawings over the wall to engineers, who then pass them to contractors—is fundamentally broken. That siloed approach is a recipe for rework, delays, and wasted money.

To truly design for Lean, we need a complete operational shift. It’s about moving away from an adversarial mindset and embracing a genuine partnership from day one.

This cultural change often starts with a contractual one, like Integrated Project Delivery (IPD). IPD is more than just a handshake agreement to get along. It's a formal, multi-party contract that legally binds the owner, architect, and contractor into a single, unified team.

Suddenly, everyone shares in the risk and the reward. If the project comes in under budget and ahead of schedule, everybody wins. If problems arise, everyone shares the pain. This structure completely changes the dynamic, erasing the "us vs. them" mentality and forcing every decision to serve the project's best interests, not just one company's bottom line.

Putting Pull Planning into Practice

One of the most powerful tools for making this collaboration real is the Pull Planning session. It’s a world away from traditional, top-down scheduling where a project manager builds a Gantt chart in a vacuum. Instead, Pull Planning starts with the final goal and works backward.

A workflow diagram outlining three steps: 1. Define Value (handshake), 2. Map Stream (organizational chart), 3. Find Waste (trash can).

This process is about getting hands-on. In a Pull Planning workshop, the people who actually do the work—the electricians, plumbers, drywallers, and painters—are the ones who create the schedule. They get in a room and physically map out their tasks on a wall with sticky notes, starting from key milestones and pulling work forward.

It’s a simple but profound shift. Instead of being told when to show up, trade partners are asked, "What do you need from the team before you can start?" This simple question fosters ownership and creates a schedule built on reliable commitments, not hopeful guesses.

Imagine a commercial tenant fit-out. Here’s how it unfolds:

  • Set the Finish Line: The team agrees on the major milestones. Let’s say the most important one is "Ready for Furniture Installation."
  • Work Backward from the Goal: The flooring installer puts up a sticky note for their work. Then, they state what they need before they can begin—like "final coat of paint is dry." This "pulls" the painter's work into the timeline.
  • Uncover the Chain Reaction: The painter, in turn, needs the drywall to be finished and sanded. That pulls in the drywall contractor, who needs the MEP (mechanical, electrical, plumbing) rough-ins to be complete.

This highly visual, interactive process immediately highlights dependencies and potential logjams that a standard schedule would completely miss. It’s no longer just a timeline; it's a network of promises made between the people on the ground.

Designing for Manufacture and Modularity

Two men discuss plans and inspect modular construction units in a large factory.

This is where the rubber meets the road. All the high-level strategy sessions and workflow mapping lead to this point: making design decisions that directly shape how the building is physically constructed. We do this through a game-changing approach called Design for Manufacture and Assembly (DfMA).

Instead of designing a building to be stick-built piece-by-piece on a potentially chaotic job site, DfMA shifts the mindset entirely. You start thinking about the building as a kit of parts. You design components—from entire bathroom pods to intricate facade panels—that can be built with precision in a controlled factory setting. These pieces then arrive on-site ready for a clean, fast, and accurate installation.

This method is a direct attack on some of the biggest culprits of waste in construction. Think about it: on-site work is messy. It's at the mercy of weather delays, material damage, and the classic coordination failures between trades. Off-site manufacturing, on the other hand, gives you incredible quality control, slashes material waste, and creates a much safer work environment. The payoff is a faster, more predictable timeline.

Bridging the Gap Between Design and Fabrication

Here’s the biggest mistake I see teams make: designing in a silo. What looks brilliant in a BIM model might be a nightmare to actually build. This is why a non-negotiable principle of design for lean is getting manufacturers and fabricators in the room from day one.

Their input is pure gold. They’ll give you instant, real-world feedback on everything from material choices and connection details to transportation logistics. Their early involvement ensures the design is actually optimized for efficient production, not just aesthetically pleasing.

A design isn't truly "lean" until it has been vetted by the people who will actually build it. Early collaboration with manufacturers isn't a nice-to-have; it's a critical step that prevents costly redesigns and fabrication headaches down the line.

DfMA in Action Real-World Examples

So, what does this look like on an actual project? The applications are incredibly versatile, and you can scale the approach to fit the needs of almost any commercial or adaptive reuse project.

  • Modular MEP Racks: For a multi-story office building, designing mechanical, electrical, and plumbing systems on prefabricated racks is a massive win. These racks get assembled and pressure-tested in a factory, then hoisted into place on-site. This all but eliminates the slow, error-prone overhead work that bogs down so many jobs.
  • Standardized Apartment Layouts: In a new residential tower or hotel, standardizing the layouts allows for the prefabrication of entire units, especially the complex parts like bathrooms and kitchens. You get consistent quality across hundreds of units, and the on-site crews can focus on core construction and final hookups.
  • Prefabricated Facade Systems: Designing the building’s exterior as a system of panels is another great example. These are manufactured off-site and craned into place, making the building watertight in a fraction of the time. That means interior work can start much, much sooner.

This isn't a niche concept anymore; it's rapidly becoming a cornerstone of modern construction. Industry data shows that in major global markets, 90% of contract manufacturers now offer Design for Manufacturing (DFM) services to help teams get it right from the start. You can explore more manufacturing statistics to see just how deep this industry shift runs.

By fully embracing DfMA, you're directly minimizing waste from transportation, waiting, and defects. The end result is a faster, more valuable, and less risky project.

Strategies for Eliminating Waste on Your Project

A construction worker in a hard hat and vest uses a tablet at a site with an 'Eliminate Waste' sign.

When we talk about "waste" in construction, most people picture a overflowing dumpster. That’s part of it, but it’s just the tip of the iceberg. The real project-killers are the invisible wastes: wasted time, wasted movement, and the colossal waste of not using your team's full brainpower.

Adopting a design for lean approach means training your eyes to spot these inefficiencies—all "eight wastes"—and then systematically designing them out of your workflow. This isn't just theory; it's a practical way to sharpen project performance and protect your budget.

Tackling the Eight Wastes on Your Job Site

Let's get practical. Here’s what these wastes actually look like in the wild and how you can start fighting back.

  • Defects: This is the easy one to spot. It’s any work that has to be torn out and redone. Picture a crew ripping out freshly installed ductwork because it clashes with plumbing lines that were never coordinated in the design phase. A costly, frustrating, and entirely preventable mess.

    • The Fix: Use digital clash detection in your BIM models before a single component is fabricated. For tricky assemblies, build physical mock-ups. It’s far cheaper to solve a problem with plywood and 2x4s than with finished materials on-site.
  • Overproduction: This is the waste of doing work before it’s actually needed. A classic example is the design team issuing a 500-page drawing set when the site crew only needs the foundation plan for the next 90 days.

    • The Fix: Ditch the massive document dumps. Instead, align design releases with the construction schedule and issue drawing packages in smaller, targeted batches. This ensures everyone is working from the latest information and prevents crews from accidentally building off outdated plans.
  • Waiting: Idle time is a project killer. It's a framing crew standing around because their lumber delivery is late, or a project manager losing two days waiting for an answer to a critical RFI.

    • The Fix: This is where pull planning is a game-changer, as it forces trade partners to coordinate handoffs. Pair that with just-in-time material deliveries to keep the site clear and crews productive. The core idea is eliminating bottlenecks, a principle also seen in tools like real estate marketing automation software that focus on streamlining workflows.

Uncovering the Less Obvious Wastes

The next few wastes are more subtle but can be just as damaging to your schedule and budget.

  • Non-Utilized Talent: This is the massive opportunity cost of ignoring the expertise of the people actually doing the work. It’s the architect who specifies a connection detail that’s impossible to build, or the PM who dictates a schedule without talking to the foremen who know how long things really take.
    • The Fix: Get your key subcontractors and fabricators in the room during design. Ask them simple questions: "How would you build this? How can we make it safer and faster for your crew?" Their insights are pure gold.

The greatest untapped resource on any project is the collective intelligence of the entire team. Failing to ask for input from trade experts isn't just a missed opportunity; it's a guaranteed way to bake inefficiency into your plan.

  • Transportation: This is the unnecessary movement of materials. Think about a shipment of steel studs dropped in a central yard, only to be moved again to the third floor, and then moved a third time to the actual installation point. Every move adds cost and risk, but zero value.

    • The Fix: Plan your site logistics with military precision. Coordinate deliveries to land materials as close as possible to their final destination, minimizing double-handling.
  • Inventory: Excess material sitting on-site is a liability. It gets damaged, stolen, or simply gets in the way. Pallets of drywall stacked in a hallway for weeks are a prime example of inventory waste.

    • The Fix: Shift from large bulk orders to smaller, more frequent material drops that align with the construction pace. This requires tight coordination but keeps the site clean and capital free.
  • Motion: This is the wasted energy of people moving unnecessarily. An electrician walking 200 feet back and forth to a gang box for parts is burning time and their own energy, which adds up fast over a full day with a full crew.

    • The Fix: Set up the job site for efficiency. Use mobile tool carts, pre-stocked material kits, and strategically placed supply caches to keep everything workers need within arm's reach.
  • Extra-Processing: This is work that adds no value for the client. The classic example is specifying a Level 5 paint finish for the walls inside a mechanical closet no one will ever see. It’s gold-plating that the owner didn't ask for and won't benefit from.

    • The Fix: Stay laser-focused on the definition of value established with the client. Before adding a step or a feature, ask the team, "Does the owner care about this?" If the answer is no, it's a prime candidate for elimination.

The shift from a traditional mindset to a Lean one requires looking at the entire project through a different lens. Below is a quick comparison of how these two approaches handle common sources of waste.

Waste Reduction Traditional vs Lean Approach

Type of Waste Common Example in Traditional Projects Lean Design Mitigation Strategy
Defects Reworking clashing MEP systems found during installation. Using BIM for digital clash detection before fabrication.
Overproduction Releasing 100% of drawings at once, causing confusion. Releasing design packages aligned with the pull plan sequence.
Waiting Crews idle while waiting for material deliveries or RFI answers. Just-in-time deliveries and co-locating the project team.
Non-Utilized Talent Designers create details without input from the installers. Involving trade partners in early design charrettes.
Transportation Materials moved multiple times from laydown yard to install point. Planning deliveries to the point-of-use to avoid handling.
Inventory Bulk ordering materials that get damaged or lost on site. Ordering smaller material quantities based on immediate need.
Motion Workers walking long distances to retrieve tools or parts. Creating mobile tool kits and strategically placed material caches.
Extra-Processing Applying high-end finishes in non-public, utility spaces. Constantly validating design choices against client-defined value.

By learning to see these eight wastes, you empower your entire team to become active problem-solvers. They move from simply completing tasks to continuously improving the process, which is where real, sustainable gains are made.

How to Tell if It's Working (And What to Do When It Isn't)

Adopting Lean principles isn't a "set it and forget it" kind of deal. It's a real commitment. After you've got the team on board and started using practices like pull planning, you need to ask the crucial question: Is this actually making a difference?

Success in a Lean framework isn't just about hitting the final deadline or budget—that's table stakes. We need to look deeper. The real signs of progress are found in the health of your day-to-day workflow and the reliability of your plans.

Measuring What Matters on a Lean Project

Forget vanity metrics. To get a real pulse on how your team is doing, you need to track a few key indicators that show how effective your Lean implementation truly is.

  • Plan Percent Complete (PPC): This is the bread and butter of the Last Planner System. Simply put, it's the percentage of tasks planned for the week that actually got done. If you're consistently hitting 80% or higher, it’s a strong sign that your workflow is predictable and your team is making reliable commitments.
  • First-Pass Quality Yield: How much work is being done right the first time, with no need for fixes or rework? That's what this metric tracks. A high yield tells you that your early collaboration, clash detection, and quality checks are working exactly as they should be.
  • Cycle Time: This is all about speed and predictability. It measures how long it takes to get something done from start to finish—whether that's an RFI, a submittal approval, or the fabrication of a modular bathroom pod. When you see cycle times getting shorter and more consistent, you know you're successfully squeezing waste out of the process.

Tracking these numbers changes the entire conversation. Instead of just staring at a finish date on a calendar, you start focusing on the daily and weekly reliability that actually leads to a great outcome.

Navigating the Inevitable Hurdles

Let’s be honest: shifting to a Lean approach can be tough. It’s as much a cultural change as it is a process change, and that means you're going to hit some friction. Knowing where the common roadblocks are is the first step to getting around them.

The number one reason Lean initiatives fail is when people treat it like a checklist. Lean is a mindset—a commitment to getting better every single day—not just a box to tick. Without real leadership and a team that’s willing to learn from mistakes, the whole effort will eventually fizzle out.

Here are a few of the classic challenges I see time and again, and how to get ahead of them:

  • Resistance to Change: Most people are comfortable with the way they've always done things. When you introduce a new way of working, like a pull planning session, some folks might see it as just more work or a challenge to their expertise. The trick is to show them what’s in it for them: fewer frantic emergencies, less rework, and a workday that’s a lot more predictable.
  • Superficial Buy-In: It’s easy for leadership to say they support Lean. It’s another thing entirely for them to provide the time, resources, and authority the team needs to actually make it work. Real buy-in means leaders show up, help clear roadblocks, and protect the team from the constant "firefighting" that kills any chance for process improvement.
  • Inconsistent Application: Lean is an all-or-nothing game. If only half the team shows up for the daily huddle or if waste-reduction walks are sporadic, you'll just create new problems and erode trust in the whole system. Consistency from everyone, every day, is what makes it stick.

Getting Lean right takes patience and a willingness to stick with it. By keeping an eye on the right metrics and being prepared for these cultural hurdles, you can make sure these powerful ideas deliver real, lasting value to your projects.


At Sherer Architects, LLC, we believe that a well-designed process is the foundation of a successful project. Our expertise in commercial architecture and adaptive reuse is built on decades of experience in creating efficient, valuable, and enduring spaces. If you're ready to bring structure to your vision and maximize your investment, let's start the conversation. Learn more about our collaborative approach at https://shererarch.com.

Categories
Uncategorized

What Is Life Cycle Cost Analysis A Project Owner’s Guide

When you’re making a big purchase—whether it’s a major piece of equipment or a multi-million dollar building—it's easy to get fixated on the price tag. But that initial number is just the tip of the iceberg. Life cycle cost analysis (LCCA) is the practice of looking below the surface to understand the true cost of an asset over its entire life, from the day you buy it to the day you're done with it.

It's about shifting your mindset from "How much does it cost now?" to "How much will it cost me in total?"

Seeing Beyond The Sticker Price

Two cars parked in a driveway next to a house and wooden fence, with "TOTAL COST" text.

Think of it like buying a car. You have two options for your company fleet. Car A is cheap off the lot, but it’s a notorious gas-guzzler with a reputation for needing frequent, expensive repairs. Car B costs 25% more upfront, but it sips fuel and is known for its bulletproof reliability.

If you only look at the sticker price, Car A seems like the obvious choice. But an LCCA acts like a financial crystal ball. It forces you to account for all the other costs you'll incur over the next ten years: fuel, insurance, routine maintenance, and the likely cost of major repairs.

Suddenly, Car B—with its minimal running costs—starts to look like the far smarter financial decision. That’s the core of LCCA: it gives you the complete picture so you can make decisions based on long-term value, not just short-term savings.

The True Cost of Ownership

This all-encompassing view is often called the Total Cost of Ownership (TCO). It's a cornerstone concept in smart project management, especially in fields like commercial real estate where decisions have consequences that last for decades. TCO provides a structured way to think about every direct and indirect cost tied to an asset.

When we apply this to a building, what are we actually looking at? It’s so much more than the construction contract. The analysis pulls in a whole spectrum of expenses:

  • Initial Costs: This is the upfront investment—design fees, land acquisition, permits, and the actual construction.
  • Operating Costs: These are the daily and monthly bills required to keep the lights on, like energy, water, and janitorial services.
  • Maintenance Costs: The budget needed for routine upkeep and predictable repairs to keep everything from the HVAC to the elevators running smoothly.
  • Replacement Costs: The big-ticket items you know you'll have to replace down the road, like a new roof or a chiller system.
  • Disposal Costs: Any expenses associated with demolishing or decommissioning the building at the end of its useful life, minus whatever you can get back from salvaged materials.

Thinking through these future costs is a critical part of reducing total cost of ownership and is essential for making sound financial decisions.

Why The Price Tag Is Only Part of The Puzzle

To get a clearer view of this shift in perspective, let's compare the two approaches directly.

Initial Cost Vs Life Cycle Cost: A Comparison

Factor Initial Cost Focus (Short-Term View) Life Cycle Cost Analysis (Long-Term View)
Time Horizon Immediate purchase price Entire operational lifespan (e.g., 30-50 years)
Cost Scope Acquisition, design, and construction All costs: initial, operating, maintenance, replacement, and disposal
Decision Driver Lowest upfront bid Best long-term value and lowest total expense
Typical Outcome Potential for high long-term operational and repair costs Optimized performance, reliability, and financial predictability
Key Question "What's the cheapest way to build this now?" "What's the most cost-effective solution over the long run?"

As the table shows, focusing only on the initial bid is a common but costly mistake. It often pushes project teams toward cheaper materials and systems that become a constant financial headache. Poor energy performance, frequent breakdowns, and shorter lifespans can completely wipe out any upfront savings.

A short-term view on cost savings often creates long-term financial liabilities. The goal of LCCA is to identify the option that provides the lowest total cost over a designated period, ensuring the best possible value for the investment.

This isn't just a theoretical exercise; the real-world impact is massive. A study by the American Society of Civil Engineers (ASCE) found that prioritizing low initial costs can lead to long-term expenses that are 2-3 times higher for major projects.

For example, an asphalt highway might be cheaper to lay down than a concrete one, but its heavy maintenance and resurfacing needs can inflate the total cost by more than 50% over its lifetime. It’s a classic case of a small saving today creating a much bigger bill tomorrow.

Why You Can't Afford to Ignore Life Cycle Costing

Let's get practical. Life cycle cost analysis isn't just an academic exercise; it's the financial engine behind buildings that are truly sustainable, profitable, and built to last. Think of it less as an accounting task and more as a strategic crystal ball, giving developers and owners the confidence to make smart, value-driven decisions that will pay off for decades.

It fundamentally changes the conversation. Instead of just asking, "What's the cheapest way to build this today?" it prompts the far more important question: "What investment will deliver the best possible value over the entire life of this asset?"

Turning a Potential Liability Into a High-Performing Asset

A building is a living, breathing financial entity. Without a long-term game plan, what looks like a great deal on day one can quickly morph into a money pit, bleeding cash through sky-high energy bills, constant system failures, and unplanned, expensive repairs.

LCCA flips that script entirely. By mapping out future costs, you can make strategic upfront investments in materials and systems that reduce operational headaches and boost performance for the long haul.

This is especially true for the big-ticket items that can make or break a building's operating budget:

  • HVAC Systems: That high-efficiency HVAC unit might have a bigger price tag, but the massive energy savings it delivers year after year can easily pay for the difference—and then some.
  • Lighting Solutions: Modern LED lighting combined with smart controls costs more to install than basic fixtures. But the dramatic drop in electricity use and the near-elimination of replacement costs make it a clear financial winner.
  • Building Envelope: Spending more on high-performance windows and superior insulation feels like a big expense during construction, but it slashes heating and cooling costs for the entire life of the building.

By putting real numbers to these decisions, LCCA builds an undeniable, data-driven case for quality. It ensures your project becomes a valuable asset, not a constant drain on your resources.

The Financial Case for Sustainability

Today, everyone's talking about sustainability and energy efficiency, and LCCA is where the rubber meets the road. It provides the financial proof that "green" design isn't just about feeling good—it's about being smart with your money. To get a top certification like LEED, you have to demonstrate long-term performance, and LCCA is the tool that quantifies it.

Life cycle cost analysis provides the financial backbone for sustainable design. It proves that green buildings aren't just good for the planet—they are fundamentally good for the bottom line.

This isn't just theory. According to the Whole Building Design Guide (WBDG), energy consumption alone can eat up 40% of a building's total life cycle cost. It's a staggering figure. We've seen this play out in the real world for years; buildings put up before LCCA was standard practice often suffered from crippling operational costs. In one powerful example, VA hospitals managed to cut their 25-year costs by 25% just by using LCCA to choose better HVAC systems. You can explore more WBDG resources on facility performance to see just how impactful this can be.

Better Predictability and a Stronger ROI

When you map out future costs, you bring a powerful dose of predictability to your project. LCCA helps owners budget intelligently for major replacements down the line—you'll know that roof is coming due in year 20 or the boiler will need replacing in year 25. This foresight prevents nasty financial surprises and makes managing the asset much smoother.

Ultimately, this all leads to a much stronger Return on Investment (ROI). A building with lower, more predictable operating costs is simply more profitable. It can command higher rents, attracts better tenants, and holds a much higher resale value. LCCA helps transform a construction project into a high-performing investment, proving that the smartest move is always to look beyond the initial price tag.

How to Perform a Life Cycle Cost Analysis

Thinking about a life cycle cost analysis might seem complicated, but it's really just a logical process. It breaks down what feels like a massive financial puzzle into a series of manageable, clear-cut steps. The goal is to move beyond guesswork and get to concrete, data-driven decisions that show you the true long-term value of your options.

The whole methodology is built around one core idea: translating all future costs into today's dollars. This allows for a true apples-to-apples comparison between different choices, giving you a clear picture of what you'll really spend over the life of a building or a system.

Establish the Ground Rules

Before you even think about crunching numbers, you have to define the scope of your analysis. This is the foundation. Without it, you're just comparing apples and oranges. It’s all about getting everyone on the same page by answering a few key questions.

First, what alternatives are you actually comparing? Are you deciding between two different HVAC systems? Three types of roofing materials? Or are you making the much bigger call between renovating an existing building and starting from scratch? Define each option clearly.

Next, you need to set the study period. This is the timeframe you’ll use to compare the costs. It needs to be long enough to capture major replacement cycles and give you a realistic view of the asset's service life. For most major public or federal projects, a 40-year study period is the standard.

Identify and Gather All Cost Data

With the framework in place, it's time to go on a data-gathering mission. This is where you dig in and identify every single cost tied to each alternative over the entire study period. If you miss a cost category here, you can completely skew the results and end up making the wrong call.

Here’s a look at the different types of costs you'll need to track down and estimate.

Key Cost Categories In A Life Cycle Cost Analysis

Cost Category Description Example
Initial Costs The upfront investment to get the asset up and running. Purchase price, shipping, site prep, installation fees, and initial staff training.
Operating & Maintenance The recurring expenses to keep the asset functioning day-to-day. Energy bills, water usage, janitorial services, routine maintenance, and predictable repairs.
Replacement Costs Major, planned capital expenses to replace key components at their end-of-life. Replacing a commercial chiller after 20 years or a roof membrane after 25 years.
Residual Value The estimated salvage or resale value of the asset at the end of the study period. Selling used equipment or the scrap value of materials. This is treated as a credit.

The goal here is simple: be thorough. A solid LCCA accounts for every dollar spent—or saved—from the day you buy something to the day you get rid of it. This detailed accounting is what turns a gut feeling into a smart financial projection.

For instance, government agencies running an LCCA on infrastructure projects use formulas that add all these factors up. A typical federal analysis might look like this: LCC = Initial Costs + Replacements – Residual Value + Energy + Maintenance. It even accounts for less obvious things, like user delay costs during road repairs, which can be 15-25% of the total project cost. You can dive deeper into these calculations by reviewing federal guidelines for pavement analysis.

The diagram below shows how following this methodical process leads to smarter, more sustainable decisions.

A diagram illustrates the LCCA benefits process: strategic decisions, cost reduction, and sustainable asset.

As you can see, a structured LCCA process is the bridge between initial ideas and strategic, cost-effective asset management for the long haul.

Discount Future Costs to Present Value

This is easily the most critical—and most misunderstood—part of the whole analysis. You can't just add up all the costs over 40 years and call it a day. Why not? Because of the time value of money. A dollar in your hand today is worth more than a dollar you'll get ten years from now. That's because of inflation and the potential to earn interest on the money you have now.

To make a fair comparison, you have to convert every future cost into its equivalent value in today's dollars. This is done with a financial calculation called discounting, which gives you the Net Present Value (NPV) of each expense.

Here’s an analogy. If you know you have to pay a $1,000 maintenance bill ten years from now, you could invest a smaller amount today—say, $700—and let it grow over time to cover that future expense. That $700 is the Net Present Value of that future cost.

By discounting every future expense—from the annual energy bill to that big roof replacement in year 20—you can finally add them all up. This gives you a single, comparable number for each of your alternatives. The option with the lowest total NPV is your most cost-effective choice over the long run, giving you the hard data you need to make the right financial move for your project.

LCCA in Action: A Real-World Scenario

Theory is one thing, but seeing a life cycle cost analysis play out in a real-world decision is where the lightbulb really goes on. Let's walk through a classic dilemma for a commercial building owner: choosing the right roofing system for a property they just acquired.

This simple comparison shows exactly how the "cheaper" option today can easily become a major financial headache down the road.

Two houses with different roofs and green grass, overlooking a city skyline.

Imagine the owner needs to replace a failing roof on a 10,000-square-foot building. They've got two quotes and need to make the smartest financial move over a 40-year study period—a pretty standard timeframe for analyzing a major building system like a roof.

Setting Up the Comparison

The choice boils down to two very different materials, each with its own unique cost structure and performance profile.

  • Option A: The Standard TPO Roof. This is a common thermoplastic polyolefin (TPO) system. It's reliable and, more importantly, budget-friendly upfront. It has an estimated service life of about 20 years.
  • Option B: The Premium Metal Roof. This is a high-quality, standing-seam metal roof. The initial sticker price is significantly higher, but it’s built to last for 50+ years and even offers energy savings thanks to its reflective surface.

Just looking at the initial bids, the TPO roof seems like a no-brainer. But an LCCA forces you to look beyond that first invoice and consider every single cost over the next four decades.

Crunching the Numbers

Let's break down the lifetime costs for each option. For this example, we’ll keep it simple and use today’s dollars, but a formal analysis would discount all future costs back to their Net Present Value (NPV).

Option A: TPO Roof (20-Year Lifespan)

  • Initial Installation Cost: The contractor’s bid comes in at $100,000.
  • Annual Maintenance: Routine inspections and minor repairs are estimated at $1,000 per year. Over 40 years, that’s $40,000.
  • Major Replacement Cost: Here's the kicker. Since this roof only lasts 20 years, it will have to be completely torn off and replaced at the 20-year mark. Assuming costs are similar, that’s another $100,000 hit.

Option B: Premium Metal Roof (50+ Year Lifespan)

  • Initial Installation Cost: The upfront investment is much steeper at $180,000.
  • Annual Maintenance: Metal roofs are incredibly durable and need far less upkeep, estimated at just $300 per year. Over 40 years, that adds up to only $12,000.
  • Energy Savings: That reflective surface isn't just for looks. It’s projected to cut cooling costs by $2,000 annually. Over 40 years, that’s a whopping $80,000 in savings, which we treat as a credit.
  • Replacement Cost: With a 50+ year lifespan, this roof will easily outlast our 40-year study period. That means the replacement cost is $0.

This long-term mindset applies to almost every component of a building. Take insulation, for example. An LCCA would compare the initial price against long-term thermal performance and energy savings when evaluating insulation alternatives like spray foam vs. blown-in. It’s the same principle, just a different system.

The Final Verdict

Okay, let's put it all together and see which option truly provides the best long-term value over our 40-year window.

Cost Component Option A (TPO Roof) Option B (Metal Roof)
Initial Cost $100,000 $180,000
Total Maintenance $40,000 $12,000
Replacement Cost $100,000 $0
Energy Savings $0 -$80,000
Total Life Cycle Cost $240,000 $112,000

The results couldn't be clearer. Despite costing 80% more upfront, the premium metal roof’s total life cycle cost is less than half that of the "cheaper" TPO system.

This is the power of LCCA in a nutshell. It forces a crucial mental shift from focusing on the short-term price tag to understanding long-term value. By running this analysis, the building owner avoids a costly mistake and makes a strategic investment that saves a projected $128,000. This is how you use data to build more profitable, sustainable, and resilient buildings.

Finding The Right Data And Tools

A life cycle cost analysis is only as good as the numbers you feed it. While the math itself is straightforward, the real work lies in sourcing accurate costs and realistic service life estimates. This is what transforms a vague guess into a financial forecast you can actually bank on.

Think of it like cooking a gourmet meal. The recipe might be simple, but the quality of your ingredients makes all the difference. In LCCA, your data is the raw ingredient—get it wrong, and the final result will be disappointing, no matter how well you follow the steps.

Where to Find Credible Cost Data

To build a solid LCCA, you need reliable data for everything from initial material and labor costs to the expected lifespan of a boiler. The best place to start is with established industry benchmarks. You don't have to reinvent the wheel.

Here are a few of the go-to resources we use:

  • RSMeans Data: This is pretty much the gold standard for construction cost data in North America. RSMeans offers incredibly detailed cost info on materials, labor rates, and equipment, making it essential for nailing down those initial and replacement cost estimates.
  • Government Resources: You’d be surprised what you can find from agencies like the Department of Energy (DOE) and the National Institute of Standards and Technology (NIST). They publish mountains of data on the energy performance and expected service life for all sorts of building systems.
  • Manufacturer Specifications: When you're looking at a specific piece of equipment, like a high-efficiency HVAC unit or a particular roofing system, the manufacturer is your best friend. They provide the nitty-gritty details on performance, maintenance needs, and expected lifespan.

Using these sources gives your LCCA a strong, evidence-based foundation and lends a ton of credibility to your final numbers.

Software That Does The Heavy Lifting

Look, nobody wants to manually calculate the Net Present Value for 30 years of operating expenses in a spreadsheet. It’s tedious and a recipe for human error. This is where specialized software comes in to save the day (and your sanity).

The screenshot below shows the homepage for the Building Life-Cycle Cost (BLCC) programs, which were developed by NIST.

This is a fantastic example of a tool designed to take the pain out of the process. It's used by everyone from federal agencies to private developers to automate those complex discounting calculations and get a clear picture of long-term cost-effectiveness.

Handling The Inevitable Uncertainty

Even with the best data in the world, you can't predict the future. Inflation might spike, energy prices could swing wildly, or a brand-new system might fail years ahead of schedule. A good LCCA doesn't ignore this; it confronts it head-on.

The goal isn’t to predict the future with perfect accuracy. It’s to make an informed, defensible decision based on the best information we have today, while fully understanding the potential risks.

To manage this uncertainty, one of the most critical steps is to run a sensitivity analysis. This just means you re-run the numbers using different assumptions. What if the discount rate is higher? What if energy savings are 15% lower than you projected?

If your preferred option still looks like the winner across a range of different scenarios, you can move forward with much greater confidence. It’s also crucial to keep your assumptions transparent. Documenting your data sources and clearly stating your logic ensures everyone involved understands exactly how you got from A to B.

Integrating LCCA Into Your Next Project

Knowing what a life cycle cost analysis is is one thing; actually weaving it into your project workflow is where the real magic happens. This isn't about tacking on another complicated step. It's a fundamental shift in how you make decisions, steering every choice toward the long-term financial health of the building right from the get-go.

If there’s one rule to follow, it’s this: start early. The real power of an LCCA is unlocked during the initial design and planning stages. If you wait until later, you’ve already missed the best opportunities to make a difference.

A Roadmap for Action

Bringing LCCA into your process isn't a solo effort. It demands collaboration and a forward-thinking attitude, grounded in a clear, proactive approach to gathering information and making smart calls.

Here’s a practical way to get started:

  1. Assemble the Right Team Early: Get your architect, engineers, and contractors in the same room from day one. Their combined experience is absolutely essential for pulling together realistic cost data and service life estimates for everything from the HVAC system to the roofing materials.

  2. Define Your Goals and Study Period: What are you trying to achieve with this building, financially and operationally? Once you know that, agree on a study period that makes sense—it should be long enough to see at least one major replacement cycle for the building's key components.

  3. Use LCCA as a Communication Tool: Don't present the analysis as a way to slash the budget. Frame it as a strategy to optimize value. Use the numbers to clearly show clients and investors how a slightly higher upfront cost can generate massive long-term savings and a much healthier ROI.

A well-executed life cycle cost analysis completely changes the conversation with stakeholders. It shifts the focus from short-term budget headaches to long-term asset value, backing up higher-quality investments with hard, undeniable financial data.

Fostering a Lifecycle Costing Mindset

Ultimately, making LCCA a habit is about nurturing a new perspective. It’s about seeing that every single choice made during design and construction sends financial ripples decades into the future.

This way of thinking allows you to look past the initial price tag and focus on creating buildings that are more sustainable, resilient, and profitable over their entire lives.

By making LCCA a standard part of your development process, you’re not just building better buildings—you’re building a powerful competitive advantage. You deliver projects that meet today's budget and perform beautifully for years, solidifying your reputation for delivering exceptional, lasting value.

Frequently Asked Questions About LCCA

Even after breaking it all down, it's natural to have a few questions when you start applying a concept like life cycle cost analysis in the real world. Here are some of the most common ones we hear from owners and developers, along with some straightforward answers.

What’s the Difference Between LCCA and TCO?

You'll often hear these two terms pop up in the same conversation, and it’s easy to see why—they're two sides of the same coin.

Think of Total Cost of Ownership (TCO) as the big-picture goal. It’s the total, all-in cost of owning something, from the day you buy it to the day you get rid of it.

Life Cycle Cost Analysis (LCCA) is the specific method you use to figure out that TCO. It's the structured, nuts-and-bolts process—the financial modeling that includes discounting future costs to their present value so you can make a true apples-to-apples comparison. TCO is the destination; LCCA is the map you use to get there accurately.

How Long Should the Study Period Be for an LCCA?

There’s no magic number here; the right timeframe really depends on what you're analyzing. But there are some solid rules of thumb that can point you in the right direction.

For a whole building or a major piece of public infrastructure, a 40-year period is often a good, robust standard. When you're looking at individual components, the trick is to set a timeframe that’s long enough to see at least one full replacement of the shorter-lived option you're considering.

Example: Let's say you're comparing a standard roof with a 15-year warranty against a premium roof built to last 30 years. You need to run the analysis for at least 30 years. Anything less, and you’d miss the massive cost of tearing off and replacing that first roof—a detail that completely changes the financial outcome.

Is LCCA Just for New Buildings?

Not at all. Actually, LCCA is an incredibly valuable tool for renovations and adaptive reuse projects. It’s what gives you the hard financial data to justify making smart upgrades to an existing building.

For instance, should you keep patching up that old, inefficient HVAC system, or does it make more financial sense to replace it? LCCA lays it all out. It pits the high ongoing energy and maintenance bills of the old unit against the upfront investment and long-term savings of a new one. This is how you build a rock-solid business case for sustainable upgrades, proving exactly when it’s time to invest in efficiency for the long haul.


At Sherer Architects, LLC, we build life cycle cost analysis right into our design process. It’s how we make sure every project, from a brand-new commercial build to a complex historic renovation, delivers the greatest possible value over its entire lifetime. Explore how our architectural expertise can optimize your next investment.

Categories
Uncategorized

How to Reduce Construction Costs A Developer’s Practical Guide

When construction costs start to spiral, you can’t just react—you need a solid game plan. The best way to get a handle on your budget is to attack it from three angles: start with meticulous early-stage strategic planning, embrace modern building methods like modular construction, and weave technology into every step of your project management.

This isn't about nickel-and-diming your way through a build. It’s about baking efficiency into your project's DNA from day one.

A Strategic Framework for Lowering Construction Costs

Let's be honest: with material prices swinging wildly and skilled labor getting harder to find, keeping a project on budget feels tougher than ever. But seasoned developers know the secret. The biggest savings aren't found on the job site; they’re locked in long before anyone breaks ground.

It all comes down to making smart, deliberate decisions in the pre-construction phase. This is the point where a simple change on paper costs next to nothing but can save you a fortune down the road.

This guide is designed to give you a clear, actionable roadmap—no fluff, just practical tactics you can use on your next commercial project. Forget chasing small savings during the chaos of construction. We’re going to build a cost-effective foundation from the very beginning.

Key Pillars of Cost Control

To really get a grip on your project's budget, you need to look at it from a few different perspectives at once. Here are the areas where you'll get the most bang for your buck:

  • Value Engineering Reimagined: Most people think of value engineering as just slashing costs. We'll reframe it as a collaborative process to boost project value without compromising on quality or what the building needs to do.

  • Modern Construction Methods: It's time to look beyond traditional stick-built methods. We’ll dig into the real-world cost benefits of alternatives, like understanding Why Steel Building Construction Is The Most Affordable Choice In Today's Economy and leveraging off-site modular fabrication.

  • Intelligent Procurement: This is about more than just getting three bids. A truly smart procurement strategy helps you lock in better prices, secure skilled labor, and reduce your overall risk.

I can't stress this enough: by focusing on the pre-construction phase, project owners can influence up to 70% of a building's total lifecycle cost. A little extra time spent planning here is the single best way to avoid those soul-crushing change orders and rework later on.

To give you a quick overview, this table breaks down the core strategies we'll be covering.

Core Strategies for Immediate Cost Reduction

This table summarizes the primary cost-saving pillars discussed in the article, outlining the key action and its potential impact on a project's budget and timeline.

Strategy Pillar Key Action Potential Impact
Early-Stage Planning In-depth site analysis and feasibility studies before design commitment. Avoids costly surprises, reduces change orders, and aligns budget with reality from the start.
Value Engineering Collaboratively analyze materials and systems for cost vs. lifecycle value. Lowers initial and long-term operating costs without sacrificing essential functions or quality.
Modern Methods Adopt off-site or modular construction for key components. Significantly accelerates project timelines, reduces on-site labor needs, and improves quality control.
Smart Procurement Develop strategic partnerships and bulk purchasing agreements. Secures better pricing on materials and labor, mitigates supply chain risks, and ensures resource availability.

Ultimately, this guide is here to give you the tools and insights to build smarter. The goal is to show you exactly how to approach your projects so they come in on time and on budget—even when the market is anything but predictable.

Winning the Budget Battle in Pre-Construction

Three engineers in hard hats discussing blueprints and a house model for value engineering.

If you want to save real money on a construction project, the time to act is long before the first shovel hits the dirt. The biggest opportunities to control costs happen during pre-construction, where every decision has a massive ripple effect but changes are still cheap to make.

Too many teams rush this critical planning stage, only to get slammed with change orders and delays later on. It’s a classic case of being penny-wise and pound-foolish. Shifting your focus to meticulous upfront planning is the single best way to kill budget-draining problems before they even have a chance to materialize on site.

The secret sauce here is early collaboration. Get your architect, general contractor, and key engineers in the same room from day one. This simple step changes the entire dynamic from a clunky series of handoffs to a truly integrated partnership.

Foster Early Collaboration for Maximum Impact

When your design and construction teams operate in silos, you’re practically inviting trouble. An architect might specify a stunning but needlessly complex feature that the contractor only flags as a budget-buster after bids are already in. That friction always leads to painful redesigns, last-minute compromises, and a budget that's stretched to its breaking point.

Now, imagine an integrated team. The contractor provides real-time cost feedback on design ideas as they happen. The structural engineer suggests a more efficient system that still achieves the architect's vision. This is where innovation thrives.

On a recent mid-rise office project, for example, bringing the contractor in early led to a game-changing suggestion: switch from a traditional steel frame to a mass timber hybrid. Not only did it align with the owner’s sustainability goals, but it also shaved weeks off the schedule and slashed foundation costs because of the lighter structure. That's the kind of win you only get with early teamwork.

The real magic of pre-construction is turning "value engineering" from a last-ditch cost-cutting exercise into an ongoing conversation about maximizing value. It becomes less about what you can remove and more about what you can improve to meet the budget.

Conduct a Rigorous Site and Feasibility Analysis

A brilliant design means nothing if it’s not feasible on your specific piece of land. A thorough site analysis is non-negotiable, and it needs to go way beyond a simple survey. You have to dig into every variable that could blow up your budget down the line.

This deep dive should cover:

  • Geotechnical Investigation: You absolutely must know your soil composition, water table, and whether you're sitting on a pile of rock. Finding out you need deep foundations or extensive soil remediation after the design is done is a project-killer.
  • Utility and Infrastructure Assessment: Are the existing water, sewer, and power lines sufficient for your new building? The cost to upgrade municipal infrastructure can be staggering, and it's a detail that’s frequently missed in preliminary budgets.
  • Zoning and Permitting Research: Navigating local ordinances and design review boards can be a minefield. Uncovering a surprise setback requirement or height restriction late in the game will force you into expensive, time-consuming redesigns.

A critical part of this is accurately estimating renovation costs to ground your plans in financial reality from the start. By front-loading this due diligence, you swap out risky assumptions for hard data, creating a far more resilient and predictable project budget.

Challenge Design Assumptions to Unlock Savings

Even the best designs are built on assumptions that are worth questioning. Challenging these ideas constructively can unlock huge savings without watering down the project's quality or aesthetic. Smart value engineering and sustainable design choices can trim construction costs by 15-25%.

Consider these key areas for a second look:

  1. Structural Systems: Is a cast-in-place concrete structure truly the only option? Could a precast or steel system be built faster and more affordably?
  2. Facade Materials: That complex glass curtain wall might look amazing, but could a streamlined window wall or a panelized system deliver a similar aesthetic for a fraction of the price? On a high-rise, a decision like this can save millions.
  3. MEP Systems: Get granular with the mechanical, electrical, and plumbing specs. Often, a slightly different HVAC configuration or a different manufacturer can provide the same performance with a much lower lifecycle cost.

This isn't about making the building cheaper; it's about interrogating every line item to ensure it delivers maximum value for every single dollar spent. This is the hard work in pre-construction that lays the foundation for a project that hits its financial goals without sacrificing its vision.

Embracing Off-Site and Modular Construction

Construction workers oversee a large modular building unit on a trailer, with a crane operating nearby.

If you really want to move the needle on construction costs, you have to start thinking beyond the traditional job site. Stick-built methods will always have their place, but some of the most dramatic savings I’ve seen come from moving the work into a controlled factory setting. This isn't just a trend—it's a fundamental shift in how we manage risk, schedule, and quality.

Off-site construction is exactly what it sounds like: building major components, from entire wall panels to fully-furnished hotel rooms, in a factory. These completed "modules" are then shipped to the site and craned into place. By doing this, you're taking all the unpredictability of a chaotic job site—weather, labor inefficiencies, site congestion—and replacing it with a predictable, assembly-line process.

That’s where the real power lies. A factory doesn't care if it's raining, snowing, or 100 degrees outside. The work continues, on schedule and with precision.

The Financial Case for Prefabrication

When you look at the numbers, the argument for going modular becomes incredibly strong. It’s one of the surest ways to cut project timelines by up to 50% and knock 20-30% off the total cost. With the skilled labor shortage we're all facing, the fact that contractors report needing 30-50% less on-site labor is a massive advantage. You can dig into more industry data by checking out the latest global construction costs from Arcadis.

But the speed isn't just about finishing faster; it's about making money sooner. If you can open a new hotel or apartment building three or four months ahead of schedule, that’s months of revenue you weren’t expecting. That has a huge impact on the project's overall ROI.

The savings also show up in your materials budget. Factories buy in bulk, getting far better pricing than any single-project contractor ever could. And because everything is cut and assembled with precision machinery, material waste is slashed, often by as much as 90% compared to what gets thrown in the dumpster on a typical job site.

Identifying Ideal Projects for Modular

Now, modular isn't a silver bullet for every single project. It delivers the biggest bang for your buck on buildings that have a lot of repetition. The more you can standardize the units, the more efficient and cost-effective the factory production line becomes.

So, where does it make the most sense? Think about projects like:

  • Hotels and Motels: Guest rooms are the classic example—perfectly uniform and ideal for being built as complete pods.
  • Multi-Family Housing: Whether it's apartments, student dorms, or senior living, the repeating layouts are a natural fit for off-site manufacturing.
  • Healthcare Facilities: We're seeing more patient rooms, exam rooms, and even entire operating theaters built as modules to guarantee quality and accelerate delivery.
  • Quick-Service Restaurants: The standardized kitchens and layouts can be assembled with incredible speed and consistency.

If your project has a highly unique, one-of-a-kind architectural form, traditional on-site methods might still be the way to go. The key is to have this conversation early in the design phase to see if the project can be adapted to capitalize on modular's benefits.

A hotel developer client of mine was skeptical about modular until we ran the numbers. By using prefabricated bathroom and guest room pods, they were able to construct a 150-room hotel 40% faster than their previous project. The savings on construction loan interest alone were substantial, and they started generating revenue a full season earlier than planned.

Vetting Your Prefabrication Partner

Let me be clear: choosing the right off-site manufacturer is every bit as important as picking your general contractor. This is not a commodity. A bad modular partner can wipe out every penny of potential savings and turn your project into a logistical nightmare.

When you're vetting potential partners, you need to do your homework.

  • Go See Their Shop: A factory tour is non-negotiable. Is it clean? Organized? Do you see clear quality control checks in place?
  • Check Their References: Ask for a portfolio of projects just like yours and then actually call their past clients. Ask the hard questions about communication, quality, and on-time delivery.
  • Drill Down on Logistics: They need a rock-solid plan for getting those modules from their factory to your site and safely craned into place. This has to be coordinated perfectly with your on-site team.
  • Confirm Engineering Integration: Make sure their engineers can work seamlessly with your team to integrate the modules with the site-built foundation and, critically, all the MEP (mechanical, electrical, plumbing) systems.

For the right projects, modular construction can absolutely change the game. It’s a powerful strategy for reining in costs, crushing schedules, and ultimately delivering a better building more predictably.

Technology That Actually Cuts Costs on the Job Site

Construction worker in a hard hat uses a tablet to monitor a drone flying over a building site.

If you're still managing a complex commercial project with spreadsheets and a string of emails, you're leaving money on the table. It's that simple. Modern construction tech isn't about flashy gadgets; it's the core of smart project management, giving you the clarity to spot expensive problems long before they show up on site.

Think of it this way: you wouldn't build a tower without a crane, so why manage a multi-million-dollar budget without the right digital tools? The upfront cost for good software and hardware pays for itself quickly by cutting down on mistakes, improving efficiency, and giving you hard data to back up your decisions.

Beyond 3D Models with Building Information Modeling (BIM)

We’ve all heard about BIM, but its real muscle for cost control is often missed. It’s far more than a fancy 3D rendering. BIM creates a true digital twin of your project where every single component—from the rebar in a foundation to the light fixtures in the ceiling—lives in a shared, intelligent model.

The killer feature here is clash detection. Before a single trade sets foot on site, the BIM model can show you exactly where a massive HVAC duct is about to run straight through a primary structural beam. Or where the plumbing stacks and electrical conduits are trying to occupy the same space.

Fixing that clash on a screen costs a few clicks. Fixing it in the field means stop-work orders, change orders, and a blame game between subs that grinds your schedule to a halt. By resolving these conflicts during pre-construction, BIM directly prevents the kind of rework that absolutely demolishes a budget.

Predicting the Future with Data and AI

While BIM shows you what’s planned, artificial intelligence (AI) and data analytics help you anticipate what could go wrong. These aren’t just buzzwords; they’re powerful tools that chew through historical project data, material price fluctuations, and even weather forecasts to create startlingly accurate cost estimates from day one.

This data-first approach takes estimating from a gut-feel art form to a data-backed science. Instead of just relying on past experience, an AI model can flag hidden risks in a project schedule or optimize material orders with a level of precision a human simply can't match.

Adopting these tools can lead to 10-15% savings just by refining the design and getting ahead of risks. As insights on global construction cost trends show, project variables are only getting more complex, making this predictive power essential.

A robust project management platform is non-negotiable. It pulls all communication into one place, handles routine tasks like RFIs and submittals, and gives everyone a real-time dashboard of the project’s health. This frees up your PMs to solve real problems instead of just pushing paper.

Digital Tools and Their Cost-Saving Applications

Choosing the right technology can feel overwhelming, but focusing on the specific problem you're trying to solve is key. Below is a quick breakdown of some of the most impactful tools and how they directly save you money.

Technology Primary Application Direct Cost-Saving Benefit
BIM Software Creating a detailed, data-rich 3D model of the building Prevents rework by identifying system clashes (e.g., plumbing vs. electrical) before construction starts.
Project Management Tools Centralizing communication, documents, and scheduling Reduces delays from miscommunication, automates administrative tasks, and provides real-time budget tracking.
Drones Site surveys, progress monitoring, and safety inspections Drastically cuts surveying time, verifies contractor pay applications against actual work, and reduces safety risks.
AI & Data Analytics Cost estimating, risk forecasting, and resource optimization Creates more accurate initial budgets, predicts potential schedule overruns, and optimizes material procurement.

These tools don't just offer marginal gains; they fundamentally change how you manage risk and resources, leading to more predictable and profitable outcomes.

Eyes in the Sky: Drones for Real-Time Site Intel

One of the most practical and high-ROI technologies I’ve seen on job sites lately is drones. A task that once took a survey crew two days to complete can now be done in a couple of hours by a single drone operator.

Here’s how they immediately impact your bottom line:

  • Quick & Accurate Surveys: Drones generate incredibly precise topographical maps, which are crucial for accurate earthwork calculations. Getting this right from the start avoids major cost overruns in site prep.
  • Progress You Can See: Weekly flights create a time-lapse record of the project. You can overlay the drone imagery on the plans to verify that what you’re being billed for is what’s actually been built. It keeps everyone honest.
  • Safer Inspections: Drones can easily inspect dangerous or hard-to-reach places like rooftops, scaffolding, and building exteriors without putting a single person at risk. This lowers your insurance liability and prevents costly accidents.

The data you get from a drone is unbiased, fast, and safe. It’s a perfect example of how a relatively small investment delivers huge returns by improving accuracy and cutting down on expensive site labor.

Rethink Your Procurement and Contractor Game

How you buy your materials and who you hire to build your project can sink your budget before the first shovel even hits the dirt. Your procurement strategy isn't just about chasing the lowest bid—it's a delicate dance of managing risk, guaranteeing quality, and building partnerships that pay you back, project after project.

Every job is different, of course, but the core principle is always the same: stop thinking transactionally. When you treat suppliers and subs like genuine partners, you open the door to better pricing, more reliable schedules, and the kind of flexibility you’ll desperately need when things inevitably go sideways.

Pick the Right Project Delivery Method

The contract you sign sets the tone for everything that follows. It dictates how your team collaborates, who holds the risk, and how everyone gets paid. This decision is one of the most powerful levers you can pull to control costs.

There are a few main ways to structure a project, and each has its own financial DNA:

  • Design-Bid-Build (DBB): This is the old-school, one-step-at-a-time method. You get a full design from an architect, then shop it around to general contractors. While it seems competitive on the surface, it often pits you against your builder, whose main path to profit can become finding change orders in the plans.

  • Design-Build (DB): Here, you put design and construction under one roof with a single contract. The beauty of this is having one point of contact and responsibility. More importantly, the builder is at the table from day one, giving real-time cost feedback that keeps the design grounded in reality and focused on efficiency.

  • Integrated Project Delivery (IPD): This is the most collaborative—and for complex projects, often the smartest—model. The owner, architect, and contractor all sign one multi-party agreement, sharing both the risks and the rewards. This creates a powerful “all for one” dynamic where everyone is incentivized to find savings and solve problems together.

For most commercial developers trying to keep a lid on costs, steering toward a Design-Build or IPD model is a no-brainer. Getting your builder involved early is the single best way to find cost-saving opportunities when they’re still just lines on a drawing, not expensive fixes in the field.

Forge Real Partnerships with Your Subs and Suppliers

Your subcontractors and material suppliers have an incredible amount of influence over your final costs and timeline. Building long-term, trusted relationships with them is one of the most underrated cost-control strategies out there. A sub who knows you and trusts you is far more likely to sharpen their pencil on pricing and make your job a priority when their schedule is jammed.

Stop the madness of just blasting out bid packages to a dozen random companies. Instead, cultivate a short-list of the top three or four pros in each major trade. These are your go-to partners. Bring them into the design process early.

Think about it: a great mechanical contractor can glance at a preliminary HVAC layout and immediately see a simpler, more efficient way to run the ductwork, potentially saving you thousands in labor and materials. That’s the kind of gold you’ll never get from a low-bidder you’ve never met.

Get Strategic About Buying Materials

Material costs can swing wildly and often account for a massive slice of your budget. If you're just passively accepting quotes as they come, you’re practically asking to overpay. It's time to get proactive.

Here are a few tactics I’ve seen work time and again:

  • Buy in Bulk: If you’ve got a pipeline of projects, negotiate master pricing agreements for common materials like drywall, light fixtures, or flooring. This volume gives you serious leverage to lock in lower per-unit costs for months or even a year.
  • Go Direct: For certain big-ticket or high-volume items, look into cutting out the middleman. Buying directly from the manufacturer can shave off a whole layer of markup.
  • Lock in Your Prices: In a volatile market, this is critical. Work with your key suppliers to get firm pricing for materials you won't need for another six months. This protects your budget from nasty surprises and adds some much-needed certainty.
  • Embrace Just-in-Time Delivery: Why pay to store and move materials around your site multiple times? Coordinate with suppliers for just-in-time deliveries. This drastically cuts down on-site storage needs, which in turn reduces the risk of theft, damage, and wasted labor.

A smart procurement plan isn't about finding the absolute cheapest price today. It's about building a resilient supply chain with partners who deliver consistent value, quality, and reliability for the long haul.

Your Blueprint for Cost-Effective Construction

Getting a project across the finish line on time and on budget isn't about finding a single magic bullet. If you want to know how to reduce construction costs effectively, the secret is weaving smart strategies together from the very first sketch to the final punch list.

The biggest opportunities for cost control happen long before anyone breaks ground. It all starts with strategic pre-planning, a phase where we look at the design, the budget, and the actual buildability all at once. Getting this right from the jump is what prevents the painful and expensive rework that sinks so many projects down the line.

Once you have a solid plan, it's about using the right methods and tools to keep things moving efficiently.

Weaving It All Together

For some projects, embracing modular construction can be a game-changer, dramatically speeding up the timeline and cutting down on the need for on-site labor. In tandem, using technology like BIM for clash detection or project management software for crisp communication helps you sidestep expensive mistakes and delays before they happen.

A sharp procurement strategy is another key piece of the puzzle. It shifts your supply chain from a series of simple transactions into a set of strategic partnerships, which often leads to better pricing and more reliable delivery.

The diagram below really breaks down how a well-oiled procurement process—from bidding to building and integrating—fits into this bigger picture of cost control.

Procurement process flow diagram outlining Bid, Build, and Integrate steps with icons and descriptions.

As you can see, each stage logically flows into the next. When this process is smooth, you minimize friction and get the most value out of every dollar spent.

At the end of the day, lowering construction costs isn't about cutting corners. It’s about building smarter, collaborating earlier, and making decisions based on solid data. It’s about giving your team the right processes and tools to build efficiently in a tough market. When you adopt these modern practices, you stop reacting to problems and start controlling the outcome, making sure your projects hit their financial targets every time.

Frequently Asked Questions

Even with the best plans laid out, specific questions always pop up when you're trying to get a handle on construction costs. I've heard these from countless developers and owners over the years, so let's tackle a few of the most common ones.

What Is the Single Most Effective Phase to Reduce Construction Costs?

Hands down, it's the pre-construction and design phase. This is where you have the most leverage.

Every decision made before a shovel hits the dirt—from the building's structural grid to the type of exterior cladding—creates a massive ripple effect on the budget. Bringing your contractor in early for collaborative planning and rigorous value engineering will save you a fortune compared to scrambling to cut costs once construction is underway.

Is Modular Construction Suitable for All Types of Projects?

Modular is a fantastic tool, but it's not the right fit for every single project. It truly shines on projects with a high degree of repetition.

Think about buildings like:

  • Hotels and apartment complexes
  • Student housing and senior living facilities
  • Hospitals or clinics with many identical exam rooms

For one-off, highly customized architectural designs, traditional on-site construction often makes more sense. You really need to run a feasibility study to see if the speed and cost benefits of modular outweigh the design constraints for what you're trying to build.

The secret to making modular work is committing early. You can't just decide to "go modular" halfway through the design process and expect to see those big savings. It has to be part of the strategy from day one.

How Much Can I Realistically Save with New Construction Technology?

The savings can be pretty significant, often in the ballpark of 10-15% of total project costs if you implement the right tools effectively.

For instance, using BIM to spot clashes between plumbing and electrical systems before they're installed can cut rework costs by 5-10% alone. Layer on an AI-powered analytics tool to fine-tune your procurement and schedule, and you could easily find another 5% in savings.

The key is to stop thinking of technology as just another line-item expense. It's an investment that pays for itself many times over through fewer mistakes, better efficiency, and smarter decisions across the board.


At Sherer Architects, LLC, we believe smart design is the bedrock of any cost-effective project. From navigating the complexities of historic tax credits to mastering the art of adaptive reuse, our team is here to guide owners through every stage. We focus on delivering results that are not only beautiful and enduring but also profitable. See how our expertise can maximize the value of your next commercial project at https://shererarch.com.

Categories
Uncategorized

How to Read Architectural Drawings Without Getting Overwhelmed

When you first open a set of architectural drawings, it can feel like trying to decipher an ancient text. The sheer number of sheets, lines, and symbols can be overwhelming, especially for clients and stakeholders who don't live in this world every day.

The secret isn't to memorize every symbol overnight, but to learn how to navigate the set. Think of it like a map. Once you understand the legend and how to find your starting point, the whole journey becomes clearer.

Your First Look at a Set of Architectural Drawings

Every professional drawing set is organized with a clear logic, moving from the big picture down to the smallest details. It's a system designed to guide you through the project's story, piece by piece. Knowing where to begin is half the battle.

Start with the Title Block

Before you even try to understand a floor plan or an elevation, find the title block. This is the rectangular box of text, almost always located in the bottom-right corner of the sheet. It's the drawing's Rosetta Stone.

Seriously, don't skip it. The title block is packed with crucial context:

  • Project Name and Location: First things first, make sure you're even looking at the right project.
  • Sheet Title and Number: This tells you exactly what you're seeing ("First Floor Plan," "Building Section A") and where it fits in the full set (e.g., A-101).
  • Architect's Information: Shows who is responsible for the design.
  • Drawing Scale: This is absolutely critical. It defines the ratio of the drawing to the real world (e.g., 1/4" = 1'-0").
  • Revision History: A log of changes. Always check this to make sure you're working from the latest version and not an outdated plan.

Always check the title block first. I've seen meetings go completely off the rails because someone was looking at an old revision. It's the single most important habit to build.

The Core Drawing Types

With your bearings set, you can start to make sense of the main drawings that tell the project's story. A complete set might contain dozens of specialized drawings, but nearly everything boils down to three fundamental views: plans, elevations, and sections.

Before we dive into each one, here's a quick reference guide to the essential elements you'll find on nearly every architectural drawing sheet. Think of this as your cheat sheet for getting oriented quickly.

Key Components of an Architectural Drawing Sheet

Component What It Tells You Why It's Important
Title Block The drawing's ID: project name, sheet title, number, scale, and revision date. Provides immediate context so you know exactly what you're looking at.
North Arrow The orientation of the building or site relative to true north. Essential for understanding sunlight, site context, and how the building is positioned.
Scale Bar A graphical representation of the drawing's scale (e.g., a marked line showing 10 feet). Allows for quick visual measurement without needing a special ruler.
Key Plan A small diagram showing which part of the overall building this specific sheet focuses on. Helps you locate where a detailed drawing fits into the larger project.
Legend/Key A list of symbols, line types, and abbreviations used on the sheet and what they mean. The "dictionary" for the drawing, translating symbols into real-world items like doors or outlets.

This table covers the "metadata" of a drawing. Getting comfortable with these components will make reading the actual plans, elevations, and sections much more intuitive.

A plan is a bird's-eye view, looking straight down as if the roof were removed. This is where you'll see the layout of rooms, the thickness of walls, and the locations of doors and windows. It's all about horizontal relationships and flow.

An elevation is what the building looks like from the outside, viewed head-on. You'll have a separate elevation for each side (North, South, East, West). This is where the building's aesthetic comes to life—you'll see exterior materials, window styles, and roof pitches.

A section is like slicing a cake. It's a cut through the building that reveals its internal construction. Sections are invaluable for understanding vertical relationships, like ceiling heights, floor thicknesses, and how different levels connect.

These three views work together. A floor plan shows where a window is, the elevation shows what it looks like, and a section shows how tall it is from the floor. Understanding this interplay is the foundation to read construction blueprints like a pro. Once you've got this down, you're ready to tackle the finer details.

Getting to Know the Main Architectural Plans

Architectural drawings tell the story of your project from several different angles. The real trick to understanding them is learning how these views connect. Don't think of them as separate documents; they're more like interconnected layers that, when pieced together, give you a complete, three-dimensional picture of the final build.

We'll start with the widest view and zoom in from there, looking at the three most common types of plans you'll see in any set of drawings. Each one answers a different, crucial question about your future space. This whole system is organized to move from the macro to the micro, as you can see below.

A concept map illustrating the organization of architectural drawings, showing site plans, elevations, and floor plans.

This map shows how everything ties together—the site plan gives context, the floor plan details the layout, and the elevations show what it all looks like from the outside.

The Site Plan: The 30,000-Foot View

First up is the site plan. This is your project's command center, a top-down view of the entire property that shows how the building fits into its surroundings. It’s where you see the forest before you start looking at the individual trees.

But a site plan is about much more than just the building's footprint; it’s all about context. Here’s what you’ll find:

  • Property Lines: The legal boundaries of your land.
  • Building Placement: Exactly where the structure sits, including setbacks from property lines.
  • Topography: Contour lines that map out the slope and elevation changes across the site.
  • Landscaping: Locations for trees, walkways, driveways, and any planned green space.
  • Utilities: Where connections for water, sewer, gas, and electricity will be.

Let's say you're developing a new retail space. The site plan is what will show you exactly where customer parking is, how shoppers will walk from the street to your front door, and how delivery trucks will get to the back. It’s the master plan for the whole property.

The Floor Plan: Stepping Inside

Once you've got the lay of the land, the floor plan takes you inside. This is the drawing most people recognize—it’s that classic bird's-eye view, as if someone sliced the roof off to show the layout of a single level. As you get comfortable with the different plan types, it’s a good idea to begin to understand how to read floor plans specifically, since they are the heart of any design.

The floor plan is all about the relationship between spaces. You can see the flow from a lobby to conference rooms, get the exact dimensions of an office, and pinpoint the locations of every wall, door, and window. This drawing answers the most important question: "How will this space actually work?"

A floor plan isn't just a layout; it's a script for how people will move and interact inside the building. Try to trace your own path from the entrance to your office. Does it feel natural? Can you spot potential bottlenecks? Figuring this out now will save you from major headaches down the road.

This is also where the details start to come into focus. Look for symbols that show plumbing fixtures in the restrooms, casework for reception desks, and which way the doors swing—a small detail that’s critical for accessibility and figuring out where furniture can go.

The Reflected Ceiling Plan: A Look Up

Finally, let's look up. The Reflected Ceiling Plan (RCP) can be a little strange at first glance. It’s another top-down view, but this time, you’re looking at a mirror image of the ceiling as if it were projected onto the floor below.

Why a mirror image? Because the RCP is the master coordinator for everything happening overhead. It’s the roadmap for your electricians, HVAC technicians, and lighting designers. On an RCP, you'll find:

  • Lighting Fixtures: The precise location and type of every single light.
  • HVAC Vents: Where the supply and return air diffusers are located.
  • Fire Safety Systems: The placement of sprinkler heads and smoke detectors.
  • Ceiling Finishes: Details on materials, like acoustic ceiling tiles or an exposed concrete finish.

For instance, while a floor plan might show a large conference room, the corresponding RCP will detail the exact grid of recessed lights, where the projector will be mounted, and how the air conditioning vents are positioned for everyone’s comfort. It’s an essential, though often overlooked, part of the puzzle.

While plans give you that crucial bird's-eye view, they don't tell the whole story. To truly understand a building's three-dimensional form, its appearance, and how it’s all put together, you need to look at a different set of drawings. Elevations, sections, and details are what bring the flat layout to life. Learning to connect these different views is the key to seeing the project as a single, coherent vision.

Architectural drawings and rolled blueprints on a wooden desk, with a pen and 'Elevations and Sections' sign.

This method of cross-referencing different views has deep roots. It was largely standardized during the Renaissance, with Andrea Palladio’s 1570 masterpiece, I Quattro Libri dell'Architettura, setting the stage. His work used precise orthographic projections—the front, side, and top views we still rely on today. This system brought incredible clarity to construction, and its core principles live on. Modern Building Information Modeling (BIM) workflows, which are built on this idea of integrated views, have been shown to slash project misinterpretations by up to 30%. To see how these foundational ideas developed, you can explore the rich history of architectural drawings.

To help clarify the role of each drawing, let's look at what each one is designed to communicate.

Table: Drawing Types and Their Purpose

Drawing Type Perspective Key Information Provided
Elevation Looking at the building from the outside, straight on. Shows exterior finishes, window/door styles, roof shape, and overall aesthetic.
Section An imaginary vertical slice through the building. Reveals interior ceiling heights, floor/roof construction, and how spaces connect vertically.
Detail A magnified, close-up view of a specific connection. Shows how different materials and components are assembled at a critical junction.

This table provides a quick reference, but let's dive into what you'll actually see on each of these sheets and why it matters for your project.

Elevations: The Face of Your Building

Think of an elevation as a flat, head-on photograph of one of your building's exterior faces. A complete set usually gives you four primary views, one for each side of the building, labeled according to the direction they face: North, South, East, and West.

These drawings are all about the building's curb appeal and external features. This is where your architect communicates the final look and feel.

On an elevation, you'll find things like:

  • Exterior Materials: Finishes like brick, metal paneling, or stucco are shown and labeled.
  • Window and Door Styles: You'll see the exact design, size, and placement of all exterior doors and windows.
  • Rooflines: The elevation clearly shows the pitch, shape, and material of the roof.
  • Vertical Heights: Key dimensions are noted here, like the height from the ground to the eaves or from one floor to the next.

For example, if you're reviewing plans for a new storefront, the front elevation is where you'll see the scale of the display windows, the design of the main entrance, and exactly where your signage will be placed. It’s your first look at the finished product.

Sections: Slicing the Building in Half

If an elevation is the outside view, a section drawing gives you a look inside by making an imaginary vertical cut right through the building. Picture slicing a layer cake and looking at it from the side—that's a section. It reveals the building's internal anatomy and how all the different parts stack up.

Section drawings are absolutely critical for understanding the building's structure and the feeling of its interior volumes. On your floor plan, you’ll see a "section cut line"—a long line with an arrow at each end—showing precisely where this imaginary slice was made and which direction you're looking.

A section reveals crucial information you can't get from other drawings:

  • Ceiling Heights: This is the only place to truly see and confirm the height of each room.
  • Floor and Roof Construction: You can see the thickness of floor slabs and the layered assembly of the roof structure.
  • Vertical Relationships: Sections clearly show how stairs connect different levels, how atriums or light wells are constructed, and what double-height spaces actually feel like.

A section cut is the ultimate reality check for a building’s interior. It’s where you can really visualize the experience of being in the space—confirming a ceiling feels tall enough or that a staircase is as grand as you pictured.

Details: The Magnifying Glass

Finally, detail drawings zoom in on specific, complex areas where multiple materials or components come together. While a section might show an entire wall, a detail drawing will show exactly how the window is sealed into that wall, complete with every layer of flashing, insulation, and sealant.

These drawings are done at a much larger scale (like 1 1/2" = 1'-0" or even bigger) to show these intricate connections with perfect clarity. They are absolutely essential for the builder to ensure quality construction and prevent future problems like water leaks or air infiltration.

You’ll typically find detail drawings for tricky areas such as:

  • Window head, jamb, and sill conditions
  • Roof-to-wall intersections
  • Foundation and footing connections
  • Custom-built features like reception desks or stair railings

By learning to move between these three types of drawings, you get the complete picture. The elevation shows you the beautiful custom window, the section shows you its height within the wall, and the detail drawing shows the builder exactly how to install it to perfection.

4. Getting to Grips with Scales, Symbols, and Schedules

A wooden ruler, pen, and document on a drafting table, with a sign showing 'Scales and Symbols'.

If the plans and elevations are the main story of a project, then the scales, symbols, and schedules are the fine print where all the critical details live. This is where you move from the big picture to the nuts and bolts—confirming the real-world size of a conference room, identifying every single electrical outlet, and finding the exact model number for the lobby doors.

Getting this part right is absolutely essential. Misinterpreting these elements is one of the quickest ways for a project to go off the rails, leading to costly mistakes and delays.

Cracking the Code of Architectural Scales

An architectural scale is simply the ratio that translates the lines on paper to their actual size once built. Without it, a drawing is just a bunch of abstract lines. You'll almost always find the scale for each drawing sheet listed in the title block, usually in the bottom-right corner.

For commercial projects, you'll run into a few common scales over and over:

  • 1/8" = 1'-0": This is often used for large-scale floor plans. The main goal here is to show the overall layout and flow of a building without getting bogged down in minute details.
  • 1/4" = 1'-0": A real workhorse scale. It’s perfect for most floor plans and building elevations because it offers a great balance between seeing the whole picture and still having enough clarity for key components.
  • 1 1/2" = 1'-0": When you need to see exactly how something complex comes together, you'll see a detail drawing at this larger scale. It's how architects clearly show intricate connections, like how a window frame is flashed and sealed into a brick wall.

The jump from hand-drafting to Computer-Aided Design (CAD) has made understanding scale even more critical. The 1982 launch of AutoCAD was a game-changer, boosting precision by an incredible 90% in major markets. But with digital files that can be zoomed in and out, it's easy to lose perspective. In fact, misreading digital plans now contributes to 37% of construction rework, costing an eye-watering $150 billion worldwide each year. You can learn more about the evolution of drafting and how it shapes the drawings we use today.

The Universal Shorthand of Symbols

Think of symbols as a visual shorthand that keeps drawings from becoming a cluttered mess. Instead of writing "duplex electrical outlet" or "double-hung window" dozens of times, architects use standardized symbols.

A drawing without a legend is like a map without a key. The first thing you should do when you get a new set of plans is find the legend. It's your dictionary for the entire project.

The symbol legend is usually on one of the first few sheets. It decodes every symbol used in the drawing set. While there are thousands of symbols out there, you'll see a few categories on virtually every project.

Common Architectural Symbols to Know

Symbol Category What It Represents Real-World Example
Doors Shows the location, size, and swing direction. A simple arc indicates which way the door opens. A line with an arc swinging into an office, indicating a 3-foot wide door.
Windows The placement, type, and size. Different line patterns can show if a window is fixed, casement, or sliding. A basic rectangle inside a wall line, representing a fixed picture window.
Electrical The locations for all outlets, switches, light fixtures, and data ports. A small circle with two parallel lines through it, marking a standard wall outlet.
Plumbing The placement of sinks, toilets, floor drains, and other fixtures. An oval shape drawn into a countertop, representing a sink basin.

Once you learn to spot these, you can scan a floor plan and immediately understand how a space works—where people will turn on the lights, plug in their laptops, and find the restrooms.

Bringing Order with Schedules

Finally, we have schedules. In the world of architecture, a schedule isn't a timeline; it's a super-organized table that provides exhaustive detail about specific building components. It's basically a spreadsheet embedded right into the drawings.

Schedules are a brilliant way to manage repetitive items. Imagine trying to label every single door on a floor plan with its size, material, fire rating, and hardware. The drawing would be unreadable. Instead, each door gets a unique tag (like 101, 102A, etc.) on the plan.

You then flip to the Door Schedule to find every last detail for door 101. Some of the most common schedules you'll rely on are:

  • Door Schedule: The master list of every door's type, size, material, fire rating, and hardware set.
  • Window Schedule: Details the model, size, glazing type, and finish for every window.
  • Finish Schedule: A room-by-room breakdown of finishes—wall paint color, flooring material, baseboard type, and ceiling style.
  • Lighting Schedule: Specifies the manufacturer, model number, and lamping for every single light fixture.

When you need the definitive answer on a specific item, the schedule is your source of truth.

How to Review Drawings with Your Architect

Walking into a design review meeting can be intimidating, with a full set of architectural drawings spread out on the table. But having a successful meeting isn't about knowing every last symbol. It's about having a game plan. With a structured approach, you can give feedback that truly matters and make sure the final building works for you.

When you sit down with your architect, the natural impulse is to dive right into the little things. Resist it. The best way to tackle a set of drawings is to start big and work your way down to the details. I always tell my clients to think of it as a three-pass system: first, the big picture flow; second, the individual rooms; and third, all the nitty-gritty details. This keeps you from getting lost in the weeds and helps you spot major issues before they become expensive problems.

Start with the Overall Flow and Layout

Your first pass is all about the journey. Lay out the floor plan and literally trace with your finger the paths people will take. Imagine you're a customer walking in for the first time, an employee rushing to a meeting, or a delivery person trying to find the service entrance.

As you follow these paths, ask yourself some basic questions about the experience:

  • Is the path obvious? Or would someone need a map to find the main conference room? Good design feels intuitive.
  • Where are the traffic jams? Look for narrow hallways or intersections that are going to feel crowded during busy hours.
  • How do key spaces relate to each other? Does the flow between the reception area, meeting rooms, and restrooms make sense?

Think of this first pass as reading the building's "story." You're evaluating how the physical layout will shape behavior. Don't worry about furniture or finishes just yet—focus on the permanent walls, doors, and hallways that define the core experience.

Zoom in on Room Dimensions and Function

Okay, once you're comfortable with the overall circulation, it's time for pass number two. Now you can zoom in on specific rooms and spaces. This is where you start connecting the lines on paper to how the space will actually be used every day.

Look at the dimensions and try to get a real feel for the scale. An empty box on a drawing is one thing, but reality is another. Is a 10' x 12' office really big enough for a desk, a filing cabinet, and a couple of guest chairs? Will people be able to comfortably pull out their chairs in the conference room without bumping into the wall? If you can't visualize it, ask your architect to point to a room in your current building that's a similar size.

A classic mistake is getting sidetracked by aesthetics too early. Before you even think about paint colors, ask your architect: "Walk me through a typical day in this room." This simple question forces a conversation about function, which is where you can provide the most valuable feedback.

Check the Details: Window Placement and Door Swings

Finally, it’s time for your third and most detailed pass. This is where you hunt for the small things that can have a surprisingly huge impact on how a space feels and functions. We're talking about window placement, door swings, electrical outlet locations, and storage.

Go through the plan room by room and ask pointed, practical questions.

  • "How does the light change in here throughout the day?" This will tell you if the window placement is going to create glare on computer screens at 3 PM or leave a corner perpetually dark.
  • "Show me exactly where we'll store X, Y, and Z." Don't just assume closets will appear. Make sure there’s dedicated, adequate storage for everything from office supplies to cleaning equipment.
  • "Which way does this door swing?" A door that swings into a tight space can render half the room useless or create an awkward collision with furniture. Check every single one.

A good design review is a conversation, not a presentation. By using this method, you become a true collaborator in the process. Remember, changes on paper are cheap. Changes made once construction has started are anything but.

Common Questions We Hear All the Time

Even when you've got the basics down, a few practical questions almost always pop up during review meetings. These are the "what-if" and "how-do-I-know" queries that come from digging into the details. Getting these answers straight will give you a real boost of confidence when you're flipping through a set of plans.

Think of this as the final piece of the puzzle. You know what the different drawings are; now let's talk about how they actually work together on a fast-moving project.

"What Do All These Dashed Lines Mean?"

This is probably the number one question we get. You'll see solid lines, dashed lines, and sometimes even dotted lines, and they all mean something different. While solid lines represent things you can see—like walls, doors, and windows—dashed lines almost always point to something that's not immediately visible from that particular viewpoint.

You'll run into them in a few common situations:

  • Things Above You: On a floor plan, dashed lines often show elements that are above the typical four-foot "cut" line. Think of kitchen wall cabinets, a ceiling beam, or the line of a roof overhang outside.
  • Things Below You: They can also show what's hidden underneath a surface. A classic example is seeing the dashed outline of a building's foundation on a site plan.
  • Things That Are Changing: In renovation work, dashed lines are your go-to for figuring out what's coming down. They’re frequently used to show walls, doors, or fixtures marked for demolition.

When in doubt, always hunt for the legend on the drawing sheets. It's the official decoder ring for what every line type, symbol, and abbreviation means for that specific project.

"How Do I Know I'm Looking at the Latest Version?"

This is a huge one. Working from an old set of drawings is a classic—and costly—mistake. The single source of truth for this is the revision block, usually found tucked into the title block in the bottom-right corner of every sheet.

Each time a drawing is officially changed and re-issued, a new line is added here. It will tell you a few critical things:

  1. A revision number or letter (e.g., Rev A, Rev B, or Rev 1, Rev 2).
  2. A quick note about what changed, like "Relocated office doors."
  3. The date of the revision.
  4. The initials of who made or approved the change.

Pro Tip: Before you walk into any meeting, make it a habit to check the revision date on your set of drawings. A quick phone call to the architect's office to confirm you have the latest issuance can save everyone a ton of wasted time and prevent decisions based on outdated information.

"How Do All These Different Drawings Fit Together?"

It can definitely feel like you're juggling a dozen different, disconnected documents. But a good set of architectural drawings is a tightly coordinated system designed to link back to itself. The trick is knowing how to follow the breadcrumbs.

For instance, a floor plan might show a wall where several different materials come together in a tricky way. Instead of trying to cram all that information onto one drawing, the architect will place a detail callout next to it. This is usually a circle with a sheet number on top and a detail number on the bottom (e.g., A501/3). That’s your signpost—it’s telling you to flip to sheet A501, find detail 3, and you'll see a magnified drawing explaining exactly how that wall is supposed to be built.

It's the same with the section cut lines you see on a floor plan. That line isn't just a random graphic; it shows you precisely where the building was "sliced" to create the section view you'll find on another page. Learning to follow these callouts is what connects the big-picture plans to the mission-critical details. It’s how all the pieces of the puzzle snap together.


At Sherer Architects, LLC, we believe clear communication is the bedrock of a successful project. We make it our job to guide clients through every drawing and decision, ensuring you feel confident and informed from day one. See how our collaborative approach brings clarity and structure to commercial, adaptive reuse, and historic preservation projects. Learn more at Sherer Architects, LLC.

Categories
Uncategorized

A Practical Guide to Environmentally Conscious Architecture

When we talk about environmentally conscious architecture, we're looking at something much deeper than just slapping on a few solar panels or planting a green roof. It’s a design philosophy that fundamentally rethinks how a building interacts with the world around it. The goal is to minimize—or even reverse—the negative environmental footprint of our buildings.

This means focusing on energy efficiency, choosing sustainable materials, and creating healthier indoor spaces. It’s about moving beyond simple aesthetics to design buildings that actively benefit both people and the planet.

Defining Environmentally Conscious Architecture

Modern building with lush green roofs, rooftop trees, and "REGENERATIVE DESIGN" text on its facade.

Think of traditional construction like a one-way street: we take resources from the earth, use them to build, and eventually create waste. Environmentally conscious architecture, on the other hand, operates more like a regenerative loop. It's a thoughtful approach that works with nature, not against it, to create structures that are efficient, healthy, and resilient for the long haul.

This isn't just a fleeting trend; it's a fundamental shift in how we approach the built environment. At its core, the goal is to create spaces that reduce environmental harm while simultaneously enhancing the well-being of the people inside and delivering long-term economic value. This is achieved by focusing on a few key pillars.

Core Pillars of Sustainable Design

At its heart, this architectural approach balances three critical elements to achieve its ambitious goals:

  • Smart Design: This is all about leveraging the natural environment. A simple example is orienting a building to maximize sunlight for warmth in the winter and minimize it in the summer, which dramatically cuts down on heating and cooling needs.
  • Material Selection: Making a conscious choice to use materials that are recycled, renewable, or locally sourced reduces a building's environmental footprint right from the start.
  • Energy Efficiency: Integrating high-performance systems for heating, cooling, and lighting ensures the building uses as little energy as possible throughout its entire life.

A key part of this is tackling two distinct types of carbon emissions: operational carbon (the energy a building uses day-to-day) and embodied carbon (the emissions generated from manufacturing materials and the construction process itself).

The Growing Demand for Green Buildings

The momentum behind this shift is undeniable. The global green construction market, valued at USD 711.0 million in 2025, is projected to more than double, reaching an estimated USD 1,508.6 million by 2032.

This explosive growth is a direct response to a hard reality: the building sector consumes over 34% of global energy and is responsible for nearly 10 gigatons of CO₂ emissions every year. As regulations tighten—for instance, the EU now mandates all new buildings be zero-emission by 2030—environmentally conscious architecture is quickly moving from a "nice-to-have" to a market necessity. As you can find in more market growth insights on Coherent Market Insights, this ensures that design promises translate into real-world performance.

By weaving these principles into the design process, environmentally conscious architecture creates buildings that are not only better for our planet but also more economical to operate and healthier for the people who live and work in them every single day.

The Financial Case for Building Green

Modern building with solar panels on the roof and large windows, illustrating lower operating costs.

While the environmental and ethical reasons for building sustainably are compelling, the business case is what truly moves the needle. It's time to put the old myth that "green" equals "expensive" to rest. Environmentally conscious architecture isn't just about doing the right thing; it’s a smart financial strategy that pays real dividends over the life of a building.

The key is to shift your perspective from short-term construction costs to the building's entire life-cycle value. When you factor in everything—from day-to-day operations to future resale value—sustainable buildings consistently come out on top as more profitable, more resilient investments.

Slashing Operational Costs Year After Year

The most immediate and obvious financial win comes from lower operating expenses. Think of a well-designed green building as a finely tuned machine, engineered to perform at its peak using minimal resources. By integrating smart energy systems and a high-performance building envelope, these properties simply sip energy instead of guzzling it.

This efficiency shows up right where it counts: on your monthly utility bills. High-performance HVAC systems, smart LED lighting, and water-saving fixtures all work together to drive down costs. For example, in a sunny climate like South Carolina's, you can reduce cooling costs significantly with advanced window films that reject solar heat without sacrificing natural daylight.

Green buildings are not just cost-cutters; they are high-performance assets. Data shows that investing in green building retrofits can cut everyday operating expenses by up to 10% annually, while new green constructions can reduce maintenance costs by 20% compared to traditional structures.

This consistent drop in overhead creates a reliable financial buffer and shortens the payback period on your initial investment, making the property more profitable from the get-go.

Boosting Asset Value and Attracting Tenants

Beyond the monthly savings, environmentally conscious architecture makes your building a more valuable asset in the marketplace. In today's economy, sustainability is a powerful feature that attracts top-tier tenants and commands higher sale prices.

Corporations are increasingly guided by Environmental, Social, and Governance (ESG) goals, and they actively seek out certified green buildings. These tenants are often willing to pay more for spaces that reflect their values and provide a healthier environment for their employees. This creates a clear competitive advantage for property owners:

  • Higher Rental Rates: Green-certified buildings consistently lease for more than their conventional counterparts.
  • Increased Occupancy: Demand for sustainable spaces means lower vacancy rates and quicker lease-up times.
  • Greater Resale Value: As the market continues to prioritize sustainability, these properties appreciate faster and are easier to sell.

The following table breaks down how these advantages stack up against traditional properties.

Financial And Performance Gains Of Green Buildings

Metric Conventional Building Green Certified Building
Operating Costs Standard utility and maintenance bills. Up to 10-20% lower annually.
Rental Rates Baseline market rates. Often command a 5-11% rental premium.
Occupancy Rates Standard market vacancy rates. Typically higher due to strong demand.
Resale Value Standard appreciation. Increased asset value and market appeal.
Tenant Appeal Broad appeal. High appeal to ESG-focused corporations.
Resilience Dependent on grid and infrastructure. More self-sufficient and resilient.

Ultimately, these metrics confirm that green buildings aren't just an ethical choice—they are a superior financial asset designed for long-term performance.

Building Resilience for a Changing World

Finally, sustainable buildings are just plain tougher. They are designed from the ground up to adapt to a future where climate-related risks and volatile energy prices are the new normal.

This built-in resilience is a critical financial advantage. A building that can keep the lights on during an extreme weather event or stay comfortable during a power outage protects business continuity. Features like natural ventilation, superior insulation, and on-site renewables make these structures less dependent on fragile utility grids. This durability safeguards the asset against future shocks, making environmentally conscious architecture a truly forward-thinking and secure investment.

Core Strategies for Sustainable Building Design

Modern building with solar panels and wood facade, showcasing smart, sustainable design strategies.

Now that we've covered the financial upsides, let's get into the nuts and bolts of how environmentally conscious architecture actually works. These aren't just abstract ideas; they're practical, proven design principles that work together to create buildings that perform exceptionally well.

By weaving these four key strategies into a project from the very start, we can dramatically cut a building's environmental footprint while making it a better, more valuable place to be. Think of it as a layered approach to smart design, where each strategy supports the others, creating a building that is efficient, comfortable, and resilient from the ground up.

Embracing Passive Design First

Before you even think about solar panels or high-tech HVAC systems, the most intelligent move is to let nature do the work for you. That's the whole idea behind passive design: using the building’s location, climate, and position to slash energy needs. It’s like a plant instinctively turning its leaves to catch the sun—a building can be designed to do the exact same thing for energy.

By simply paying attention to the sun's path and local wind patterns, an architect can design a building that stays comfortable year-round with very little help from mechanical heating and cooling. This is, without a doubt, the most powerful and cost-effective first step.

  • Strategic Orientation: We position the building to welcome the low winter sun for natural warmth while shielding it from the harsh, high-angle summer sun to keep things cool.
  • Natural Ventilation: Windows and openings are designed to catch prevailing breezes, creating natural airflow that cools the interior without flipping a switch.
  • Daylighting: Large, thoughtfully placed windows, light shelves, and skylights flood the space with natural light, cutting down the need for artificial lighting during the day.

Fortifying the Building Envelope

With a smart passive design in place, the next job is to wrap the building in a high-performance building envelope. Think of the envelope as the building’s technical shell—its skin. Its main purpose is to create a solid barrier, keeping the comfortable conditioned air inside and the outside weather where it belongs.

A leaky, poorly insulated envelope is like wearing a mesh jacket in a blizzard; you're just bleeding energy. A robust envelope is the bedrock of energy efficiency, drastically reducing how hard the heating and cooling systems have to work and delivering huge energy savings over the long haul.

A well-sealed and insulated building envelope is the single most important factor in reducing a building's heating and cooling costs. It's the foundation upon which all other energy efficiency measures are built.

This is achieved with a combination of elements, like advanced insulation, high-performance windows with special low-emissivity (Low-E) coatings, and meticulous air sealing to stop costly drafts and leaks in their tracks.

Optimizing Mechanical Systems

Because passive design and a tight envelope have already done so much to reduce the building's energy demand, the mechanical systems—the HVAC, lighting, and plumbing—can be much smaller, more efficient, and less expensive. Systems optimization is all about choosing the right equipment for the job and making sure it all works together seamlessly.

Instead of just installing oversized, energy-guzzling equipment "just in case," we can right-size the systems to match the building's actual, reduced needs. This could mean smart lighting with occupancy sensors that turn off when a room is empty or high-efficiency HVAC units that use a fraction of the power of older models. It also includes things like low-flow toilets and faucets to cut down on water use.

Selecting Sustainable Materials

The final piece of the puzzle is the careful choice of building materials. Everything that goes into a building, from its concrete foundation to its interior paint, has an environmental history. Sustainable material selection is the practice of choosing products that have a lighter impact across their entire life cycle—from how they're sourced and made to how they're used and eventually disposed of.

This means prioritizing materials that are recycled, renewable, locally sourced, and non-toxic. Using reclaimed wood, for example, not only saves trees but also adds incredible character. Opting for low-VOC (volatile organic compound) paints and finishes dramatically improves indoor air quality, making the building healthier for everyone inside. When implementing core strategies for sustainable design, it's crucial to explore the top eco-friendly building materials available on the market to make informed decisions that align with project goals.

By putting these four strategies together—passive design, a tight envelope, optimized systems, and smart materials—we create buildings that are far more than just the sum of their parts. They become elegantly integrated systems designed from the start to be efficient, healthy, and built to last.

Making Sense of Green Building Certifications

So, a building claims to be “green.” How do you really know? In the world of sustainable architecture, you can’t just take someone’s word for it—you need proof. That's where green building certifications come into play.

Think of them like a nutritional label for a building. They offer a clear, standardized, and independently verified report card on a building’s environmental performance. These aren’t just participation trophies; they are rigorous, data-driven frameworks that score a project across dozens of metrics. For a developer or owner, earning a certification is far more than a plaque for the lobby. It's a powerful statement about the project's quality, efficiency, and long-term value.

LEED: The Industry Benchmark

When people talk about green buildings in North America, they’re often talking about LEED. Developed by the U.S. Green Building Council (USGBC), LEED (Leadership in Energy and Environmental Design) is a globally recognized symbol of sustainability achievement.

It’s built on a straightforward points system. Projects earn points by meeting specific criteria across a range of categories. Add up the points, and you land one of four certification levels: Certified, Silver, Gold, or the highly coveted Platinum.

The system looks at the whole picture:

  • Sustainable Sites: Did you build on a site that minimizes environmental harm? Did you protect natural habitats and manage stormwater effectively?
  • Water Efficiency: How smart is the building with water? This covers everything from low-flow fixtures to water-wise landscaping.
  • Energy and Atmosphere: This is the big one. It’s all about minimizing energy consumption through good design, efficient systems, and renewable energy sources.
  • Materials and Resources: What is the building made of? This category rewards the use of sustainable, recycled, and regional materials, and it pushes teams to reduce construction waste.
  • Indoor Environmental Quality: A green building should be a healthy building. This focuses on clean air, natural light, and creating a comfortable space for the people inside.

A LEED-certified building sends a clear signal to the market: this is a high-performance asset built to last.

Beyond LEED: Other Key Players

While LEED is the heavyweight champion, it's not the only game in town. Other excellent certification systems offer different philosophies and levels of ambition, allowing teams to find the perfect fit for their project.

BREEAM (Building Research Establishment Environmental Assessment Method) is the UK's answer to LEED and is used all over the world. It’s a similarly comprehensive, science-based system but places a particularly strong emphasis on a building’s entire life-cycle performance—from the drawing board all the way through its operational years.

For those who want to push the boundaries of what's possible, there's the Living Building Challenge. This isn't so much a checklist as it is a profound design philosophy. The goal is to create buildings that are truly regenerative, meaning they actually give more back to the environment than they take. To succeed, a project must generate all its own clean energy, capture and treat all its own water, and be built from non-toxic, responsibly sourced materials. It's an incredibly high bar, but it shows what’s achievable.

These certifications are all about accountability. The global construction industry is a massive contributor to carbon emissions. While sustainable design is gaining traction, the pace of change is still too slow. Verifiable standards like these are essential for closing the gap between what we say we’ll build and how a building actually performs.

The Power of Predictive Energy Modeling

How can you be sure a design will hit its energy targets before you even break ground? The secret weapon is energy modeling. This is basically a digital twin of your building, created with sophisticated computer simulation software.

Architects and engineers feed the model all the crucial data: the building’s orientation, the type of windows, the R-value of the insulation, the specs for the HVAC system, and more. The software then runs a year-long simulation using local weather data to predict exactly how the building will consume energy, month by month.

This powerful tool lets the design team test-drive different ideas. What’s the long-term payback on triple-pane windows versus double-pane? How much energy would we save by shifting the building’s orientation by 15 degrees? Energy modeling provides the data to answer these questions, turning aspirational green design into a measurable, predictable reality.

Breathing New Life into Existing Buildings

While shiny new towers often steal the spotlight, one of the most impactful sustainable design strategies doesn’t involve a single shovel of new dirt. It’s built on a simple but powerful idea you'll hear from preservationists and green architects alike: the greenest building is the one already standing.

This isn't just a sentimental thought. It's about a crucial concept called embodied carbon—all the CO2 released just to manufacture the steel, concrete, and glass, and then to haul it all to a site and put it together. When we decide to renovate instead of demolish, we honor that massive upfront carbon investment and sidestep the environmental cost of starting all over.

The Power of Adaptive Reuse

Adaptive reuse is the art of giving an old building a new job. Imagine a historic textile mill in Greenville finding a second life as modern loft apartments, or a forgotten warehouse on the Charleston peninsula being reborn as a bustling food hall. This is more than just recycling; it's a strategic move that saves resources, injects energy into established neighborhoods, and protects our architectural heritage.

The beauty of this approach is twofold. First, you're saving the embodied energy locked into the original structure's bones. Second, you’re often working within existing, walkable communities, which cuts down on the demand for new roads and sprawling infrastructure.

Think of it this way: by adapting an existing structure, you're essentially recycling an entire building. This single choice can slash 50% to 75% of the embodied carbon emissions that would have been generated by new construction.

Historic Preservation Meets Modern Performance

Though a close cousin to adaptive reuse, historic preservation has a slightly different mission. The goal here isn't just to repurpose the space, but to painstakingly protect its historical and architectural soul while making it perform for the 21st century. It's a delicate dance: how do you thread modern, energy-efficient systems into a building without erasing the character that makes it so special?

It's a genuine challenge, but the payoff is huge. Getting it right takes a creative team that knows how to weave the new seamlessly into the old.

A few common strategies include:

  • Window Restoration: Instead of ripping out original wood or steel windows, experts can restore them and add modern weatherstripping or low-profile interior storm panels. This boosts thermal performance without sacrificing the historic look of the facade.
  • Strategic Insulation: Carefully blowing high-performance insulation into attics and basements, or even wall cavities when possible, in a way that works with the original construction and avoids creating moisture problems down the road.
  • Discreet Modernization: Integrating high-efficiency HVAC systems and even solar panels where they won't be seen, like on flat roofs or less prominent building faces.

Financial Incentives for Sustainable Renovation

Choosing to save an old building isn't just good for the planet—it’s also a savvy financial move, thanks to some powerful incentives. Programs like the Federal Historic Tax Credit can offer a substantial credit, often 20% of the total qualified rehabilitation costs, which directly reduces a developer's federal income tax bill.

On top of that, many states, including South Carolina, have their own historic tax credit programs that can be "stacked" with the federal incentive. These financial tools can take a huge bite out of the upfront costs of a renovation, making it a real competitor to new construction. When you combine those credits with the long-term savings from a more efficient, updated building, the business case is hard to argue with.

Your Guide to Local Incentives and Resources

Turning the ideas of environmentally conscious architecture into a real, standing building takes a solid plan. For developers and property owners here in South Carolina, this means getting practical and tapping into local opportunities from day one. Real success is baked in long before the first shovel hits the dirt.

The early planning phase is where you truly set yourself up for both financial and sustainable wins. It’s about more than just finding an open lot; it's about picking a site that plays nicely with our climate and making sure your project goals align with the financial incentives on the table. Getting an experienced architect involved early is the key to making this all click.

Strategic Planning and Design

Every great project starts with clear goals. Are you aiming for a specific LEED certification? Do you plan to capitalize on historic tax credits? Figuring this out upfront guides every single decision that follows and lets your design team craft plans that hit those targets perfectly.

It’s a huge advantage to work with architects who know South Carolina’s specific building codes, energy standards, and green certification programs inside and out. They can help you navigate the maze of local rules and pinpoint the best sustainable strategies for our region, whether that’s designing for optimal sun exposure or managing stormwater like a pro.

A common mistake is treating sustainability as an add-on. For the best ROI, green building goals must be integrated into the project’s DNA from the initial concept, influencing site selection, massing, and material choices.

This flow chart shows how you can take an existing building and transform it into a high-performance, sustainable asset.

A process flow for building reuse, showing assessment, retrofit, and renewal, highlighting environmental and cost benefits.

Moving from assessment to renewal isn’t just about a facelift; it’s about preserving the building’s embodied carbon while giving it a new lease on life with better efficiency and longevity.

Navigating South Carolina Incentives

Getting a handle on the financial side of things is absolutely critical to making your project pencil out. Thankfully, South Carolina has a number of programs meant to encourage sustainable development and historic preservation, which can seriously lighten the load of your initial investment.

Here are a few key resources you should definitely look into:

  • State-Specific Programs: South Carolina offers its own historic preservation tax credits that you can often stack with federal incentives for a major financial advantage.
  • Utility Rebates: Major utility providers like Duke Energy and Dominion Energy frequently provide big rebates for installing energy-efficient HVAC systems, modern lighting, and other high-performance gear.
  • Federal Grants: Don't forget to check for various federal programs that support energy efficiency and renewable energy, as they can add another valuable layer of funding to your project.

When you actively find and weave these incentives into your project’s financial strategy, you can make the vision of environmentally conscious architecture a profitable reality.

Common Questions About Sustainable Architecture

Even with all the clear benefits, it's natural to have questions when you're considering an environmentally conscious approach for the first time. Let's tackle a few of the most common ones we hear from clients to demystify the process and the real-world value of building green.

Does It Cost More Than Traditional Construction?

This is probably the number one question, and the answer isn't a simple yes or no. While some high-performance materials might have a higher price tag upfront, the real conversation is about long-term value and life-cycle savings. The smartest strategies, particularly passive design, often add very little to the initial budget but pay you back for decades.

Think about it: the savings on energy and water bills alone often mean the initial investment pays for itself in just a few years. After that, those savings go straight to your bottom line, year after year. Better yet, powerful incentives like historic tax credits and local utility rebates can dramatically cut the initial cost, making it a smart financial move right out of the gate.

We encourage clients to shift their thinking from "What does it cost to build?" to "What will it cost to own and operate this building for the next 50 years?" Sustainable design is all about maximizing long-term profitability and asset value.

Can an Old Building Really Become Environmentally Friendly?

Absolutely. In fact, giving an existing building a new life is one of the most powerful sustainable moves you can make. This approach, often called adaptive reuse, preserves the massive amount of embodied carbon locked into the original structure—that’s all the energy that was spent manufacturing and transporting every brick, beam, and window.

Modernizing an older building for high performance is a well-established practice. The key is to blend thoughtful upgrades with the building’s original character. Common strategies include:

  • Adding modern, high-performance insulation to the walls and roof.
  • Replacing old, drafty windows with energy-efficient ones that respect the original aesthetic.
  • Swapping out oversized, outdated HVAC equipment with new, efficient systems properly sized for the space.
  • Integrating renewable energy, like discreetly placed solar panels that don't compromise the building's look.

Historic preservation projects are a perfect example of this balance, proving you don't have to choose between character and efficiency. You can have both.

What Is the First Step for a New Green Building Project?

The single most important first step is committing to an integrated design process. This isn't just a buzzword; it's a fundamental shift in how projects are managed. It means getting the owner, architect, engineers, and contractor in the same room from day one, before any lines are drawn.

When everyone is at the table from the beginning, sustainability becomes a core goal of the project, not an expensive feature you try to add later. This early collaboration is where the magic happens. The team can set clear goals (like targeting a specific LEED certification), analyze the site to take full advantage of sun and shade, and use energy modeling to test ideas and make informed decisions.

Starting with this unified vision is the best way to deliver a high-performance building that meets your goals, on time and on budget.


At Sherer Architects, LLC, we specialize in guiding clients through every stage of design and construction, turning complex challenges into beautiful, enduring, and sustainable results. Learn how our expertise in commercial architecture, adaptive reuse, and historic preservation can maximize the value of your next project.

Categories
Uncategorized

Master ‘construction documentation management’ for Efficient Projects

Managing construction documents is more than just digital housekeeping. It's the disciplined process of organizing, sharing, and tracking every single file that makes a project tick—from the first napkin sketch to the final closeout package.

The entire point is to make sure everyone, from the architect in the office to the crew in the field, is working off the latest and greatest information. Get this right, and you dodge the costly rework and frustrating delays that plague so many jobs.

Building Your Foundation for Document Control

Before you get distracted by shiny new software, remember this: the success of your construction documentation management is built on the rules you set before you ever log in. Jumping straight into a tech solution without a solid framework is like pouring a slab on un-compacted soil—it’s going to crack.

This initial groundwork is what kills miscommunication, establishes who's responsible for what, and creates that "single source of truth" that protects your project. It's about building a culture of precision that directly defends your timeline and budget.

Establishing Clear Documentation Standards

First things first, you need to create documentation standards that are dead simple for everyone to follow. Think of these standards as the universal language for your project. If an architect, a sub, and a PM all have different ideas of what a "complete" submittal package looks like, you're headed for chaos.

Your standards need to spell out the exact requirements for key documents. For example:

  • Drawings: Be specific. Mandate what goes in the title block, define your layering standards, and lock in the required file formats (e.g., PDF, DWG).
  • RFIs: Don't leave it to chance. Use a standard template that demands a clear question, references the specific drawing, and sets a hard deadline for the answer.
  • Submittals: Create a checklist. Outline every piece needed for a complete submission, like product data sheets, physical samples, and shop drawings.

These aren't just arbitrary rules. They are the guardrails that keep thousands of documents consistent and reliable.

Creating Logical Naming and Versioning Protocols

If you can't find a document, you might as well not have it. A logical and consistent naming convention is absolutely non-negotiable. Without it, your shared drive turns into a digital junk drawer.

A practical naming convention could look something like this:

ProjectNumber_Discipline_DocumentType_Description_Date
1234_ARC_DWG_FloorPlan-L1_20251028

This simple structure makes every file instantly identifiable and searchable. Equally important is how you handle updates. Solid document version control is the bedrock of good practice, stopping errors before they happen by ensuring everyone is on the same page.

A simple versioning protocol can save a project from disaster. I've seen teams use "v1.0" for major revisions and "v1.1" for minor tweaks. This immediately tells anyone looking at the file how significant the change is. When a revision is superseded, it gets archived—never deleted—to maintain a complete project history.

This one habit prevents that classic, costly mistake: a crew building from an outdated drawing. Rework is the most expensive symptom of poor document control.

Defining Roles and Responsibilities

At the end of the day, a system is only as good as the people using it. You have to clearly define who is responsible for what. This isn't about micromanaging; it's about giving everyone clarity and ownership.

A simple responsibility matrix (you might know it as a RACI chart) is a great tool for this. It maps out who is:

  • Responsible: The doer (e.g., the subcontractor drafting the shop drawing).
  • Accountable: The owner of the final decision (e.g., the PM who signs off on the submittal).
  • Consulted: The experts who give input (e.g., the architect or engineer).
  • Informed: The stakeholders kept in the loop (e.g., the client).

When everyone understands their part in a document's journey—from creation and review to approval and distribution—bottlenecks just melt away. This clarity turns your document system from a passive filing cabinet into an active tool for getting the job done right.

Designing Essential Documentation Workflows That Work

Once you've laid the groundwork with your documentation standards, it's time to map out the actual paths those documents will travel. Think of these workflows as the project's circulatory system. When they’re flowing smoothly, information gets exactly where it needs to go, keeping the job alive and healthy. But when they get clogged, the entire project can suffer from some seriously costly delays.

These aren't just abstract flowcharts you draw up once and forget. A well-designed workflow for something as common as a Request for Information (RFI), a change order, or a submittal is what stops a simple question from turning into a two-week work stoppage. It creates a predictable, repeatable process that everyone—from the architect down to the newest subcontractor—can actually understand and follow.

The diagram below breaks down the core pieces that form the foundation of any solid document workflow.

A process flow diagram detailing document foundation steps: Standards, Naming, and Roles.

As you can see, clear standards, consistent naming conventions, and well-defined roles are the sequential building blocks. Get these right, and you're well on your way to creating reliable and efficient processes.

Mapping the RFI Workflow

The humble RFI is the perfect example of a small document with the potential for massive disruption. An unclear drawing detail or a conflict in the specs can bring an entire crew to a grinding halt. A sloppy, informal RFI process just pours salt in the wound, letting that simple question fester for days or even weeks.

A robust RFI workflow has to clearly define every single step of the journey:

  1. Initiation: The process kicks off when a subcontractor or site supervisor spots a problem. They submit the RFI through a central system, making sure to reference the exact drawing number and location. No vague questions allowed.
  2. Initial Review: The GC's project manager immediately vets the RFI for clarity and legitimacy. Is this a real issue, or could the answer be found by simply re-reading the existing documents?
  3. Assignment: The PM then routes the RFI to the right person—usually the architect or a specific engineering consultant. An automated notification goes out with a firm deadline for a response.
  4. Response & Review: The architect or engineer provides a definitive answer. Crucially, that response comes back to the PM first, who confirms it actually resolves the issue before it goes any further.
  5. Distribution & Closure: The official response is logged and automatically pushed out to everyone impacted by the clarification, including the person who asked in the first place. The RFI is then formally closed, creating a permanent, traceable record.

This structured path builds in accountability and turns what could be a major delay into a routine clarification.

Streamlining the Submittal Process

Submittals are all about getting the green light on materials and equipment so you can get them ordered on schedule. A disorganized submittal process is a direct threat to your project timeline, especially when it comes to long-lead items.

Your workflow for submittals—covering everything from shop drawings to product data sheets—needs to be just as methodical.

  • Submission: The subcontractor uploads their complete submittal package into the project’s DMS. This is immediately logged against a predefined submittal register that keeps everyone honest about due dates.
  • GC Review: The project manager or engineer does the first pass, checking to ensure the submission actually complies with the contract documents.
  • Design Team Review: Once it clears the GC, the package is forwarded to the architect and relevant engineers for their formal review and stamp.
  • Action & Return: The design team sends the submittal back with a clear, non-negotiable status: "Approved," "Approved as Noted," "Revise and Resubmit," or "Rejected."
  • Final Distribution: The official, stamped submittal is distributed back to the subcontractor, giving them the official go-ahead to start procurement.

I once worked on a project where a two-month delay on window delivery was traced back to a submittal package just sitting in an architect's inbox, unforwarded. A simple, transparent workflow with automated reminders would have saved tens of thousands of dollars in schedule impacts.

Taming the Change Order Workflow

Nothing hits a project's budget and schedule quite like a change order (CO). Because of their serious financial and legal weight, COs demand a workflow with an ironclad audit trail. The whole process must be transparent, efficient, and leave absolutely no room for misinterpretation.

The journey of a change order should be meticulously tracked from start to finish:

  1. Identification: The need for a change is identified, often sprouting from an RFI response, a direct owner request, or an unforeseen condition discovered on site.
  2. Pricing: The GC immediately requests pricing for the proposed change from every subcontractor who will be affected.
  3. Review & Assembly: All the costs are compiled by the GC, who reviews them for fairness before assembling the formal Change Order proposal for the owner and architect.
  4. Approval: The owner and architect review the CO. This stage can often involve some back-and-forth negotiation before a final signature is secured.
  5. Execution: Once the CO is fully executed, it’s distributed to all parties, and the accounting department is notified to officially adjust the contract value.

If you want to dig deeper into the nuts and bolts of setting these up, check out a comprehensive guide to documentation workflow management for more best practices. By creating these clear, logical, and repeatable processes, you build a system that crushes bottlenecks before they even form and keeps the entire team communicating seamlessly.

Selecting and Implementing Your Digital Toolkit

A construction worker uses a phone next to a laptop displaying construction plans and a blue hard hat on a wooden table.

Making the leap from overflowing binders and messy shared drives to a dedicated Document Management System (DMS) is one of the most powerful moves you can make. This isn't just about saving paper; it’s about giving your project a central nervous system. The right digital toolkit provides your entire team with a single, reliable source of truth they can access from anywhere.

The first step, and it's a big one, is picking the right DMS. The market is flooded with options, but a handful of core features are absolutely non-negotiable for any serious construction documentation management platform. Without them, you're just swapping one messy system for another.

Non-Negotiable DMS Features

Your shopping list should start with features that solve real-world problems on the job site. You're not looking for a digital filing cabinet—you need an active project partner.

Here’s what to insist on:

  • Cloud-Based Access: Your documents need to live in the cloud, not on a server in a back office. This is the only way the PM on-site, the architect at their desk, and the owner across the country can all be confident they're looking at the same file.
  • Mobile-First Capability: So much of the real work happens in the field. If your team can't pull up the latest drawings or submit an RFI from a tablet or smartphone, the system is fundamentally broken.
  • Powerful Search Functions: Wasting 10 minutes digging for a specific submittal is 10 minutes of lost productivity. A quality DMS has robust search tools that let you find any document in seconds using keywords, dates, or metadata.
  • Automated Version Control: This is the feature that single-handedly stops rework. The system must automatically archive old versions and push the current, approved document to the forefront. It’s the best way to prevent a crew from building off an outdated plan.

I consulted on a project that was bleeding money from rework. The root cause? Version confusion between two key subcontractors. Implementing a DMS with automatic version control immediately solved the problem, saving them an estimated $50,000 on that project alone by preventing just one major mistake.

When choosing a DMS, it’s helpful to compare what's out there. The right features can make or break your project's flow.

Key Features of a Modern Construction DMS

Feature Description Impact on Project Efficiency
Cloud-Based Access & Mobile App Allows real-time access to all documents from any device, anywhere. Eliminates delays waiting for information from the office; decisions can be made instantly on-site.
Automated Version Control Automatically archives old document versions and ensures only the current one is accessible. Drastically reduces the risk of costly rework from using outdated plans or specifications.
Customizable Workflows Enables setting up automated approval processes for RFIs, submittals, and change orders. Speeds up review cycles and ensures no document gets lost in someone's inbox.
Robust Search & OCR Powerful keyword search, metadata tagging, and Optical Character Recognition (OCR) for scanned docs. Finds any document in seconds, saving hours of manual searching and boosting productivity.
Integration Capabilities Connects seamlessly with project management software, BIM platforms (e.g., Revit), and accounting systems. Creates a single source of truth, breaks down data silos, and reduces double-entry.
Role-Based Permissions Allows granular control over who can view, edit, and approve specific documents and folders. Protects sensitive information and simplifies the user interface by only showing relevant data.

Looking at a table like this makes it clear: a modern DMS is less about storage and more about actively managing the flow of information to keep your project moving forward.

Structuring Your Digital Filing System

Once you've picked your tool, you have to bring some order to the chaos. Don't just drag and drop your existing mess of folders into the new system. This is your chance to build a logical, scalable structure from the ground up.

Start with top-level folders that mirror your project's lifecycle. A simple, effective setup might look like this:

  1. 01-Contracts & Legal
  2. 02-Permits & Compliance
  3. 03-Design Documents
  4. 04-Submittals & Shop Drawings
  5. 05-RFIs & Change Orders
  6. 06-Safety & Inspections
  7. 07-Project Photos
  8. 08-Closeout Package

Inside each of these, create subfolders organized by discipline (Architectural, Structural, MEP) or by subcontractor. The key is consistency. Whatever structure you decide on, apply it to every single project without exception.

Integrating for a Single Source of Truth

A standalone DMS is good, but an integrated one is game-changing. The real magic happens when your document system communicates with your other critical software, especially your Building Information Modeling (BIM) and project management platforms like Procore or Autodesk Construction Cloud.

This integration creates that elusive "single source of truth." When an RFI is logged in your PM tool, the related documents in the DMS are automatically linked. When a change is made in the BIM model, the updated drawings get pushed to the DMS, and everyone is notified. This interconnectedness shatters data silos and ensures every decision is based on complete, current information.

As we move through 2025, artificial intelligence is taking this even further. AI is set to automate up to 70% of routine documentation tasks like sorting files and checking for compliance. Modern systems using optical character recognition (OCR) and natural language processing (NLP) can scan a handwritten form, figure out what it is, and route it to the right person for approval. This technology is already cutting human error rates from 15-20% down to under 2%. To dig deeper into this, you can find additional insights on efficient construction document management.

Driving Adoption Through Training and Permissions

The final piece of the puzzle is your people. You can invest in the best system in the world, but it's worthless if no one uses it correctly. Getting this right comes down to two things: smart permissions and hands-on training.

Set up role-based permissions from day one. Your subcontractors should only be able to see and upload to their specific folders. Project managers need wider access, while owners might get view-only rights to key financial and progress documents. This not only protects sensitive information but also keeps the interface clean and simple for each user.

Finally, train your team. I don’t mean sending out a memo. Hold a hands-on session where you walk through the core workflows for RFIs, submittals, and daily reports. When you show people exactly how this tool will make their jobs easier, not harder, they'll actually want to use it.

Adapting Your System for Specialized Projects

A man in a blue shirt meticulously reviews and writes on construction blueprints on a wooden table outdoors.

A rigid, one-size-fits-all approach to construction documentation management is a recipe for failure. The core principles of control and access always apply, of course, but the day-to-day realities of a high-rise commercial build are worlds apart from a delicate historic landmark restoration. Every specialized project comes with its own unique risks, regulations, and headaches, demanding a documentation strategy that’s just as specialized.

If you don't adapt your system, you’re guaranteed to miss the critical details that blow up budgets, derail schedules, and lead to compliance nightmares. The real trick is to think through the project's specific documentation needs before you even break ground. That way, you can build a customized framework that's ready for the challenges you know are coming.

Commercial Builds: Taming MEP and Subcontractor Chaos

Large-scale commercial jobs are beasts of complexity. The sheer volume of subcontractors and the intricate dance of Mechanical, Electrical, and Plumbing (MEP) systems can be overwhelming. Your documentation system has to be a well-oiled machine, capable of handling a flood of submittals, RFIs, and coordination drawings without grinding to a halt.

For these projects, it's all about seamless information flow and clash detection. Your strategy needs to focus on:

  • Dedicated MEP Submittal Tracking: Don't just dump everything into one folder. Create specific, clearly labeled folders for every single MEP component, from air handlers to switchgear. Your submittal log should track more than just an approval status—it needs to include fabrication and delivery lead times.
  • Airtight Coordination Drawing Versions: With so many trades squeezed into tight spaces, version control for coordination drawings is non-negotiable. Your system must make it painfully obvious which BIM model and composite drawings are the most current to prevent incredibly expensive on-site clashes.
  • Streamlined Subcontractor Onboarding: Set up a standard digital package for every new sub. This should include direct links to the current drawing set, project-specific safety protocols, and the reporting templates you expect them to use. Consistency from day one is key.

Here's a classic mistake on big commercial jobs: treating all submittals as equals. A submittal for the lobby tile simply doesn't have the same urgency as the one for a custom-fabricated electrical panel with a 20-week lead time. Your system has to be smart enough to flag and fast-track these critical-path items.

Adaptive Reuse: Documenting the Great Unknown

Adaptive reuse projects—like turning an old warehouse into loft apartments—are all about managing discovery. You’re not starting with a clean slate; you're starting with a building full of secrets hidden behind walls and under floors. In this scenario, your documentation system has to become a living, breathing log of every discovery and decision made along the way.

The name of the game is meticulously documenting existing conditions and tracking every single change as unforeseen issues pop up.

  • The Existing Conditions Report: This is your project bible. Use a mix of 3D laser scans, heavily annotated photos, and detailed field notes to create an exhaustive baseline before a single wall comes down.
  • A "Discovery" RFI Workflow: Create a specific RFI category just for unforeseen conditions. This special workflow should immediately ping the owner, architect, and structural engineer to get a solution hammered out fast.
  • The Materials Log: Document everything you find. Some materials might be hazardous (like asbestos or lead paint) and require detailed abatement records. Others might be salvageable for reuse, which can impact both the budget and sustainability goals.

The success of an adaptive reuse project often comes down to how quickly the team can document a surprise, figure out a solution, and get it approved. A slow or messy process here will bring the entire job to a standstill.

Historic Preservation: A Masterclass in Detail and Compliance

Working on a historic preservation project is a whole different ballgame. The guiding principle is protecting the building's historical integrity, which means every move is scrutinized by preservation boards, historical commissions, and government agencies. Your documentation has to be ironclad—the undeniable proof of your compliance and craftsmanship.

Your system transforms into a detailed, historical record of the entire process.

  • Meticulous Materials Research and Matching: You'll need to create detailed files for every original material, complete with research on historical construction methods. When you propose a new material as a match, the submittal must include side-by-side photo comparisons and spec sheets that justify your choice beyond any doubt.
  • Formal Mock-Up Approvals: Before you touch a large area—say, repointing a brick facade or restoring original windows—you must document the creation and formal approval of physical mock-ups. Use time-stamped photos and get actual signatures on approval forms.
  • Bulletproof Tax Credit Documentation: Many of these projects are funded by historic tax credits. Your document system absolutely needs a dedicated section to organize every application, report, and piece of correspondence required to secure and maintain that crucial funding.

On projects like these, your documentation system is far more than an organizational tool. It's a critical risk management asset that actively protects your budget, your schedule, and your company's reputation.

Managing Legal Compliance and Long-Term Retention

So, the punch list is done, the owner has the keys, and everyone’s celebrating a successful project. You might think it’s over, but for your project documents, their most important job is just beginning. Every contract, change order, RFI, and safety log now shifts from being an active project tool to a permanent legal record.

Thinking about long-term storage isn’t just about digital housekeeping. It's a core part of your company's risk management strategy.

A clean, easy-to-search archive is your single best defense if a claim, warranty issue, or lawsuit pops up down the road. Imagine getting a call three years from now about a supposed material failure. Without a clear, auditable trail of approved submittals and correspondence, you're digging through old hard drives and emails, trying to prove you did everything right. With a solid construction documentation management system, you can pull that proof in minutes.

This isn't a niche concern anymore. The document management services industry in the US hit $8.7 billion in 2025, largely because construction firms are getting serious about handling their mountain of paperwork. You can see more on the document management market on ibisworld.com.

How Long Do You Really Need to Keep This Stuff?

Knowing what to keep is one thing; knowing how long to keep it is another. While the rules can differ by state and contract, there are some solid industry standards that should form the baseline of your retention policy. Get this wrong, and you could be facing serious legal and financial heat.

The main drivers here are the statutes of limitation and statutes of repose. The first sets a deadline for filing a lawsuit after damage is discovered. The statute of repose, which is often more critical in construction, sets a hard-and-fast deadline from the project’s completion date, no matter when a defect is found.

Here’s a quick-and-dirty guide for how long to hang onto key documents:

  • Contracts and Change Orders: These are the legal heart of the project. Plan on keeping them for at least 10 years post-completion, but check your state’s statute of repose and go with whichever is longer.
  • As-Built Drawings and Specs: This is the final word on what was actually built. 10 years is the standard best practice here.
  • Safety Records (OSHA Logs, etc.): Don't guess on these. Regulatory bodies have their own rules. OSHA, for instance, requires you to keep injury and illness records for 5 years.
  • Warranties and Closeout Docs: The simple rule here is to keep them for the entire duration of the longest warranty period, which can easily be several years.

A well-structured digital archive becomes your corporate memory. It ensures that the critical knowledge from a project doesn't walk out the door when a project manager retires or moves on.

Archiving and Retrieval That Actually Works

Let's be clear: dragging a bunch of files into a folder named "Archive" isn't a strategy. The real goal is to build a secure, searchable archive that a complete stranger could navigate ten years from now. Your digital closeout package should be a perfectly organized, self-contained history of the project.

First, lock it down. Once a project is officially closed out, the archive should become read-only. This prevents accidental changes or deletions and preserves the integrity of the record. Storing this final archive in a secure cloud environment with redundant backups is non-negotiable—it protects you from catastrophic data loss.

This is where all that hard work you put into your file naming and folder structure at the beginning of the project really pays off. When everything is consistent, anyone in your company should be able to find a specific RFI from six years ago based on the file name alone. That’s how you build a durable and, most importantly, defensible project history.

Common Questions About Construction Documentation

When you're knee-deep in a project, questions about managing paperwork are bound to come up. It's especially true when you're shifting from the old-school paper trail to a more organized digital system. Here are some of the things project managers and contractors ask us most often.

What's the Single Biggest Mistake People Make with Document Control?

Hands down, the most common and costly error is not having a single source of truth. It’s a classic problem: drawings live in a dozen different places. You've got some on the main server, a few more floating around as email attachments, and the superintendent has a critical set saved directly to their laptop.

This kind of fragmentation is a recipe for disaster. Sooner or later, someone will build off an outdated drawing. That one mistake can lead to significant rework, blowing the budget and throwing the schedule completely off track. A centralized Document Management System (DMS) is the only way to guarantee that everyone—from the architect to the field crew—is looking at the exact same, most current file.

How Can I Get My Field Teams to Actually Use the New System?

Field adoption is everything, and it boils down to two things: simplicity and mobile access. If your foreman has to pinch and zoom on a tiny phone screen or navigate through ten menus just to find a drawing, they’ll go right back to their paper copies. You have to choose a system with a clean, intuitive mobile app that works well on a tablet.

Training is the other piece of the puzzle. Skip the corporate overview and get right into practical, hands-on sessions that mirror their daily tasks. Show them exactly how to:

  • Pull up the latest drawing set on their tablet.
  • Snap a few photos and attach them to a daily report right from their phone.
  • Find the most recent RFI response without having to call the office.

When you prove the tool makes their job easier, not harder, they'll get on board.

The moment a site superintendent can pull up a specific submittal in 30 seconds to answer a subcontractor's question on the spot, they're sold. The value becomes real, saving them time and preventing a costly mistake before it happens.

What's the Best Way to Name Construction Files?

There's no single magic formula, but consistency is king. The goal is to create a logical, descriptive structure that makes every file instantly searchable and understandable. A solid naming convention is your first line of defense against digital chaos.

We've found a format that includes a few key identifiers works wonders:

ProjectNumber-Discipline-DocumentType-Description-Date

For instance, a file named 2401-ARC-DWG-L2_FloorPlan-20251105.pdf tells you everything you need to know at a glance. It's for project 2401, it's an architectural drawing of the second-floor plan, and it was issued on November 5, 2025. This disciplined approach makes finding any document quick and foolproof.

Isn't a DMS Just a Fancier Version of Dropbox?

That's a common misconception. While tools like Google Drive or Dropbox are great for basic file sharing, they aren't true document management systems. They just don't have the construction-specific features you need to manage risk and maintain control over the project.

Here’s a quick breakdown of the key differences:

Feature Cloud Storage (e.g., Dropbox) Construction DMS
Version Control Manual; easy to overwrite files. Automatic; archives all old versions.
Workflows None; relies on manual emailing. Built-in and automated for RFIs, submittals.
Permissions Basic folder-level access. Granular, role-based security controls.
Audit Trails Limited tracking of views/downloads. Detailed, unchangeable logs of all actions.

Think of it this way: a dedicated DMS is an active project management tool that enforces your processes. Cloud storage is just a passive digital filing cabinet.


At Sherer Architects, LLC, we build our success on a foundation of meticulous planning and flawless execution, where superior document control is non-negotiable. Whether you are developing a commercial property, pursuing an adaptive reuse project, or preserving a historic landmark, our decades of experience ensure every detail is managed with precision. Let us bring structure and clarity to your next project.

Start your project with us today

Categories
Uncategorized

Unlocking the Design Processes in Architecture From Vision to Reality

Bringing a building to life is a journey, not a single leap. The design processes in architecture provide a structured, proven path that takes a project from a simple idea all the way to a finished structure. Think of it less as a rigid set of rules and more as a collaborative roadmap, ensuring your vision, budget, and goals are carefully translated into a functional, safe, and beautiful building.

Your Architectural Journey From First Sketch to Final Build

Starting an architectural project without a clear process is a bit like setting off on a cross-country road trip without a map. You know where you want to go, but the route is a mystery, full of wrong turns and unexpected delays. The architectural journey is a deliberate, multi-stage partnership between you and your architect, designed to turn your concept into a physical reality.

Each phase logically builds on the one before it. This ensures every decision is thoughtful, every detail is considered, and the final result is exactly what you hoped for. When you understand these stages, you’re no longer just a passenger; you become an informed co-pilot, ready to make smart decisions, manage your budget, and know what’s coming next. This professional, methodical approach is why the global architectural services market was valued at around $383.65 billion and is expected to climb to $557.29 billion by 2032. The value is in the guidance. If you're curious, you can explore more architecture industry statistics to get a sense of the industry's scale.

A Map of the Design Process

To get our bearings, let's visualize the entire journey as a timeline with six key destinations. Each stop is a critical phase where specific tasks are completed before we can move on to the next.

This flowchart lays out the six core stages of the architectural process, from the initial brainstorming sessions of pre-design to the final oversight during construction.

A comprehensive flowchart outlining the 6 stages of architecture, from pre-design to construction, with associated timelines.

As you can see, the process flows from big-picture ideas to incredibly fine-tuned technical details. This progression makes sure we get the foundation right before we start creating the final, detailed instructions for the builders.

Understanding Each Phase's Purpose

Every stage has a unique purpose, demanding different levels of input from you and producing specific documents and drawings. Knowing what’s happening at each step demystifies the whole experience and helps build a stronger, more effective partnership with your design team.

Great architecture is not born from a single moment of inspiration. It is the result of a rigorous, phased process that carefully balances vision with practicality, creativity with regulation, and budget with ambition.

To give you a quick reference, here's a look at the key stages in the architectural design process, their main goals, and how much of the project timeline they typically occupy.

The 6 Key Stages of Architectural Design

Phase Primary Goal Typical Timeline %
1. Pre-Design Define the project's goals, scope, and budget. 2–5%
2. Schematic Design Translate the program into broad design concepts. 10–15%
3. Design Development Refine the design, selecting materials and systems. 15–20%
4. Construction Docs Create detailed drawings for permitting and building. 35–40%
5. Bidding/Negotiation Select a contractor to build the project. 3–5%
6. Construction Admin Oversee construction to ensure it matches the design. 20–25%

This table provides a high-level snapshot. We'll dive much deeper into each of these phases throughout this guide, exploring what happens, who’s involved, and what it means for you.

Establishing the Foundation of Your Project

Architectural design workspace with house plans, a model, and a "DESIGN JOURNEY" notebook on a wooden desk.

This is the moment your vision starts its journey into the real world. The beginning of any architectural project is where the most critical decisions are made—the ones that ripple through every subsequent phase, impacting everything from your budget to your final move-in date. It's like laying the foundation for a skyscraper; if the base isn't meticulously planned and flawlessly executed, the entire structure is compromised.

We're going to walk through the first two key phases in the design processes in architecture: Pre-Design and Schematic Design. Think of them as the strategic heart of your project, turning abstract goals into something you can actually see and discuss. Honestly, this is where your input as a client matters most.

Pre-Design: The Discovery Phase

Before anyone even thinks about drawing a line, a great project begins with a conversation. In fact, it starts with a whole series of conversations. This is the Pre-Design phase, a deep-dive investigation where you and your architect collaborate to define the soul of the project. It's all about asking the right questions to make sure everyone is on the same page.

The main goal here is to develop a detailed architectural program. And no, that's not a piece of software. It’s a comprehensive document—a project playbook, really—that spells out exactly what this new building needs to be and do.

A solid program will cover:

  • Project Goals: What is the core purpose of this building? What problems is it meant to solve for you?
  • Functional Needs: How many rooms do you need? Just as important, how do people need to move between them? What specific activities will happen here?
  • Budgetary Constraints: This means having a frank, realistic discussion about the total project cost, from construction and materials to professional fees.
  • Site Analysis: We’ll study the property itself—zoning codes, the lay of the land, how the sun hits it, and any other environmental factors that will shape the design.

This phase is pure strategy. By nailing down the scope with this level of detail, we head off expensive changes and frustrating miscommunications down the line.

Schematic Design: Giving Ideas a Form

Once we have the program locked in, we can move into Schematic Design. This is where the magic really starts to happen, as all those abstract ideas from Pre-Design get translated into the very first visual concepts. It’s an exciting time, because you finally get to see what your project might look like.

Don't expect detailed blueprints yet. At this stage, your architect will be creating broad-stroke drawings and simple models. It's a highly creative and iterative process focused on exploring the big-picture possibilities, not getting bogged down in the tiny details.

Schematic Design is the bridge between the 'why' and the 'what.' It’s where we test big ideas, explore the building’s personality, and establish a clear direction that will guide the rest of the design process.

The work produced here is intentionally conceptual, designed to spark conversation and get your feedback. You’ll typically see things like:

  • Rough Sketches and Massing Models: Simple 3D models, either physical or digital, that show the building's overall size, shape, and how it sits on the property.
  • Basic Floor Plans: These diagrams illustrate the general layout and show how different rooms and spaces relate to one another.
  • Site Plans: These drawings show how the building connects to its surroundings, including things like driveways, walkways, and initial landscaping ideas.

To really get the functional relationships right, architects often use conceptual tools like an interior design bubble diagram to map out how different spaces should connect and flow. This helps ensure the layout feels intuitive and works efficiently before we commit to a specific design.

Your feedback during this phase is absolutely essential. Now is the time to say what you love, what you're not so sure about, and why. Moving a room is easy on a schematic sketch, but it becomes exponentially more difficult and expensive once we start creating detailed construction drawings. When you sign off on a schematic design, you’re setting the fundamental course for the entire project.

Refining the Blueprint for Construction

Two designers review architectural blueprints and tools on a table, with 'FIRST CONCEPTS' visible.

The creative energy of Schematic Design has given the project its soul and direction. But how do you turn those initial concepts into a building that can actually stand up? That critical jump from a broad idea to a buildable reality happens across two of the most technically demanding phases: Design Development (DD) and Construction Documents (CD).

If Schematic Design was the initial sketch on a napkin, these next two stages are where we create the incredibly detailed, full-color painting.

This is where the design processes in architecture shift from asking "what if?" to defining "exactly how." Your architect's team will start coordinating with a small army of specialized consultants—structural engineers, mechanical and electrical experts, civil engineers—to weave all the complex systems into the design. It's an intense period of problem-solving that solidifies every detail and sets the stage for a smooth construction process.

Design Development: Getting Serious with the Details

Think of the Design Development phase as the project's adolescence. The basic identity we established earlier begins to mature, gaining real substance and specific characteristics. The floor plans and exterior look you approved are now fleshed out with a much deeper layer of detail, and critical decisions get locked in for good.

This isn't just about aesthetics anymore; it's about performance. During DD, the team makes firm commitments on major building components that define the building's character and long-term durability.

Your job here is to make the final call on key selections. The big-picture layout is set, but we'll need your input on things like:

  • Material Selections: Finalizing the exterior materials like brick, siding, or metal panels, and choosing key interior finishes.
  • Fixture and Appliance Choices: Picking out the specific plumbing fixtures, lighting, and major appliances that will be installed.
  • Window and Door Specifications: Selecting the exact types, styles, and performance ratings for all windows and doors.

This phase results in a set of drawings and specifications far more detailed than anything you've seen yet. They show precisely how the building is put together, confirming that all its parts and systems work in harmony.

Construction Documents: Creating the Instruction Manual

Once Design Development is done and you've signed off on the refined design, the project moves into the Construction Documents (CD) phase. This is the longest and most demanding stage for the design team, often taking up 35-40% of the entire design schedule. The goal is simple but massive: create a comprehensive, legally binding set of instructions that tells a contractor exactly how to build your project.

Imagine you've bought a highly complex piece of furniture that arrives in hundreds of pieces. The Construction Documents are the hyper-detailed, step-by-step instruction manual that ensures every single bolt, panel, and screw ends up in the right place. Without it, you’d just have a pile of expensive parts.

The quality of the Construction Documents directly impacts the quality, cost, and timeline of the final build. Thorough, well-coordinated documents minimize ambiguity, leading to more accurate contractor bids and fewer expensive changes during construction.

This essential set of documents is made up of two main parts:

  1. The Drawings (Blueprints): This is the set of technical drawings that visually lays out the work. It includes everything from floor plans with precise dimensions to intricate detail drawings showing how a window is flashed into a wall.
  2. The Specifications (Specs): This is a hefty written document that works with the drawings. It provides detailed qualitative requirements for materials, equipment, installation standards, and workmanship. For example, the drawings show a wall, but the specs define the exact type of drywall, the stud spacing, the paint manufacturer and color, and the required quality of the finish.

This documentation is what you'll need to get building permits and what contractors will use to bid on the job. This is where the $249.2 billion global architectural services industry really proves its worth, managing incredible complexity to mitigate risk for clients. The industry is composed of around 326,000 businesses, all focused on turning intricate designs into tangible assets. For a closer look at the sector, you can review key architecture industry outlook data.

Protecting Your Investment Through Meticulous Planning

All the painstaking effort that goes into the DD and CD phases serves one primary purpose: to protect your investment. By solving design puzzles and coordinating all the building systems on paper, your architect prevents costly surprises and frustrating delays on the job site.

When a contractor has a clear, complete set of documents, they can give you a more accurate and competitive price. Ambiguity in the plans forces builders to guess, and they’ll often pad their bids to cover those unknowns. Worse, changes made once construction is underway are exponentially more expensive than changes made on paper. Thorough planning is the single best tool you have to keep your project on budget and on schedule.

Navigating Bids and Securing Approvals

Desk with architectural blueprints, a laptop, measuring tape, hard hat, and a sign saying 'DETAILED PLANS'.

With a complete set of construction documents, your project has reached a critical fork in the road. This is the moment the design on paper gets tested against the hard numbers of construction pricing and the detailed scrutiny of city officials. Two essential processes now kick off at the same time: finding the right builder and getting the legal green light to start digging.

This part of the design processes in architecture can feel a bit like spinning plates, but it’s all about protecting your investment. Your architect’s role changes here. They shift from being the primary designer to your strategic guide and advocate, helping you navigate the contractor selection process and the often-intimidating world of permits. Their experience is key to making sure this administrative hurdle is cleared smoothly, setting the stage for a successful construction launch.

Selecting Your Builder: The Bidding Process

Think of the construction documents as the official rulebook for the game. This phase, known as Bidding or Negotiation, is where you invite contractors to tell you how much it will cost to build your project based on that rulebook. The objective is simple: find a great builder who can execute the plans on time and on budget.

Generally, you have two main ways to pick a general contractor. Each comes with its own pros and cons, depending on your project’s needs and how you prefer to work.

  • Competitive Bidding: This is the classic approach, especially for public works or big commercial jobs. Your architect will send the plans out to a handful of pre-vetted contractors. They each come back with a sealed, fixed-price bid, and you typically award the job to the lowest qualified bidder. It’s a great way to ensure price transparency and competition.
  • Negotiated Contract: With this method, you pick a contractor you trust early in the process—sometimes even before the design is finished. You then work directly with them to negotiate a fair price. This path is far more collaborative and lets the builder give valuable feedback on costs and buildability as the design takes shape. It’s a popular choice when you already have a great relationship with a builder.

Your architect is your most valuable player here. They’ll help you vet the contractors, dig into the bids to make sure you're comparing apples to apples, and guide you toward a smart decision.

The architect's responsibility during the bidding process is to act as the client's trusted advisor. This involves clarifying the design intent for bidders and ensuring the bids received accurately reflect the full scope and quality detailed in the construction documents.

Securing Legal Go-Ahead: The Approvals Process

While you’re busy picking a contractor, your architect is simultaneously wrestling with the all-important approvals process. You cannot build anything until the local authorities have reviewed and stamped your plans, confirming they meet every relevant code and regulation. This is an absolute must for every single project.

How complicated this gets really depends on where you're building. At a minimum, it means submitting the drawings to the local building department. They’ll check your plans against building, fire, and energy codes.

But it often doesn't stop there. Many projects need a thumbs-up from several other agencies, each with its own schedule and requirements. These can include:

  • Zoning Boards: They make sure your project fits within the local rules for things like building height, property line setbacks, and parking.
  • Design Review Boards: In many towns and cities, these groups look at the project's aesthetics to ensure it fits with the community's character.
  • Historic Preservation Commissions: If you're working on a historic landmark or in a historic district, this commission has the final say on whether your plans are respectful of the building’s heritage.

Getting all these approvals can be a long and winding road, but your architect is your expert guide. They’ll prepare the paperwork, answer the tough questions from officials, and make any necessary tweaks to the plans to get them approved. Their firsthand experience with local agencies is what keeps the project moving forward and gets you the official clearance to start construction.

Ensuring Quality During Construction

An architect's job doesn't end when the blueprints are handed over. In fact, it shifts into one of the most crucial phases of the entire project: Construction Administration (CA). Think of your architect as your dedicated representative on the ground, the expert whose job is to protect your investment and ensure the vision we've developed together comes to life exactly as planned.

I like to compare it to a conductor leading an orchestra. The construction documents are the sheet music, and the contractor's team are the skilled musicians. The conductor’s role isn’t to play the instruments, but to ensure everyone is playing the right notes, in the right key, and at the right time. Without that oversight, the beautiful symphony on the page can easily turn into noise.

The Architect as Your On-Site Advocate

During construction, your architect becomes your eyes and ears, observing progress and making sure the work aligns with the plans. This isn't about micromanaging the builder; it's about safeguarding your interests and the integrity of the design. This active involvement is built around a few key, recurring tasks.

These responsibilities typically include:

  • Scheduled Site Visits: We'll be on-site at regular intervals and critical milestones to see the work firsthand. This lets us catch potential issues before they become expensive problems and answer questions on the spot.
  • Reviewing Payment Applications: Before you cut a check to the contractor, your architect reviews their invoice. We verify that the work you're being billed for has actually been completed and meets the quality standards outlined in the contract.
  • Answering RFIs (Requests for Information): It's completely normal for builders to have technical questions. We provide clear, timely answers to keep the project moving forward correctly.
  • Managing Change Orders: Sometimes, unexpected site conditions pop up, or you might decide you want to make a change. The architect manages this process formally, negotiating fair pricing and making sure any adjustments fit seamlessly into the overall design.

Protecting the Design Vision

A huge part of quality control comes down to reviewing submittals. These are the data sheets, material samples, and detailed shop drawings the contractor sends for approval before anything gets ordered or built. For example, we'll review the exact model of the windows, the specific batch of bricks, or the finish on a light fixture to confirm it’s precisely what was specified.

This attention to detail is especially important for custom features that give a building its unique character. Elements like intricate custom stone work require meticulous oversight to ensure the final installation matches the design intent in both material and craftsmanship.

Construction administration is the essential follow-through that transforms a well-designed project on paper into a well-built reality. It bridges the gap between design intent and final execution, ensuring the quality you paid for is the quality you receive.

Ultimately, having the architect involved through construction is your best insurance policy. It ensures the final building isn’t just a building, but the exact one you and your architect worked so hard to imagine. This diligent final phase is what brings your vision to life, just as you pictured it.

Common Questions About Architectural Design

Stepping into an architectural project for the first time can feel like learning a new language. It's only natural to have a lot of questions about how it all works, how much it will cost, and what's expected of you.

Getting a handle on the timeline, fees, and your own responsibilities is the best way to become a confident and informed partner in the process. Let's break down some of the most common questions we hear from clients.

How Long Does the Architectural Design Process Typically Take?

This is usually the first question on everyone's mind, and the honest answer is: it really depends. There's no single timeline that fits every project.

A small-scale interior renovation might move from an idea to construction-ready plans in just 3-6 months. A custom home, on the other hand, with all its personal details and complexities, could easily take 6-12 months for the design and permitting phases alone—before a shovel ever hits the ground.

For larger commercial or institutional buildings, the design process can stretch over several years. A few key things will always influence the schedule:

  • Project Complexity: The more detailed the design and the more sophisticated the building systems (like HVAC and electrical), the more time the Design Development phase will require.
  • Regulatory Hurdles: This is often the biggest wild card. Navigating zoning laws, city design review boards, and historic commissions can add significant and sometimes unpredictable delays.
  • Client Decision-Making: The pace of the project is directly tied to how quickly you can provide feedback and make decisions. Your involvement keeps the momentum going.

How Are Architectural Fees Typically Structured?

Architectural fees aren't one-size-fits-all. They’re usually structured in one of three ways, chosen based on the project’s scope and predictability. Understanding them helps you see how you'll be billed as the project progresses.

Typically, payments are tied to major project milestones. For instance, you might see invoices after the completion of Schematic Design, Design Development, and the Construction Documents. Once construction starts, billing usually shifts to a monthly schedule for Construction Administration services.

Here are the three most common fee structures:

  1. Percentage of Construction Cost: The architect's fee is a set percentage of the final construction budget. This often ranges from 8-15% and naturally scales the fee to the size and complexity of the project.
  2. Fixed Fee: A single, lump-sum fee is agreed upon before any work begins. This is a great option for projects where the scope is crystal clear and the path forward is straightforward.
  3. Hourly Rate: The architect bills for their time on an hourly basis. This structure is common for smaller projects, initial feasibility studies, or phases where the full scope isn't yet known.

What Is the Client's Most Important Role?

Your most critical role is to be the keeper of the vision and the primary decision-maker. This is especially true in the early stages of design. While your architect brings the design and technical expertise, you provide the "why" behind the project.

The client is the keeper of the vision. Your ability to communicate goals clearly in the beginning and provide decisive feedback throughout the process is the single most important factor in keeping a project on track, on budget, and true to its original purpose.

A great project is a partnership, and your active participation is what drives it forward. Your biggest contributions happen in the first half of the process:

  • Providing a Clear Brief: During Pre-Design, it's all about sharing your detailed vision—what you need the space to do, how you want it to feel, and what your budget looks like.
  • Offering Decisive Feedback: Your clear "yes" or "no" on the initial concepts during Schematic Design sets the direction for everything that follows.
  • Making Timely Choices: During Design Development, you'll be asked to select materials, fixtures, and finishes. Making these decisions on time is crucial for keeping the project moving toward construction.

What Is the Difference Between Design-Bid-Build and Design-Build?

These terms describe two different ways of structuring the team. The traditional process we've been walking through is what's known as Design-Bid-Build, but it's good to understand the alternative.

Design-Bid-Build
This is the classic approach. You hire an architect under one contract and a contractor under a completely separate one. The architect finishes the entire set of design drawings first. Then, those plans are given to several contractors who "bid" on the job, and you choose one to build it. This method is great for fostering price competition.

Design-Build
In this model, you hire a single firm under one contract to handle both the design and the construction. The architect and contractor are on the same team from day one. This integration can lead to better communication, faster timelines, and a single point of responsibility for you.

The right choice really depends on your priorities—whether that's cost certainty, speed, or a streamlined management process.


At Sherer Architects, LLC, we believe an informed client is an empowered one. Our team is here to guide you through every stage, making sure your vision is realized with clarity and confidence. If you're planning a commercial, adaptive reuse, or historic preservation project, let's start the conversation. Explore our services and see how we can bring structure to your vision.

Categories
Uncategorized

Mastering Construction Change Order Management

Handling change orders is the formal dance of documenting, reviewing, approving, and putting into action any shift from a project's original contract. It's the essential framework that keeps a project's scope, schedule, and budget in check, making sure everyone involved is on the same page.

Why Change Orders Are an Inevitable Part of Construction

Let's clear up a common misconception right away: change orders aren't a sign that someone messed up. In reality, they are a normal and necessary part of every single construction project. They're simply the mechanism for controlled evolution. The first step toward mastering the process is to stop seeing them as crises and start treating them as manageable events.

Changes pop up for all sorts of reasons. It could be the client suddenly wanting a higher-grade finish for the lobby flooring, or the excavation crew hitting an unexpected layer of bedrock that forces a redesign of the foundation. These kinds of adjustments aren't just common—they're practically guaranteed.

From Obstacles to Opportunities

If you think of every change order as an obstacle, you’re setting yourself up for a confrontational project. Experienced project managers know better. They go into a job expecting changes because they understand the initial blueprint is a well-informed starting point, not the final word set in stone.

This shift in mindset is everything. When a team is prepared for change, a new request doesn't cause panic. Instead, it triggers a calm, documented process. You move from a reactive "firefighting" mode to a proactive "solution-managing" one.

A well-managed change order is simply a documented conversation that protects the owner, the architect, and the contractor. It clarifies expectations and ensures fair compensation for new work, turning a potential point of conflict into a moment of structured collaboration.

The numbers don't lie. Research from the American Institute of Architects (AIA) looked at over 18,000 projects and found that 100% of them had at least one change order. The bigger the project, the more changes you can expect—smaller jobs averaged 1.7 change orders, while larger ones had nearly 12. You can dig into the AIA's findings to see how project scale and other factors come into play.

Ultimately, successful change order management comes down to having a solid system in place. A good process can absorb these modifications without derailing the entire project. The table below breaks down some of the most common triggers and what they typically mean for your schedule and budget.

Common Triggers for Construction Change Orders and Their Impact

This table breaks down the most frequent reasons change orders are initiated and the corresponding effects they have on project timelines and budgets.

Change Order Trigger Description Typical Impact on Schedule Typical Impact on Cost
Owner-Requested Changes The client decides to add, remove, or alter a feature after the contract is signed (e.g., upgrading materials, changing a room layout). Moderate to High Moderate to High
Errors or Omissions Mistakes or missing details in the original plans and specifications are discovered during construction. High High
Unforeseen Site Conditions Unexpected issues are found on-site, such as poor soil quality, hidden utilities, or hazardous materials. Moderate to High Moderate to High
Design Changes The architect or engineer refines the design to improve functionality, aesthetics, or performance. Low to Moderate Low to Moderate
Material/Labor Availability A specified material becomes unavailable or delayed, or there's a shortage of skilled labor, requiring substitutions. Moderate Low to Moderate
Code Revisions A building code or regulation changes after the project has started, forcing a design or construction adjustment. Low to Moderate Low to Moderate

Understanding these common triggers is the first step. With this context, we can now dive into the practical strategies and workflows needed to manage them effectively.

Building a Bulletproof Change Order Workflow

Flying by the seat of your pants with change orders is a sure-fire way to blow your budget, wreck your schedule, and sour relationships. Instead of reacting to every little shift, the pros build a structured, repeatable workflow. This isn't about adding red tape; it's about creating a clear and predictable path that protects everyone involved when things inevitably change.

The whole process kicks off the second someone spots a potential deviation from the contract. Catching it early is everything. A sub who notices a clash between the prints and what's actually on-site, or an owner who casually mentions a "small idea" they just had—both are triggers that need to be captured and documented right away. Ignoring these whispers is how a tiny tweak snowballs into a major project headache.

Most of the time, change orders bubble up from one of a few common sources: the client wants an upgrade, the site throws you a curveball, or there's an error or omission in the design that needs fixing.

Flowchart illustrating three common triggers for construction change orders: Upgrade, Site Issue, Design Fix.

As you can see, changes can come from anywhere—client inspiration, real-world discoveries, or a simple blueprint correction. Each one needs to be managed through the same steady, consistent process.

Crafting an Undeniable Change Order Request

Once you've identified a potential change, you need to formalize it with a Change Order Request (COR). Think of this document as your opening argument. A sloppy, half-baked COR is an invitation for pushback and delays. A well-crafted one greases the wheels for a smooth approval.

A truly solid COR does more than just say what's changing; it builds an airtight case. Here’s what it must include:

  • A Detailed Scope: Get specific. "Relocate wall" isn't going to cut it. You need something like, "Relocate the north wall of Office 101 three feet east. Scope includes demolition of existing wall, new steel stud framing, GWB on both sides, Level 4 finish, prime and two coats of paint to match existing, and relocation of two (2) electrical duplex outlets and one (1) data port."
  • Clear Justification: You have to explain why this is necessary. Is it an owner directive? A response to an unforeseen condition? Reference the specific RFI, drawing number (e.g., A-2.1), or meeting where the change was discussed. This context is critical.
  • A Transparent Cost Breakdown: This is non-negotiable. Break down the costs for materials, labor (with rates and estimated hours), equipment, and any sub-tier contractor quotes. Your markup for overhead and profit, typically a standard 10-15%, should have already been defined in the prime contract.
  • A Realistic Schedule Analysis: Don't just guess how much time it will add. The COR needs to clearly state the impact on the project timeline, showing exactly how many days are needed and how this change affects other critical path activities.

Navigating the Approval and Integration Process

With your rock-solid COR in hand, it's time for negotiation and approval. This shouldn't feel like a battle. When you present clear, thorough information, you’re not arguing; you're collaborating with the owner and architect to make an informed decision. Get the COR to them quickly, walk them through it, and be ready to explain the cost and schedule impacts.

The best negotiations happen when there's a foundation of trust and transparent data. A well-documented COR shifts the conversation away from haggling over price and toward collaboratively solving a problem for the good of the project.

Once the COR is signed by all the right people, it officially becomes a Change Order. But you're not done yet. The final, and most frequently missed, step is to weave that approved change back into the project's DNA.

This means taking several key actions immediately:

  1. Update the Contract: The change order is a legal amendment. It needs to be formally logged, numbered, and filed with the original contract documents.
  2. Adjust the Budget: The project's master budget must be revised right away to reflect the new contract value.
  3. Revise the Master Schedule: Any time extension from the change order has to be incorporated into the project schedule, pushing out milestones and the completion date accordingly.
  4. Distribute the Information: Get the approved change into the hands of the people who need it. The superintendent, the foreman, and the specific subs doing the work all need the updated drawings, specs, and direction.

Skipping this final integration phase is a rookie mistake. An approved change order that lives in a folder but not in the master plan creates chaos on site. It’s the very thing this workflow is designed to prevent. A bulletproof process follows the change from the first spark all the way to seamless execution in the field.

Clarifying Roles to Prevent Project Gridlock

Nothing grinds a project to a halt faster than confusion over a change order. When a change request lands and nobody's quite sure who owns the next step, you get a classic case of finger-pointing, missed emails, and delays that bleed money. A solid change order process isn't just about forms and software; it’s about people knowing exactly what they’re supposed to do and when.

Ambiguity is the enemy of progress on a job site. If roles aren't crystal clear from the pre-construction meeting, a simple owner request can trigger a chain reaction of chaos. The owner might think a verbal "go-ahead" is enough, the architect could sit on a technical review for a week, and the general contractor is left stuck in the middle, unable to price the work or direct their subs.

This kind of gridlock is entirely preventable. By defining and communicating each stakeholder's role before the first change order ever appears, you build a system of accountability. Everyone knows their part, from initiation to execution.

The Owner and The Architect

The Owner is the ultimate decision-maker. They're the one who typically initiates or must approve any change that impacts the budget or the timeline. Their most critical responsibility? Providing clear, timely decisions. A "maybe" or a delayed response has a serious ripple effect, holding up material procurement and scheduling for multiple trades down the line.

The Architect or Engineer is the technical authority. Their main job is to review a proposed change for design intent, code compliance, and sheer feasibility. They're the ones who ensure that a requested modification fits the overall project vision and won't create some unintended structural or MEP conflict. Their swift and thorough review is what keeps the process moving.

Think about a common scenario: an owner decides they want to add a large window to an exterior wall.

  • The Owner formally submits the request, usually to the GC.
  • The GC immediately forwards it to the Architect for a technical review.
  • The Architect has to verify if the change is structurally sound, how it affects the building envelope's performance, and if it still meets energy codes before giving a technical green light.

A delay on the architect’s desk can stall the entire process before anyone even talks about price.

The General Contractor and Subcontractors

The General Contractor (GC) is the central hub of the entire change order process. Think of them as the conductor of the orchestra. They're responsible for receiving the initial request, coordinating with the design team, and—most importantly—pricing the work and figuring out the real impact on the schedule. The GC gathers quotes from all affected subcontractors, compiles them into a comprehensive Change Order Request (COR), and presents the complete package to the owner for a final decision.

The Subcontractors are the boots on the ground, the specialists who provide the real-world cost and time estimates for their specific trades. When a GC asks for a price on a change, the subs have to respond quickly and accurately. Their input is the foundation of the whole COR; without it, the GC can't give the owner the complete picture. This is why clear, detailed communication from the GC to the subs is so vital—it prevents pricing errors and misunderstandings about the scope.

A well-defined responsibility matrix, often called a RACI chart, is one of the most powerful tools a project team can use. It strips away all the guesswork by mapping out exactly who is Responsible, Accountable, Consulted, and Informed for every step of the change order lifecycle.

To clear up any confusion from the start, we use a responsibility matrix like the one below. It's a simple but effective way to ensure everyone is on the same page.

Change Order Responsibility Matrix (RACI Chart)

Task/Decision Point Owner Architect/Engineer General Contractor Subcontractor
Identifies Need for Change R C C C
Submits Formal Request for Change A C R I
Reviews for Design & Technical Feasibility C A R C
Develops Scope & Gathers Sub Quotes I C A R
Prepares Cost & Schedule Impact Analysis I C A R
Submits Formal Change Order Request (COR) C I A I
Approves/Rejects Change Order Request A C I I
Issues Executed Change Order A I R I
Updates Contract Documents C R A I
Performs the Changed Work I I A R
Documents & Verifies Completed Change I C A R

This chart isn't just a document to be filed away; it's a living guide that prevents communication from breaking down. It ensures the right people are involved at the right time, turning what could be a contentious process into a smooth, collaborative effort.

By establishing this kind of clarity upfront, you transform change order management from a source of friction into just another structured, predictable part of running a successful project.

Creating Documentation That Stands Up to Scrutiny

When a change order goes sideways and fingers start pointing, your documentation is the only thing that matters. It’s your first, last, and best line of defense against claims, disputes, and costly litigation. Creating records that leave zero room for ambiguity isn’t just good practice; it's a fundamental part of risk management on any job site.

The goal here is to build an ironclad paper trail that tells the whole story of the change from start to finish. Every phone call, every sketch, every decision needs to be captured in a way that an outsider could piece together months—or even years—down the road. A vague note on a napkin or a quick "yeah, go ahead" in the hallway is an open invitation for trouble.

A desk with a plant, a green book, money, a document, and a pen for business records.

Anatomy of a Bulletproof Change Order Form

The foundation of any solid documentation system is a standardized change order form that’s used religiously on every project. While the specific layout can vary, a truly "bulletproof" form has several non-negotiable fields that cut through the noise and create a crystal-clear record. Think of it as your pre-flight checklist for any scope modification.

A robust form absolutely must include:

  • Unique Tracking Number: Simple and sequential (like CO-001, CO-002) so you can find it instantly.
  • Clear Project Identifiers: The official project name, number, and site address. No confusion about which job it belongs to.
  • Detailed Description of Change: This is the heart of the document. You have to spell out exactly what work is being added or removed, referencing specific drawing numbers, spec sections, and RFIs.
  • Justification for the Change: Get to the why. Is this an owner request? A design omission that just surfaced? An unforeseen site condition?
  • Comprehensive Cost Breakdown: The price needs to be transparent. Break it down into labor, materials, equipment, sub costs, and the contractually defined markup for overhead and profit.
  • Schedule Impact Statement: How many calendar days will this add to or subtract from the completion date? If there's no impact, you must explicitly state "zero (0) days" to avoid ambiguity.
  • Signature and Date Blocks: Designated lines for the owner, contractor, and sometimes the architect to formally execute the agreement.

This isn't just a memo; this level of detail turns the form into a legally binding amendment to your original contract.

The Power of the Central Change Order Log

Individual forms are critical, but they're only one piece of the puzzle. The real magic happens when you maintain a central change order log. This master document, whether it's a spreadsheet or a dedicated module in your PM software, gives you a live, at-a-glance dashboard of every single change on the project.

A well-kept log tracks the vitals for every Change Order Request (COR) and executed Change Order (CO).

Log Entry Status Description Cost Impact Schedule Impact
COR-007 Approved Relocate lobby reception desk +$7,250 +3 days
COR-008 Pending Owner Review Add exterior security cameras +$11,400 +5 days
COR-009 In Pricing Upgrade flooring in Break Room TBD TBD
CO-006 Executed Deduct value engineering for lighting -$4,800 0 days

This log becomes an indispensable tool for project managers. It immediately shows the cumulative financial and schedule impact of all changes, prevents items from falling through the cracks, and acts as the single source of truth in owner meetings. Getting a handle on process documentation best practices is what makes the difference between a clean closeout and a messy dispute.

Communication Protocols That Actually Work

Even the best forms and logs are useless if your communication is a disorganized mess. The final piece of the documentation puzzle is establishing clear protocols for how information flows. Effective change management isn’t just about paperwork; it's about making sure the right people are talking at the right time.

Cautionary Tale: A contractor on a mid-rise project moved a series of interior walls after getting a verbal nod from the owner's rep on site. The formal paperwork got pushed to the back burner. When the final invoice hit, the owner balked at the $45,000 charge, claiming they misunderstood the scope. With no signed change order, the contractor was stuck in a months-long legal battle and ended up eating most of the cost.

This is exactly why meticulous, real-time record-keeping is non-negotiable. It’s not about adding bureaucracy—it’s about protecting your bottom line. By combining detailed forms, a central log, and clear communication, you build a fortress of documentation that protects your budget, your schedule, and your business.

Protecting Your Budget and Project Timeline

A change order does more than just tweak the scope—it directly meddles with the financial and scheduling DNA of your project. If you don't have a firm grip on both, even a seemingly minor change can set off a chain reaction of cost overruns and delays, putting the entire job at risk. You have to be proactive and methodical about pricing the change and, just as importantly, analyzing its ripple effects.

The way you price a change order really sets the tone for fairness and transparency. Choosing the right method is critical, and it all comes down to the nature of the work. You wouldn't price a simple light fixture swap the same way you'd price the removal of an unexpected rock ledge discovered during excavation.

Overhead view of a desk with a tablet displaying a budget timeline, watch, calculator, and office supplies.

Choosing the Right Pricing Method

Your contract should spell out the approved pricing methods, but knowing which one to use in a given situation is a skill learned in the trenches. Most scenarios fall under one of three main approaches, and each has its place.

  • Lump Sum: This is your classic fixed price for the whole change. It’s perfect for well-defined adjustments where there are no unknowns, like changing from one specified type of flooring to another. The owner gets cost certainty right away, and the contractor knows exactly what they're getting paid. No surprises.

  • Time and Materials (T&M): When you run into unforeseen conditions or work with a scope you can't pin down, T&M is the only way to go. The contractor bills for their actual labor hours and material costs, plus a pre-agreed markup, which is often in the 10-15% range. This is the go-to for emergency repairs or when trying to estimate the work up front would be pure guesswork.

  • Unit Pricing: This method is a lifesaver for changes that involve quantifiable items where you don't know the final quantity yet. For example, if you hit bad soil and need to over-excavate, you can price the change per cubic yard of soil removed and new fill brought in. It’s a transparent, scalable way to price the work based on an agreed-upon rate.

A rookie mistake is trying to apply one method to every single change. If you try to lump sum an unpredictable task, the contractor could get burned. On the flip side, using T&M for a simple, defined task can make an owner feel like they're signing a blank check. The real skill is matching the method to the situation.

Defending Your Schedule with a Time Impact Analysis

Cost is only half the story. One of the biggest friction points in managing change orders is agreeing on a fair time extension. Just saying, "this will take five more days," won't cut it. You have to prove it. This is where a Time Impact Analysis (TIA) becomes your most valuable ally.

A TIA is a formal analysis showing exactly how a proposed change affects the project's critical path—that sequence of activities that dictates your completion date. This isn’t a gut feeling; it’s a calculated, methodical process.

A Time Impact Analysis turns a subjective argument about delays into an objective, data-backed conversation. It shifts the discussion from "I think we need more time" to "Here is the network logic showing exactly how this change adds seven days to the critical path."

To do a proper TIA, you have to insert the new activities from the change order directly into the project schedule. Then, you link them logically to the tasks that come before and after. When you rerun the schedule calculation, the real impact on the project's end date becomes clear as day. This hard evidence is what gives you leverage.

Negotiating with Confidence and Collaboration

When you walk into a meeting armed with transparent pricing and a solid TIA, you’re prepared for a productive conversation, not a confrontation. The goal isn’t to "win" the negotiation; it's to reach a fair agreement that keeps the project moving forward for everyone.

Here are a few tips I've picked up over the years for getting to that point:

  1. Present Data, Not Demands: Always lead with the facts. Show the owner and architect your cost breakdown and walk them through the TIA schedule. When they can see the logic behind the numbers and the timeline, it’s much harder to argue with the conclusion.
  2. Focus on the Project's Health: Frame the entire conversation around what’s best for the project. Keeping the schedule intact and making sure everyone is compensated fairly for extra work benefits the entire team and maintains momentum on site.
  3. Stay Collaborative: Keep the tone professional and focused on finding a solution. Think of a change order as a shared problem to solve, not a battle to be won. Those relationships are what will carry you through to a successful project completion.

At the end of the day, controlling the impact of changes boils down to process and proof. When you systematically price the work and analytically prove the schedule impact, you protect your budget, defend your timeline, and turn a potential conflict into just another manageable part of the job.

Using Technology and Handling Unique Project Demands

In today's construction world, trying to manage change orders with spreadsheets and email chains is just asking for trouble. It's a recipe for version control nightmares, lost messages, and delays that eat directly into your profit margin. Let's be honest, that manual approach just doesn't cut it anymore.

This is where dedicated construction management software, like Procore or Autodesk Construction Cloud, really shows its worth. These tools take the entire chaotic process and give it structure. A potential change can be logged right from a tablet in the field, which instantly starts a digital workflow. That Change Order Request (COR) is then automatically sent to the right people in the right order—from the PM, to the architect, and finally to the owner for the green light. The best part? Everyone can see exactly where a change stands in real-time. No more chasing people down for an update.

The features that really move the needle for project teams include:

  • Centralized Document Storage: Every RFI, photo, and subcontractor quote gets attached directly to the COR. This creates a single, bulletproof record.
  • Automated Workflows: You can build custom approval chains, which means no step gets skipped and everyone is accountable for their part of the review.
  • Financial Integration: Once a change order is approved, the system can automatically update the project budget, giving you a live, accurate view of your costs.

Special Considerations for Unique Projects

A standardized process is great, but some projects just don't play by the normal rules. I'm talking specifically about adaptive reuse and historic preservation jobs. On these projects, discovering unforeseen conditions isn't a risk—it's a guarantee.

When you're working on old buildings, you're often flying blind with incomplete or nonexistent drawings. You truly have no idea what's behind a wall or beneath a floorboard until you open it up. This level of uncertainty means your standard change order process needs a major adjustment.

On an adaptive reuse or historic preservation project, your contract has to be built for the unknown. You need clear provisions for dealing with unforeseen conditions, pre-agreed markups for T&M work, and a rock-solid process for documenting every discovery. This isn't just good practice; it's essential for managing risk.

Strategies for Managing Uncertainty

Contractors who excel at these unique projects build their entire process around navigating the unknown. The traditional change order model, which treats changes as annoying exceptions, simply fails here. You have to design a system that expects constant discovery and adjustment.

Here are a few tactics that work in the real world:

  • Build Flexibility into the Contract: Start with a contract that openly acknowledges the high likelihood of hidden issues. This means having clear language on how discoveries will be priced, often relying on Time and Materials (T&M) or pre-negotiated unit costs.

  • Conduct Intensive Preliminary Investigations: You'll never find everything, but you can get ahead of major headaches. Invest time upfront in non-destructive testing, GPR scanning, and even some targeted exploratory demolition to identify the big problems before you're deep into construction.

  • Establish a Contingency Protocol: Before the project starts, sit down with the owner and establish a clear plan for using the contingency fund. Define exactly what qualifies as an "unforeseen condition" and create a streamlined approval process for tapping into those funds. This keeps small issues from turning into big delays while you wait for a formal change order to be pushed through.

Answering Your Top Construction Change Order Questions

Even the most buttoned-up process can't account for every twist and turn on a job site. Questions are bound to come up. Let's tackle some of the most common ones that project managers wrestle with.

Can an Owner Refuse to Sign a Change Order?

Absolutely. An owner can, and often will, initially push back on a Change Order Request (COR). This usually boils down to a disagreement over the cost, a request for a time extension, or their belief that the work should have been covered under the original contract scope.

When this happens, your documentation is your best friend. You need to build a rock-solid case backed by hard evidence—think RFIs, photos of the unforeseen conditions, and direct references to the plans and specs. If an owner digs in their heels, you could be heading for a formal dispute. This is precisely why keeping a meticulous, real-time paper trail isn't just good practice; it's your ultimate line of defense.

What Is a Construction Change Directive?

A Construction Change Directive (CCD) is a different animal altogether. It’s essentially a top-down order from the owner or architect telling the contractor to get moving on a change before everyone has agreed on the final cost or schedule adjustment. CCDs are used to keep the project from grinding to a halt over negotiations, especially when the work is on the critical path.

The contractor is bound by the contract to perform the work in the CCD. The financial side of things gets sorted out later, typically formalized into a change order once the dust settles and all the true costs are tallied.

A Change Directive is basically an order to "work now, price it out later." It’s a tool to avoid gridlock but demands that you track every single cost meticulously so you get paid fairly for the work you've done.

How Do You Handle Multiple Small Changes?

It happens all the time: a series of small, related issues pop up in the same area. Instead of drowning in a sea of tiny change orders, the smart move is to bundle them. Group related Potential Change Orders (PCOs) into one consolidated Change Order Request (COR).

For instance, say an owner decides to tweak a single office layout. You can roll the wall relocation, the corresponding electrical moves, and the new flooring patch into one clear COR. This makes life easier for everyone involved in the approval chain. For more complex, on-the-fly issues, tools like augmented reality remote assistance can bring in an expert eye virtually, helping you troubleshoot and prevent a small issue from becoming a major change order.

Bundling keeps the paperwork from getting out of hand while ensuring every last adjustment is documented and signed off on before you proceed.


At Sherer Architects, LLC, we live and breathe the complexities of construction, from the first sketch to the final punch list. Our extensive background in commercial projects, adaptive reuse, and historic preservation gives us the foresight to anticipate challenges and manage change with a steady hand. We focus on building strong partnerships to steer your project away from potential pitfalls and toward well-managed, successful outcomes. If you're looking for a team that knows how to bring structure to life, let's talk. Connect with our team today to see how we can guide your next project to a profitable completion.

Categories
Uncategorized

8 Practical Construction Value Engineering Examples for 2025

In commercial and adaptive-reuse projects, maximizing value isn't just about cutting costs. It's about optimizing performance, lifecycle durability, and long-term profitability. Value engineering (VE) is the systematic process of analyzing function to identify and eliminate unnecessary costs without sacrificing quality, reliability, or aesthetic integrity. It is a proactive, creative, and collaborative approach that challenges assumptions and unlocks smarter, more efficient ways to build.

While often perceived as simple cost-cutting, true VE focuses on enhancing the overall project value, from initial design through to long-term operation. This strategic process extends beyond material swaps to encompass broader design choices. For example, focusing on aspects like maximizing natural light through strategic glazing is just one way of making design decisions that drive ROI by improving tenant well-being and reducing energy consumption over the building's life.

This guide moves beyond theory to provide tangible construction value engineering examples that project owners, developers, and contractors can implement. We will dissect eight powerful VE strategies, breaking down the problem, the proposed alternative, and the critical takeaways for your team. You will discover how to identify opportunities for significant improvements in cost, schedule, and performance, turning common design challenges into profitable and sustainable outcomes.

1. Substitution of Materials – High-Performance Concrete

A classic construction value engineering example involves substituting conventional concrete with High-Performance Concrete (HPC) or Self-Consolidating Concrete (SCC). This strategic shift focuses on lifecycle value over initial material cost. While HPC has a higher per-unit price, its superior strength, durability, and placement efficiency often lead to significant savings in labor, time, and long-term maintenance.

HPC is engineered for specific performance characteristics, such as high compressive strength, low permeability, and enhanced resistance to chemical and environmental degradation. SCC, a type of HPC, flows easily into complex formwork without mechanical consolidation, drastically reducing labor time and improving finish quality.

Strategic Analysis & Impact

The value proposition of HPC/SCC extends far beyond simple material replacement. It redefines structural possibilities and project timelines.

  • Cost & Time Impact: Initial material costs can be 15-30% higher. However, labor costs for placement and finishing can decrease by up to 50% with SCC. Faster formwork cycling and earlier strength gain can shorten the overall project schedule by weeks or even months on large-scale projects.
  • Performance Impact: The dense, impermeable nature of HPC extends the structure's service life, particularly in harsh marine or industrial environments. This reduces future repair costs, making it a powerful tool for lowering the total cost of ownership.
  • Design Impact: Higher strength allows for smaller-profile structural elements like columns and beams. This can increase usable floor space, a direct value-add for commercial and adaptive reuse projects where every square foot counts.

Key Insight: The most effective use of this VE measure is when it's considered during the initial design phase. Retroactively substituting HPC can be challenging, but planning for it allows engineers to optimize the entire structural system around its unique properties.

Implementation & Takeaways

Successfully implementing HPC or SCC requires a shift in mindset from first-cost to lifecycle value analysis.

  • Collaborate Early: Involve your structural engineer and a knowledgeable concrete supplier during the design development stage. Their expertise is crucial for mix design and logistical planning.
  • Focus on Placement Efficiency: The primary savings often come from labor reduction and speed. Ensure the construction team is trained on the specific handling and quality control procedures for SCC to maximize these benefits.
  • Model Lifecycle Costs: For owners and developers, a lifecycle cost analysis (LCCA) is essential. It will clearly demonstrate how the higher initial investment in HPC generates long-term returns through reduced maintenance and increased durability, justifying the upfront expenditure. The American Concrete Institute (www.concrete.org) provides extensive resources on HPC standards and applications.

2. Modular Construction and Prefabrication

A powerful construction value engineering example is the shift from traditional stick-built methods to modular construction and prefabrication. This strategy involves manufacturing building components, from entire rooms to facade panels, in a controlled factory setting. These modules are then transported to the construction site for assembly, fundamentally changing the project delivery model from sequential to parallel processing.

This approach minimizes on-site variables like weather delays and skilled labor shortages while maximizing quality control. Companies like Factory OS are pioneering this technology for multi-family housing, and hotel chains like Marriott have successfully deployed prefabricated bathroom pods to accelerate project completion and ensure consistent quality across properties.

A large crane lifts a modular building section while another is on a truck, at a construction site.

Strategic Analysis & Impact

Adopting modular construction is a strategic decision that impacts the entire project lifecycle, from financing and design to final assembly and turnover. It is less a material swap and more a fundamental process re-engineering.

  • Cost & Time Impact: While direct material costs can be similar, the primary value comes from schedule compression. Projects can see a 30-50% reduction in overall duration because site preparation and foundation work occur simultaneously with factory module fabrication. This leads to significant savings in general conditions, financing costs, and faster revenue generation.
  • Performance Impact: Factory production enables superior quality control, tighter building envelopes, and reduced material waste by up to 90%. This results in more energy-efficient buildings with lower long-term operating costs and predictable performance.
  • Design Impact: This method thrives on standardization. It is ideal for projects with repetitive units like hotels, dormitories, or multi-family housing. The design must be locked in early, which imposes discipline but also ensures cost and schedule certainty.

Key Insight: The greatest barrier to modular adoption is logistical planning, not manufacturing. Success hinges on meticulously coordinating module transportation, site access for large cranes, and just-in-time delivery to avoid on-site storage issues.

Implementation & Takeaways

Implementing a modular or prefabricated strategy requires a paradigm shift towards early collaboration and detailed pre-planning.

  • Engage Manufacturers Early: Bring a modular manufacturer like Factory OS or a specialized facade fabricator into the design process from the very beginning. Their input is critical to optimizing designs for factory production and transport.
  • Design for Manufacturing and Assembly (DfMA): The architectural and engineering teams must design with the manufacturing process in mind. This includes standardizing MEP connections, module interfaces, and structural connection points to streamline both factory work and on-site assembly.
  • Prioritize Logistics Planning: Develop a comprehensive logistics plan that covers transportation routes, delivery sequencing, and site staging. This plan is as critical as the architectural drawings and is essential for realizing the schedule benefits of this VE approach.

3. Value Engineering in HVAC System Design – Right-Sizing Equipment

A fundamental construction value engineering example in mechanical systems is the precise "right-sizing" of HVAC equipment. This strategy challenges the common, yet costly, practice of oversizing systems as a conservative safety measure. Instead, it focuses on meticulous load calculations to match equipment capacity directly to the building's actual thermal demands, optimizing both upfront capital and long-term operational costs.

Oversized HVAC units are not just more expensive to purchase; they operate inefficiently. They cycle on and off too frequently (short-cycling), which prevents them from effectively dehumidifying the air, increases component wear, and consumes excess energy. Right-sizing ensures the system runs for longer, more stable cycles, providing better comfort and performance at a lower operational cost.

Strategic Analysis & Impact

The value of right-sizing is realized through a holistic improvement in cost, performance, and sustainability. It's a shift from a "bigger is better" assumption to a data-driven, efficiency-focused approach. When considering Value Engineering in HVAC System Design, optimizing equipment choices and integrating advanced systems, such as implementing energy recovery ventilator technology, can significantly enhance overall system value and energy efficiency.

  • Cost & Time Impact: Initial equipment costs can be reduced by 15-25% by avoiding oversized, higher-capacity units. Long-term energy savings can be substantial, with documented cases like the University of Pennsylvania reducing energy use by 35% after a right-sizing initiative.
  • Performance Impact: Right-sized systems provide superior dehumidification and more consistent temperature control, directly improving occupant comfort and indoor air quality. This also reduces mechanical strain, leading to a longer equipment service life and fewer maintenance issues.
  • Design Impact: Proper sizing requires early coordination between the architect and mechanical engineer. It forces a more integrated design process where building envelope performance (insulation, windows, air tightness) is directly tied to mechanical system selection, leading to a more efficient building overall.

Key Insight: Right-sizing isn't about under-sizing; it's about precision. It relies on accurate energy modeling and load calculations (like ASHRAE's Manual J for residential or similar commercial standards) that account for all variables, including solar gain, occupancy patterns, and lighting loads.

Implementation & Takeaways

Successful implementation moves beyond rule-of-thumb estimates to embrace detailed engineering analysis. This data-first approach de-risks the project and locks in future savings.

  • Insist on Detailed Load Calculations: Do not accept sizing based on square footage alone. Mandate that your MEP engineer performs comprehensive load calculations using industry-standard software and methodologies from ASHRAE.
  • Leverage Energy Modeling: Use energy modeling software during the design phase to simulate how different system sizes will perform under actual expected conditions. This helps visualize the operational cost impact of various equipment choices.
  • Integrate Envelope and Systems: The best results are achieved when envelope improvements are coordinated with HVAC sizing. A better-insulated, tighter building requires a smaller, less expensive HVAC system, creating a cascading value effect.

4. Elimination of Architectural Non-Essentials

One of the most direct construction value engineering examples is the strategic elimination or modification of non-essential architectural elements. This process involves a critical review of decorative features that add significant cost but provide little to no functional or structural value. The goal is to preserve the core design intent and aesthetic appeal while optimizing the budget.

Common targets for this VE analysis include elaborate facade articulation, premium finish materials in non-critical areas, complex rooflines, and ornamental details that drive up material and labor costs. By scrutinizing these components, teams can reallocate funds to higher-impact areas or achieve substantial direct savings without compromising the building's overall quality or brand identity.

Strategic Analysis & Impact

This VE approach requires a delicate balance between cost control and design integrity. When done collaboratively, it can refine a project's focus and enhance its financial viability.

  • Cost & Time Impact: This strategy can reduce overall project costs by 5-15% or more, depending on the initial design's complexity. Simplifying intricate facade details or storefront systems can significantly reduce labor hours and shorten the schedule for building envelope construction.
  • Performance Impact: While primarily a cost-saving measure, eliminating complex geometries can sometimes improve building performance. Simpler forms can lead to a more continuous and effective thermal envelope, reducing thermal bridging and improving long-term energy efficiency.
  • Design Impact: The key challenge is maintaining aesthetic appeal. This is achieved by focusing on form, proportion, and color rather than expensive ornamentation. For example, switching from a costly imported stone rainscreen to a high-quality insulated metal panel system can achieve a modern look while dramatically cutting costs.

Key Insight: This is not about making a building bland; it's about making smart design choices. The most successful applications occur when architects, owners, and contractors collaborate early to define which elements are "mission-critical" to the design vision and which are "nice-to-haves" that can be value-engineered.

Implementation & Takeaways

Implementing this strategy effectively hinges on open communication and a shared understanding of project priorities from the outset.

  • Prioritize Design Elements: Early in the design phase, collaboratively rank architectural features based on their importance to the brand, user experience, and street appeal. This creates a clear hierarchy for VE discussions.
  • Use High-Value Alternatives: Instead of eliminating a feature, find a more cost-effective way to achieve a similar effect. Use high-quality ceramic tile that mimics granite, or use architectural precast concrete panels to replicate the look of cut stone at a fraction of the cost.
  • Leverage Mockups: Before committing to a large-scale material change, create physical or digital mockups. This allows stakeholders to visualize the alternative and ensure it aligns with the aesthetic goals, preventing costly dissatisfaction later. The National Institute of Building Sciences (www.nibs.org) offers extensive guidance on value methodology in design.

5. Constructability Review and Sequence Optimization

One of the most impactful construction value engineering examples shifts focus from what is being built to how it is being built. A constructability review involves a comprehensive analysis of construction methods, sequencing, and logistics during the design phase. By bringing construction professionals into the design process early, teams can identify and eliminate inefficiencies before they become costly rework or schedule delays on site.

This proactive approach, often formalized through methods like Integrated Project Delivery (IPD) or Early Contractor Involvement (ECI), integrates practical field knowledge into architectural and engineering plans. The goal is to ensure the design is not only sound but also efficient to build, considering factors like site access, material handling, labor availability, and safety.

Strategic Analysis & Impact

Integrating build-ability analysis early in the design process is a fundamental value engineering strategy that prevents problems rather than solving them. Its value is measured in reduced risk and enhanced efficiency.

  • Cost & Time Impact: Early involvement of construction experts can reduce overall construction costs by 5-15%. This is achieved by minimizing change orders, optimizing schedules, and improving labor productivity. For example, large-scale mixed-use developments have seen schedule improvements of over 18 months by using an ECI approach to streamline sequencing.
  • Performance Impact: A design optimized for construction leads to higher quality. Clash detection using Building Information Modeling (BIM) prevents MEP (Mechanical, Electrical, Plumbing) conflicts, reducing the need for field modifications that can compromise system integrity. This results in fewer defects and a better-performing final asset.
  • Risk Impact: This process directly mitigates project risk. Identifying potential logistical bottlenecks, safety hazards, or sequencing conflicts during design allows the team to plan solutions in a controlled environment, rather than reacting under pressure during construction. Healthcare projects using IPD have reportedly reduced costly change orders by as much as 90%.

Key Insight: The value of a constructability review is directly proportional to how early it is implemented. Bringing a general contractor or construction manager on board during schematic design provides the greatest opportunity to influence key decisions that lock in cost and schedule efficiencies.

Implementation & Takeaways

Successful implementation requires a commitment to collaboration and the use of modern planning tools. It's a procedural shift that prioritizes integrated expertise over siloed design and construction phases.

  • Establish a Collaborative Structure: Formalize the involvement of the construction team from the project's inception. Use an IPD or ECI contract structure to align the goals of the designer, contractor, and owner.
  • Leverage BIM Technology: Utilize BIM for 4D sequencing simulations and advanced clash detection. This allows the entire team to visualize the construction process step-by-step, identifying potential conflicts and optimizing the schedule before breaking ground. Providers like Autodesk offer powerful tools for this analysis.
  • Conduct Regular Workshops: Schedule dedicated constructability review workshops at key design milestones (e.g., 30%, 60%, and 90% design completion). These sessions should focus on specific building systems, site logistics, and trade sequencing. The Associated General Contractors of America (AGC) offers resources on best practices for these collaborative processes.

6. Foundation System Optimization – Spread Footings vs. Deep Foundations

A pivotal construction value engineering example is the rigorous analysis and optimization of a building's foundation system. This strategy challenges initial assumptions by comparing deep foundations, such as driven piles or drilled piers, against shallow foundations like spread footings. A comprehensive geotechnical investigation can reveal that a less expensive shallow foundation is viable, or that a targeted hybrid approach is more efficient than a uniform deep system.

This VE analysis hinges on understanding the specific soil-bearing capacity and settlement characteristics of a site. Rather than defaulting to a conservative and costly deep foundation system, the goal is to precisely match the foundation solution to the actual ground conditions and structural loads, potentially saving a significant portion of the substructure budget.

Excavated ground showing different soil layers with a grassy field and house in the background, illustrating foundation choice.

Strategic Analysis & Impact

The value of foundation optimization goes directly to the project's bottom line, as the foundation can be one of the single largest cost centers. It's a clear example of how upfront investment in analysis yields major downstream savings.

  • Cost & Time Impact: A switch from deep to shallow foundations can reduce foundation costs by 10-30% or more. A commercial development in Texas, for instance, saved an estimated $2.1M by shifting from pilings to spread footings after a detailed soil study. The construction schedule can also be accelerated by avoiding the time-consuming mobilization and installation of pile-driving equipment.
  • Performance Impact: The goal is to achieve the required structural performance for the lowest cost, not to compromise it. A properly designed shallow foundation on suitable soil is just as reliable as a deep one. The key is ensuring the geotechnical data is accurate to prevent long-term settlement issues.
  • Design Impact: Optimizing the foundation allows for more efficient load path distribution. On a shopping center project, a hybrid approach used robust drilled piers only under heavy column loads while employing simpler spread footings for lighter wall loads, reducing overall material and labor costs without sacrificing stability.

Key Insight: This value engineering opportunity is lost if not pursued early. Commissioning a comprehensive geotechnical boring program before the structural design is finalized is the most critical step. Waiting until later makes redesigning the entire structural load path prohibitively expensive and complex.

Implementation & Takeaways

Successful foundation optimization is a direct result of early and expert-led geotechnical due diligence.

  • Invest in Geotechnical Data: Don't skimp on the initial soil investigation. A thorough report from a qualified geotechnical engineer provides the essential data needed to explore all viable foundation alternatives with confidence.
  • Engage Experts Early: Involve the geotechnical engineer and structural engineer in collaborative design meetings from the schematic phase. This allows them to evaluate multiple options and align the structural grid with the most favorable soil conditions.
  • Evaluate Hybrid Systems: The best solution isn't always "all or nothing." Analyze if a combination of deep and shallow foundations can be used to address variable soil conditions or differing structural loads across the building footprint, optimizing cost-effectiveness. The American Society of Civil Engineers (ASCE) provides extensive guidelines and standards for foundation design and soil analysis.

7. Structural Steel Value Engineering – Grade Selection and Connection Optimization

A powerful construction value engineering example in steel-framed projects is the strategic optimization of steel grades and connection designs. This approach moves beyond simply choosing the cheapest material and instead focuses on a holistic view of the entire steel package, from raw material to fabrication and final erection. By selecting higher-strength steel grades and simplifying connection details, teams can reduce tonnage, labor, and project timelines.

While higher-grade steel may have a greater cost per ton, its increased strength allows for smaller, lighter structural members. This reduction in overall weight has a cascading effect, saving on material, transportation, and erection costs. Similarly, optimizing connections to favor simpler, standardized, and repeatable designs significantly cuts down on complex and expensive fabrication labor.

Steel beams and columns at a construction site with a large building, featuring 'OPTIMIZED STEEL' text.

Strategic Analysis & Impact

This VE measure is a system-based analysis that creates value by integrating design, fabrication, and erection considerations. It is not just about material cost but the total installed cost.

  • Cost & Time Impact: Material savings from reduced tonnage can be significant, often in the 12-18% range for the structural steel package. More impactful are the time savings; for instance, a stadium project that simplified its bolted connections was able to reduce fabrication and erection time by three months, creating immense value in schedule compression.
  • Performance Impact: Using higher-grade, lighter members does not compromise structural integrity. In fact, it can improve it by reducing the building's overall dead load, which can lead to smaller foundation requirements and better seismic performance.
  • Design Impact: Lighter, smaller-profile steel members can increase clear spans and create more open, flexible interior spaces. This is a crucial benefit in commercial office and adaptive reuse projects where maximizing usable floor area is a primary driver of financial return.

Key Insight: The most significant savings are unlocked when the structural engineer, general contractor, and steel fabricator collaborate during the design phase. A fabricator's input on connection design is invaluable, as they can identify details that are difficult or time-consuming to produce with their specific equipment and processes.

Implementation & Takeaways

Implementing this strategy requires proactive collaboration and a focus on the total cost of the steel system, not just the per-ton price.

  • Engage the Fabricator Early: Bring your steel fabricator onto the design team as early as possible. Their practical knowledge of efficient connection types (e.g., bolted vs. welded, standardized shear tabs) can prevent costly and time-consuming details from being locked into the design.
  • Leverage BIM and Modeling: Use Building Information Modeling (BIM) and advanced structural analysis software to run multiple scenarios. This allows the team to precisely compare the total cost and schedule impact of different steel grades and connection strategies.
  • Standardize Everything Possible: Work with the design team to standardize connection details and member sizes across the project as much as feasible. Repetition is the key to fabrication efficiency and can dramatically reduce both cost and the potential for errors. The American Institute of Steel Construction (www.aisc.org) offers extensive design guides and standards for optimizing steel structures.

8. Mechanical System Integration – Combined Systems and Heat Recovery

A powerful construction value engineering example moves beyond individual components to optimize entire building systems. This approach integrates multiple mechanical systems to reduce equipment redundancy, improve energy efficiency, and enhance occupant comfort. Instead of designing heating, ventilation, and air conditioning (HVAC) as separate, isolated units, this strategy creates a synergistic system where outputs from one process become inputs for another.

Common applications include combined heating and cooling hydronic loops, heat recovery ventilation (HRV) systems that capture energy from exhaust air, and integrated building automation systems (BAS) that intelligently manage system operations. While initial design complexity increases, the long-term benefits in operational savings and reduced capital costs are substantial.

Strategic Analysis & Impact

Integrating mechanical systems is a holistic strategy that transforms a building's energy profile and operational budget. The value is found in eliminating waste and maximizing efficiency across the entire mechanical infrastructure.

  • Cost & Time Impact: Initial capital costs for integrated equipment and advanced controls can be higher. However, this is often offset by reducing the total amount of equipment needed, potentially saving 15-20% on mechanical systems. For example, a shared geothermal loop eliminates the need for individual chillers and boilers for each building zone.
  • Performance Impact: The primary benefit is a significant reduction in energy consumption, often between 20-30%. An HRV system in a corporate headquarters can recover over 65% of the heat from exhaust air, drastically cutting annual heating costs. This directly lowers operational expenses and improves the building's environmental footprint.
  • Design Impact: This approach requires more upfront coordination and dedicated space for centralized equipment. However, it can also reduce the need for bulky rooftop units or extensive ductwork, freeing up valuable architectural space and improving aesthetics.

Key Insight: The success of mechanical system integration hinges on early collaboration and sophisticated energy modeling. Engaging a mechanical engineer specializing in sustainable design during the schematic phase is critical to identifying opportunities and accurately quantifying the long-term return on investment.

Implementation & Takeaways

Implementing integrated systems requires a forward-thinking project team committed to performance over siloed design.

  • Engage Experts Early: Bring your mechanical engineer and controls specialist into the design process from day one. Their expertise is essential for evaluating complementary system opportunities, such as linking a building’s data center cooling loop to its domestic hot water system.
  • Leverage Energy Modeling: Use detailed energy modeling software to validate design choices and provide clear data on projected savings. This analysis is crucial for securing owner buy-in and justifying any initial cost premiums.
  • Prioritize Commissioning and Training: Integrated systems are more complex. Thorough commissioning before occupancy is non-negotiable to ensure all components work together as designed. Operator training and clear maintenance protocols are vital for achieving and sustaining peak performance. For guidance on standards, organizations like ASHRAE (www.ashrae.org) offer extensive resources.

8-Point Construction Value Engineering Comparison

Measure Implementation Complexity 🔄 Resource Requirements ⚡ Expected Outcomes 📊 Ideal Use Cases 💡 Key Advantages ⭐
Substitution of Materials – High-Performance Concrete 🔄 Moderate–High: specialized mix design, strict QC, possible equipment mods ⚡ Higher material cost (+20–30%), experienced suppliers, trained crews 📊 Improved strength/durability, extended service life (100+ yrs), reduced lifecycle costs and placement time 💡 High-rise, marine structures, parking structures, harsh environments ⭐ Higher strength & durability; faster placement (SCC); smaller structural elements
Modular Construction and Prefabrication 🔄 High upfront planning & coordination; factory workflows required ⚡ Capital for factories, transport logistics, standardized tooling and interfaces 📊 30–50% schedule reduction; 20–30% labor savings; better quality control; less waste 💡 Repetitive residential, hotels, healthcare, large-volume or fast-track projects ⭐ Faster delivery, predictable budgets, superior factory QC
Value Engineering in HVAC Design – Right-Sizing 🔄 Moderate: detailed load calculations and control integration ⚡ Modeling tools, HVAC design expertise, advanced controls and commissioning 📊 15–25% equipment cost reduction; 20–30% annual energy savings; improved IAQ 💡 Offices, institutional buildings, retrofits, occupancy-variable spaces ⭐ Improved efficiency, performance, and lower operating costs
Elimination of Architectural Non-Essentials 🔄 Low–Moderate: design choices and stakeholder alignment ⚡ Minimal: alternative finishes, samples, potential mockups 📊 10–20% savings on architectural scope; faster construction; lower maintenance 💡 Retail, hotels, corporate offices, projects needing cost-controlled aesthetics ⭐ Cost reduction while retaining acceptable aesthetics and simpler maintenance
Constructability Review & Sequence Optimization 🔄 Moderate–High: collaborative IPD, BIM workflows, early contractor involvement ⚡ BIM software, contractor time, workshops and collaborative processes 📊 5–15% cost reduction; 10–20% schedule acceleration; fewer change orders 💡 Complex projects, healthcare, infrastructure, mixed-use developments ⭐ Reduced rework, improved coordination, better risk management
Foundation System Optimization 🔄 Moderate: geotechnical investigations and comparative analysis ⚡ Geotechnical borings, specialist engineering, possible ground improvement 📊 10–30% foundation cost savings; faster build with suitable shallow solutions 💡 Sites with variable soils; commercial and multi‑story developments ⭐ Significant cost savings and optimized construction schedule/equipment
Structural Steel VE – Grade & Connection Optimization 🔄 Moderate: structural analysis and fabricator collaboration ⚡ Access to premium-grade steel, skilled fabricators, modeling tools 📊 12–18% reduction in steel costs; reduced weight, shipping and fabrication time 💡 High-rises, bridges, stadiums and large steel-framed projects ⭐ Smaller members, faster installation, standardized/efficient connections
Mechanical System Integration – Combined Systems & Heat Recovery 🔄 High: complex systems coordination, controls and commissioning ⚡ Integrated equipment, advanced controls, commissioning and operator training 📊 15–20% equipment cost reduction; 20–30% energy efficiency improvement 💡 Corporate campuses, healthcare, net‑zero targets, large mixed-use buildings ⭐ Lower OPEX, reduced footprint, improved resilience and energy recovery

From Examples to Execution: Implementing a Value-First Mindset

The diverse array of construction value engineering examples detailed in this article, from optimizing foundation systems to integrating high-performance HVAC, share a common thread. They reveal that true value engineering is far more than a last-minute cost-cutting exercise; it is a proactive, strategic mindset woven into the fabric of a project from its earliest conception.

The transition from examining these examples to executing them requires a fundamental shift in perspective. Instead of asking, "How can we make this cheaper?" the value-first approach asks, "How can we achieve the essential function for the lowest lifecycle cost without sacrificing quality, durability, or performance?" This question transforms the project dynamic from a sequence of siloed tasks into a collaborative, value-seeking mission.

Recapping the Core Principles of Effective VE

Throughout the examples, several critical themes emerged as non-negotiable pillars of successful value engineering implementation:

  • Early and Continuous Collaboration: The most impactful VE opportunities are identified long before ground is broken. Integrating contractors, engineers, and architects in the schematic design phase, as seen in the foundation and structural steel optimization examples, prevents costly redesigns and unlocks synergistic solutions.
  • Lifecycle Cost Analysis (LCA) is Paramount: Initial savings are only part of the equation. As the HVAC right-sizing and high-performance concrete examples demonstrated, a higher upfront investment can yield substantial long-term returns through reduced energy consumption, lower maintenance, and increased durability. True value is measured over the building's entire lifespan.
  • Function Over Form (Without Sacrificing Design): The principle of eliminating non-essential architectural elements is not about creating bland, utilitarian structures. It's about rigorously questioning every component's purpose and cost-benefit ratio to ensure the budget is allocated to features that deliver the highest functional and aesthetic return for the owner and end-users.

Your Actionable Roadmap to Implementing Value Engineering

Moving from theory to practice is the ultimate goal. For developers, owners, and contractors looking to leverage these principles, the path forward involves a structured, intentional approach. It’s not about applying a single tactic but about building a systemic process.

Strategic Insight: Value engineering should be a scheduled, non-negotiable part of the pre-construction process. Treat VE workshops with the same importance as budget reviews or zoning meetings to formalize their role in project delivery.

To put these ideas into action, consider the following steps:

  1. Assemble an Integrated Team Early: Break down traditional silos. Bring your general contractor, key subcontractors (like mechanical and structural), and design team to the table during the conceptual phase.
  2. Define Project Functions Clearly: Before exploring alternatives, ensure all stakeholders agree on the essential functions of each building system and space. What must it do? What performance criteria are non-negotiable?
  3. Mandate a Lifecycle Perspective: Require that major decisions, especially those concerning the building envelope, MEP systems, and structural components, are evaluated using LCA. Look beyond the initial bid price.
  4. Empower Your Team to Challenge Assumptions: Foster a culture where every team member feels empowered to question the status quo and propose innovative alternatives. The best construction value engineering examples often come from a fresh perspective challenging a long-held assumption.

By embracing this proactive and collaborative framework, you transform value engineering from a reactive tactic into a powerful strategic tool. It becomes the engine that drives innovation, enhances project feasibility, and ultimately maximizes the long-term profitability and performance of your real estate assets. This is not just about building cheaper; it’s about investing smarter, building better, and creating enduring value that stands the test of time.


Ready to apply a value-first mindset to your next commercial or adaptive-reuse project? The team at Sherer Architects, LLC specializes in integrating creative design with practical, performance-driven value engineering to maximize your return on investment. Explore our portfolio and see how we turn ambitious concepts into functional, cost-effective realities at Sherer Architects, LLC.