

In commercial construction, adaptive reuse, and historic preservation, success is measured not just by completion, but by endurance and performance. The gap between a good project and a great one often lies in the rigor of its quality control. A generic checklist won't suffice; what's needed is a dynamic, phase-by-phase framework that anticipates challenges and verifies compliance at every critical juncture. This guide provides a definitive construction quality control checklist, breaking down the eight most crucial inspection and verification stages.
We'll move beyond the obvious, offering actionable steps and practical examples for each critical point. You will learn how to verify everything from concrete strength and structural steel certifications to the integrity of your building envelope. This comprehensive approach ensures that every component, from foundation to finish, meets exacting standards. It’s about building a systematic process that catches issues early, long before they become expensive problems or safety hazards.
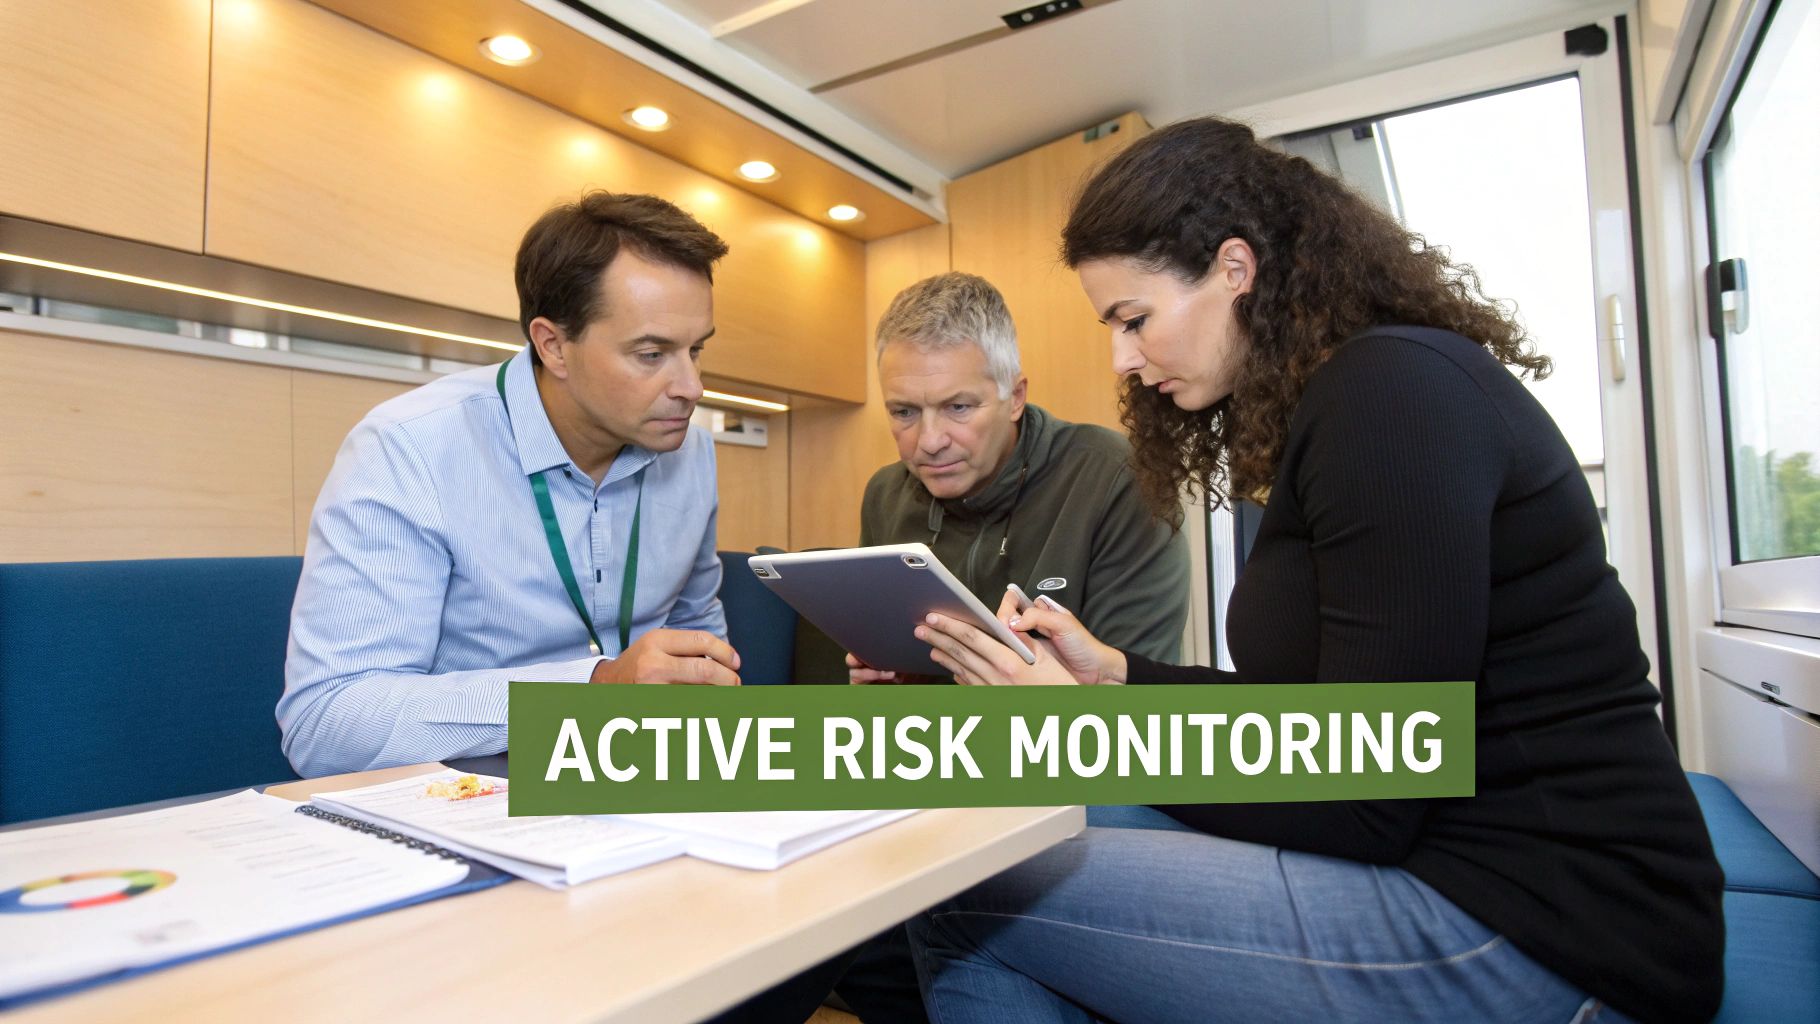
This meticulous oversight is vital throughout the project lifecycle. A key milestone that exemplifies the non-negotiable nature of detailed quality checks before handover is the practical completion inspection, which serves as a final, exhaustive review of all works. By implementing these detailed checks from day one, you can mitigate risks, prevent costly rework, and ensure your final structure is safe, compliant, and built to last. This checklist is your roadmap to delivering a project that stands as a testament to quality, durability, and meticulous planning.
1. Concrete Quality Testing and Strength Verification
Concrete is the literal foundation of most commercial and adaptive-reuse projects, making its integrity non-negotiable. This critical point on any construction quality control checklist involves a systematic process of testing concrete materials before, during, and after placement. The goal is to verify that the concrete mix meets or exceeds the specified design strength, durability, and workability requirements outlined in the project's structural plans and building codes.
This process ensures the structural safety and long-term performance of the building. It mitigates risks associated with structural failure, costly rework, and potential liability. For high-rise construction, bridge projects, or structures in seismic zones, stringent concrete testing is a fundamental requirement mandated by law and engineering best practices.
Key Testing Procedures
Verification relies on standardized tests, primarily those governed by ASTM International and the American Concrete Institute (ACI).
- Slump Test (ASTM C143): Performed on-site just before the pour, this test measures the consistency and workability of fresh concrete. It immediately indicates if the water-cement ratio is correct, preventing issues like segregation or poor finishability.
- Compressive Strength Test (ASTM C39): This is the most crucial test. Cylindrical samples are taken from the concrete batch on-site, cured under controlled conditions (ASTM C192), and then crushed by a specialized machine at specific intervals (typically 7, 14, and 28 days). The results confirm if the concrete has achieved its required design strength (e.g., 4,000 psi).
- Air Content Test (ASTM C231/C173): For exterior concrete exposed to freeze-thaw cycles, this test verifies the volume of microscopic air bubbles entrained in the mix. Proper air entrainment provides space for freezing water to expand, preventing surface spalling and internal cracking over time.
Implementation and Best Practices
Successful concrete quality control requires proactive planning and meticulous documentation. Major contractors on large-scale commercial projects, such as a new corporate campus or a multi-level parking garage, often retain independent, third-party testing laboratories. This practice ensures unbiased, verifiable results and adds a layer of accountability.
Key Insight: Don't wait for a problem. Establish clear acceptance and rejection criteria with the structural engineer and concrete supplier before the first truck arrives on site. This protocol should detail the exact steps to take if a test fails, preventing costly delays and disputes.
To effectively integrate this into your workflow:
- Schedule in Advance: Coordinate with the testing lab well before scheduled pour dates to ensure personnel are available. Factor in the lab's turnaround time for 28-day strength test reports.
- Document Everything: Every test result, batch ticket, and sample location must be logged immediately. This creates a traceable record of quality for every structural element.
- Address Failures Promptly: If a 7-day or 28-day test fails to meet the minimum strength, immediately notify the project engineer. A documented corrective action plan, which may involve further testing (like core drilling) or structural remediation, must be implemented and approved.
2. Structural Steel Inspection and Material Certification
For projects relying on a steel skeleton, from towering skyscrapers to expansive industrial facilities, the integrity of every beam, column, and connection is paramount. This essential point on a construction quality control checklist involves a rigorous verification process to ensure all structural steel meets the exact specifications for grade, dimension, and material properties. It encompasses the entire lifecycle of the steel, from the foundry to its final placement.

This process is critical for ensuring the structure can safely bear its intended loads and resist environmental forces. Proper certification and inspection prevent the use of substandard or incorrect materials, which could lead to catastrophic structural failure. For government contracts, bridge projects, or buildings in high-seismic areas, these verification steps are non-negotiable and mandated by codes from bodies like the American Institute of Steel Construction (AISC).
Key Testing Procedures
Verification is based on certified documentation and physical inspections, adhering to standards from ASTM International and the American Welding Society (AWS).
- Mill Test Reports (MTRs): This is the birth certificate for steel. The MTR is a quality assurance document provided by the steel mill that certifies a material’s chemical analysis and mechanical properties. It must be reviewed and matched against the project specifications (e.g., verifying Grade 50 steel) before the steel is fabricated or shipped to the site.
- Welding and Bolting Inspections: Certified Welding Inspectors (CWIs) must visually and, if required, non-destructively test welds to ensure they are free of defects and meet design requirements (AWS D1.1). Similarly, high-strength bolted connections must be inspected to confirm proper bolt tensioning using methods like turn-of-nut or direct tension indicators.
- Dimensional and Damage Inspection: Upon delivery, every piece of steel must be inspected for shipping damage, such as bends or twists, and measured to confirm its dimensions align with the approved shop drawings. Any discrepancies must be documented and resolved immediately.
Implementation and Best Practices
Effective steel quality control is about traceability and proactive verification, not reactive problem-solving. Major commercial projects, like a new hospital wing or data center, often employ third-party special inspectors to provide an independent layer of oversight for all steel fabrication and erection processes, ensuring unbiased compliance.
Key Insight: Implement a "gatekeeping" system. No steel member should be offloaded or erected until its corresponding Mill Test Report has been received, reviewed, and approved by the project engineer. This simple protocol prevents uncertified material from ever entering the building's structural system.
To effectively integrate this into your workflow:
- Request MTRs Early: Make the submission and approval of MTRs a prerequisite for payment to the steel fabricator. This ensures documentation is a priority.
- Tag and Track: Establish a system for tagging each steel member with a unique identifier that links it back to its MTR and its specific location in the structure as shown on the erection drawings.
- Inspect Upon Arrival: Designate a specific laydown area for steel delivery inspections. Check for transit damage, surface contaminants like excessive rust or oil, and verify piece marks against the shipping manifest and drawings before accepting the material.
3. Formwork and Shoring Safety Verification
Formwork and shoring are the temporary skeletons that support concrete and other materials until they can support themselves. This point on a construction quality control checklist involves the rigorous inspection and certification of these temporary systems to ensure they can safely handle immense construction loads without failure. The goal is to prevent catastrophic collapses, protect workers, and ensure the final structural elements are formed to the correct dimensions and specifications.
This process is a critical safety and quality assurance measure, particularly in multi-story construction or projects involving heavy concrete beams and decks. A failure in formwork not only poses a direct threat to life but also leads to significant project delays, budget overruns, and severe structural defects in the finished product. Verification is mandated by OSHA and is a cornerstone of responsible project management.
Key Inspection Procedures
Verification requires adherence to engineered designs and industry standards, primarily guided by OSHA regulations and ACI guidelines.
- Design and Drawing Review: Before installation, the project’s structural engineer or a designated qualified person must review and approve the formwork design drawings. This step confirms the system is engineered to support the anticipated dead and live loads, including the weight of wet concrete, workers, and equipment.
- Pre-Pour Inspection: A competent person must conduct a thorough visual inspection of the erected formwork system just before the concrete pour. This checklist-driven inspection verifies that all components (shores, braces, connectors) are installed correctly, plumb, and according to the approved design.
- Monitoring During and After Pour: Continuous monitoring is essential as the concrete is placed. Observers watch for any signs of deflection, settlement, or distress in the formwork. Post-pour inspections ensure the system remains stable as the concrete begins to cure and transfer its load.
Implementation and Best Practices
Effective formwork verification is a collaborative effort between the general contractor, the concrete subcontractor, and the project engineer. On complex projects, like a new hospital wing or an elevated bridge deck, a specialized formwork engineering firm is often engaged to design and certify the system.
Key Insight: Treat formwork as a temporary structure with the same engineering rigor as the permanent one. A detailed removal (stripping) schedule, approved by the project engineer, is just as critical as the installation plan. Removing supports too early can lead to structural failure, even days after the pour.
To effectively integrate this into your workflow:
- Engage a Qualified Designer: For anything beyond simple slab-on-grade work, ensure the formwork system is designed by a qualified professional engineer specializing in temporary structures.
- Conduct Pre-Pour Meetings: Hold a specific meeting with the site superintendent, concrete crew, and inspector to review the formwork design, inspection checklist, and emergency procedures.
- Document All Inspections: Every pre-pour and post-pour inspection must be documented with a signed-off checklist, notes, and photographs. This creates a clear record of due diligence and compliance.
- Control the Stripping Process: Adhere strictly to the engineer-approved schedule for removing forms and shoring. This timing is based on concrete strength test results, not just the calendar, to ensure the structure can safely bear its own weight.
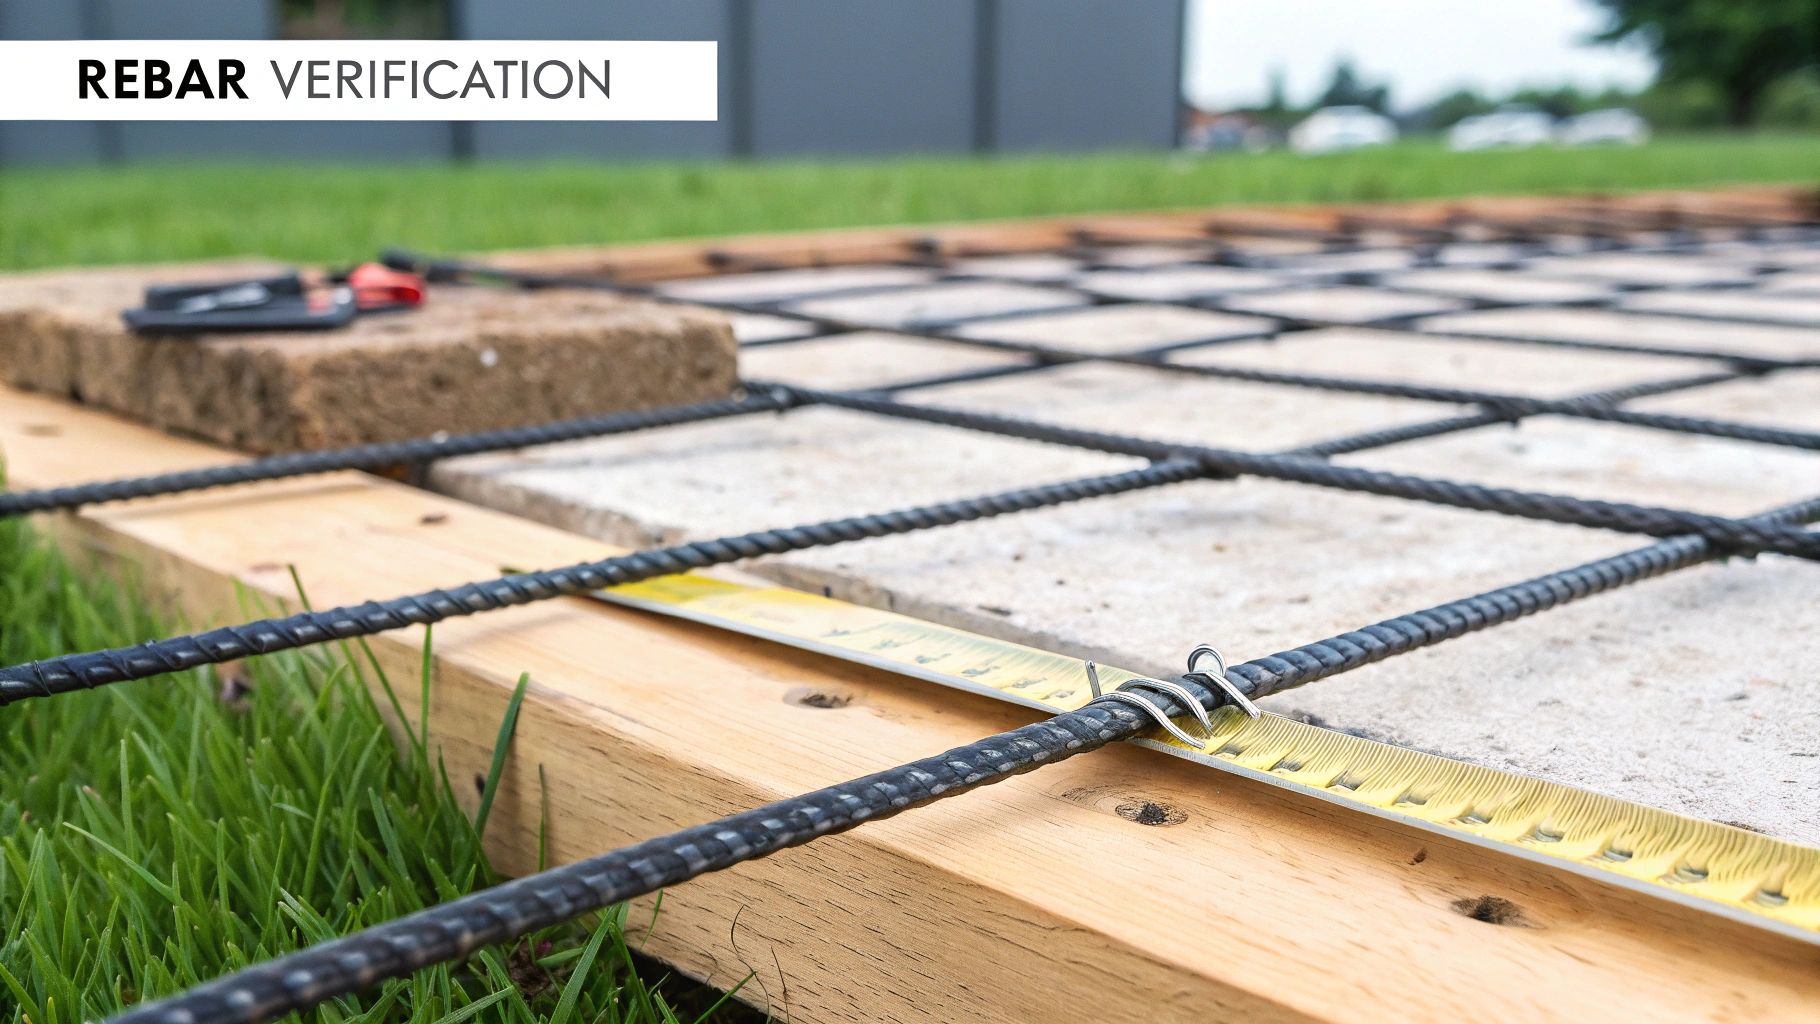
4. Rebar Placement and Installation Verification
Reinforcing steel, or rebar, is the skeletal system within concrete structures, providing the tensile strength that concrete lacks. Verifying its correct placement is a crucial step in any construction quality control checklist, as improper installation can compromise the entire structural integrity of a building, leading to cracks, premature failure, or even collapse. This inspection process ensures that the size, spacing, positioning, and concrete cover of the rebar precisely match the structural engineer's design specifications.
This verification is non-negotiable for ensuring the long-term durability and safety of concrete elements like foundations, columns, beams, and slabs. It directly prevents issues such as corrosion from inadequate concrete cover and structural weakness from incorrect splicing or spacing. For projects like high-rise residential buildings or highway bridge decks, meticulous rebar inspection is a fundamental prerequisite before any concrete is poured.
Key Testing Procedures
Verification is a visual and manual inspection process guided by industry standards from the American Concrete Institute (ACI) and the Concrete Reinforcing Steel Institute (CRSI).
- Placement and Spacing Check: Using a tape measure, inspectors confirm that the spacing between bars (both horizontal and vertical) matches the design drawings. They also verify the correct number of bars and their specified sizes (e.g., #5 rebar at 12 inches on-center).
- Concrete Cover Verification: Inspectors measure the distance from the rebar to the edge of the formwork. This "cover" is critical for protecting the steel from moisture and corrosion. Specialized tools like plastic rebar chairs or dobies are checked to ensure they are correctly sized and placed to maintain this required distance.
- Lap Splice and Tie Inspection: Where two bars overlap to create a continuous line of reinforcement, the length of this "lap splice" is measured to ensure it meets the minimum length specified in the plans. Inspectors also confirm that the rebar is securely tied with wire to prevent shifting during the concrete pour.
Implementation and Best Practices
A successful rebar inspection program hinges on a formal pre-pour sign-off process. For major projects, such as marine structures with enhanced corrosion protection requirements or government-funded infrastructure, a third-party special inspector is often mandated to perform and certify the rebar installation before the concrete contractor is allowed to proceed.
Key Insight: Treat the pre-pour rebar inspection as a mandatory "hold point" in the construction schedule. No concrete should be ordered or poured until the structural engineer or their designated inspector has formally signed off on the rebar placement. This single checkpoint prevents irreversible and costly mistakes.
To effectively integrate this into your workflow:
- Schedule a Formal Inspection: Coordinate the inspection with the project superintendent, structural engineer, and third-party inspector for a specific time after all rebar is tied but before the concrete pour is scheduled.
- Document with Photos: Take detailed, dated photographs of the rebar placement, including close-ups with a tape measure visible. This creates a permanent visual record of compliance for the project archives.
- Resolve Deviations Immediately: If any discrepancies are found, such as incorrect spacing or insufficient cover, they must be corrected on the spot. The inspector must then re-verify the corrected areas before granting approval for the pour.
5. Electrical Installation and Safety Compliance Inspection
An electrical system is the central nervous system of any modern commercial building, making its proper installation a paramount safety and operational concern. This point on a construction quality control checklist involves a rigorous, multi-stage inspection process to verify that all electrical systems are installed according to project plans, specifications, and, most importantly, prevailing electrical codes like the National Electrical Code (NEC). It covers everything from wiring and conduit to panels, grounding, and final system testing.
This process is critical for preventing fire hazards, ensuring occupant safety, and guaranteeing the reliable performance of all building systems. For facilities with specialized needs like hospitals or data centers, which have stringent power reliability and redundancy requirements, meticulous electrical inspection is not just a best practice; it is a fundamental requirement for functionality and accreditation.
Key Testing Procedures
Verification ensures that the installed system is safe, functional, and compliant. Inspections are often performed by local building officials, but a thorough internal QC process is essential.
- Rough-in Inspection: This occurs before walls and ceilings are closed. Inspectors verify proper installation of outlet boxes, correct wire sizing and type for each circuit, secure conduit runs, and appropriate support and protection of wiring. This is the last chance to easily correct issues within walls.
- Panel and Service Inspection: This focuses on the main electrical service, distribution panels, and subpanels. It includes verifying correct breaker installation, proper conductor termination and torque settings, clear and accurate panel labeling (circuit directories), and confirming that grounding and bonding systems are installed per NEC requirements.
- Final Inspection and System Testing: After all devices (lights, switches, receptacles) are installed, a final inspection is conducted. This includes functional testing, such as verifying proper operation of Ground Fault Circuit Interrupters (GFCIs) and Arc-Fault Circuit Interrupters (AFCIs), confirming correct polarity at all outlets, and performing insulation resistance tests on major feeders if specified.
Implementation and Best Practices
A successful electrical quality control program relies on proactive coordination and unwavering attention to code compliance. On major projects, such as a new industrial facility with hazardous area classifications, general contractors depend on highly qualified, licensed electrical subcontractors who maintain their own internal QC process, which is then verified by third-party inspectors and local authorities.
Key Insight: Treat electrical inspections as phased gates, not a single final event. A "pre-inspection" walkthrough with your electrical foreman before the official inspector arrives can identify and correct 90% of potential issues, preventing failed inspections, costly re-inspection fees, and schedule disruptions.
To effectively integrate this into your workflow:
- Schedule Phased Inspections: Coordinate rough-in, above-ceiling, and final inspections with the project schedule. Never cover work that has not been inspected and approved.
- Maintain Meticulous Records: Keep a dedicated log of all inspections, test results (e.g., megohmmeter readings), and corrective actions taken. This documentation is vital for the Certificate of Occupancy.
- Verify Code Compliance: The NEC is updated every three years. Ensure your electrical team is working with the edition adopted by the local jurisdiction. Address any discrepancies between plans and code requirements with the design team immediately.
6. Masonry Quality Control and Bond Testing
Masonry, whether structural block, brick veneer, or historic stone, is defined by the quality of its individual units and the mortar that binds them together. This point on a construction quality control checklist establishes a rigorous process for verifying materials and workmanship to ensure the system’s structural integrity, weather resistance, and aesthetic consistency. The goal is to confirm that the entire masonry assembly meets the specified strength, durability, and appearance standards.
Proper masonry quality control is essential for preventing common failures like water infiltration, cracking, and efflorescence, which can lead to costly repairs and compromise the building envelope. For projects like a historic building restoration or the facade of a new commercial headquarters, meticulous attention to masonry detail is fundamental to both long-term performance and the project's visual success.
Key Testing Procedures
Verification is guided by standards from organizations like The Masonry Society (TMS) and ASTM International to ensure repeatable and reliable results.
- Mortar and Grout Testing (ASTM C780 / C1019): Similar to concrete testing, samples of mortar and grout are taken on-site during construction. These samples are tested for compressive strength and consistency to ensure they meet the mix design requirements and have the necessary bonding properties.
- Masonry Prism Testing (ASTM C1314): This is a critical test for structural masonry walls. Small assemblies, or prisms, are built on-site using the actual brick/block, mortar, and grout from the project. These prisms are then cured and compression-tested in a lab to verify the ultimate compressive strength (f'm) of the entire masonry system, confirming it aligns with the structural engineer's design.
- Visual Workmanship Inspection: Continuous on-site inspection is non-negotiable. This involves checking for consistent mortar joint thickness, ensuring joints are fully packed, verifying the proper installation of flashing and weeps, and confirming that wall ties are correctly embedded and spaced.
Implementation and Best Practices
Effective masonry QC depends on setting clear standards before the first block is laid and maintaining them through diligent oversight. On large-scale projects, such as a multi-story university building with an intricate brick facade, a dedicated inspector or third-party agency specializing in masonry is often engaged to oversee the work and conduct testing.
Key Insight: Create a physical on-site mockup panel for approval before full-scale installation begins. This sample panel should include all elements: the specified brick or block, mortar color and joint profile, ties, and flashing. It serves as the definitive quality benchmark against which all subsequent work is measured.
To effectively integrate this into your workflow:
- Pre-Installation Conference: Hold a meeting with the mason, general contractor, architect, and testing agency to review submittals, mockup requirements, testing frequency, and acceptance criteria.
- Document Material Deliveries: Log all delivery tickets for masonry units, mortar components, and reinforcement. Ensure they match the approved submittals before being incorporated into the work.
- Protect the Work: Ensure that newly laid masonry is properly protected from rain and extreme temperatures during the critical curing period to prevent washouts, efflorescence, or loss of strength.
7. Welding Quality Inspection and Certification
For steel-framed structures, bridges, and industrial facilities, the integrity of welded connections is a paramount safety concern. This point on a construction quality control checklist involves the systematic inspection and testing of all structural welds to ensure they meet the stringent strength, quality, and code requirements specified by project engineers. The goal is to verify that every connection is free from defects and possesses the necessary load-bearing capacity.
This process is fundamental to preventing catastrophic structural failures. It ensures that the building performs exactly as designed under various loads, including gravity, wind, and seismic forces. In projects like high-rise buildings, critical infrastructure, or pressure vessel fabrication, rigorous weld inspection is mandated by codes from the American Welding Society (AWS) and other governing bodies.
Key Testing Procedures
Verification is achieved through a combination of visual inspection and advanced Non-Destructive Testing (NDT) methods performed by certified inspectors.
- Visual Inspection (VT): This is the most common and fundamental method, conducted before, during, and after welding. Inspectors check for proper joint preparation, correct weld size and profile, and surface defects like cracks, undercut, or excessive porosity. It is the first line of defense against poor workmanship.
- Ultrasonic Testing (UT): This NDT method uses high-frequency sound waves to detect internal discontinuities within the weld. A transducer sends a signal into the material, and the return echo is analyzed to identify hidden flaws like lack of fusion or slag inclusions without damaging the connection.
- Radiographic Testing (RT): Similar to a medical X-ray, this technique uses X-rays or gamma rays to produce an image of the weld's internal structure on film. RT is highly effective for identifying internal voids, cracks, and other volumetric defects, and is often required for 100% inspection on critical connections like those in pressure vessels or pipelines.
Implementation and Best Practices
Effective welding quality control depends on proactive oversight and meticulous record-keeping. General contractors on major projects, such as a new hospital wing or a bridge rehabilitation, will engage a third-party inspection agency with certified NDT technicians. This ensures an independent, unbiased assessment of weld quality and compliance.
Key Insight: Qualification is preventative. Verify that every welder on site holds current certifications (e.g., AWS D1.1) for the specific position and type of weld they will be performing before any structural steel is joined. This single step prevents the vast majority of common weld defects.
To effectively integrate this into your workflow:
- Establish Clear Criteria: Define the acceptance and rejection standards for all welds with the structural engineer, based on AWS or other applicable codes, before fabrication begins.
- Document Everything: Each weld inspection must be documented with a detailed report, including the welder's identification, location of the weld, inspection method used, and findings. Photographic evidence should support all visual inspections.
- Schedule Phased Inspections: Plan NDT to occur as work progresses, not at the end. This allows for timely identification and correction of any deficient welds before they are covered by other building elements, avoiding costly and complex rework.
8. Building Envelope and Moisture Barrier Verification
The building envelope acts as the primary barrier between the conditioned interior and the exterior environment, making its integrity essential for long-term durability and energy performance. This critical point on a construction quality control checklist involves a systematic inspection and testing of all waterproofing membranes, air barriers, and weather-resistive barriers. The goal is to prevent uncontrolled air leakage and water infiltration, which can lead to structural damage, mold growth, and poor energy efficiency.
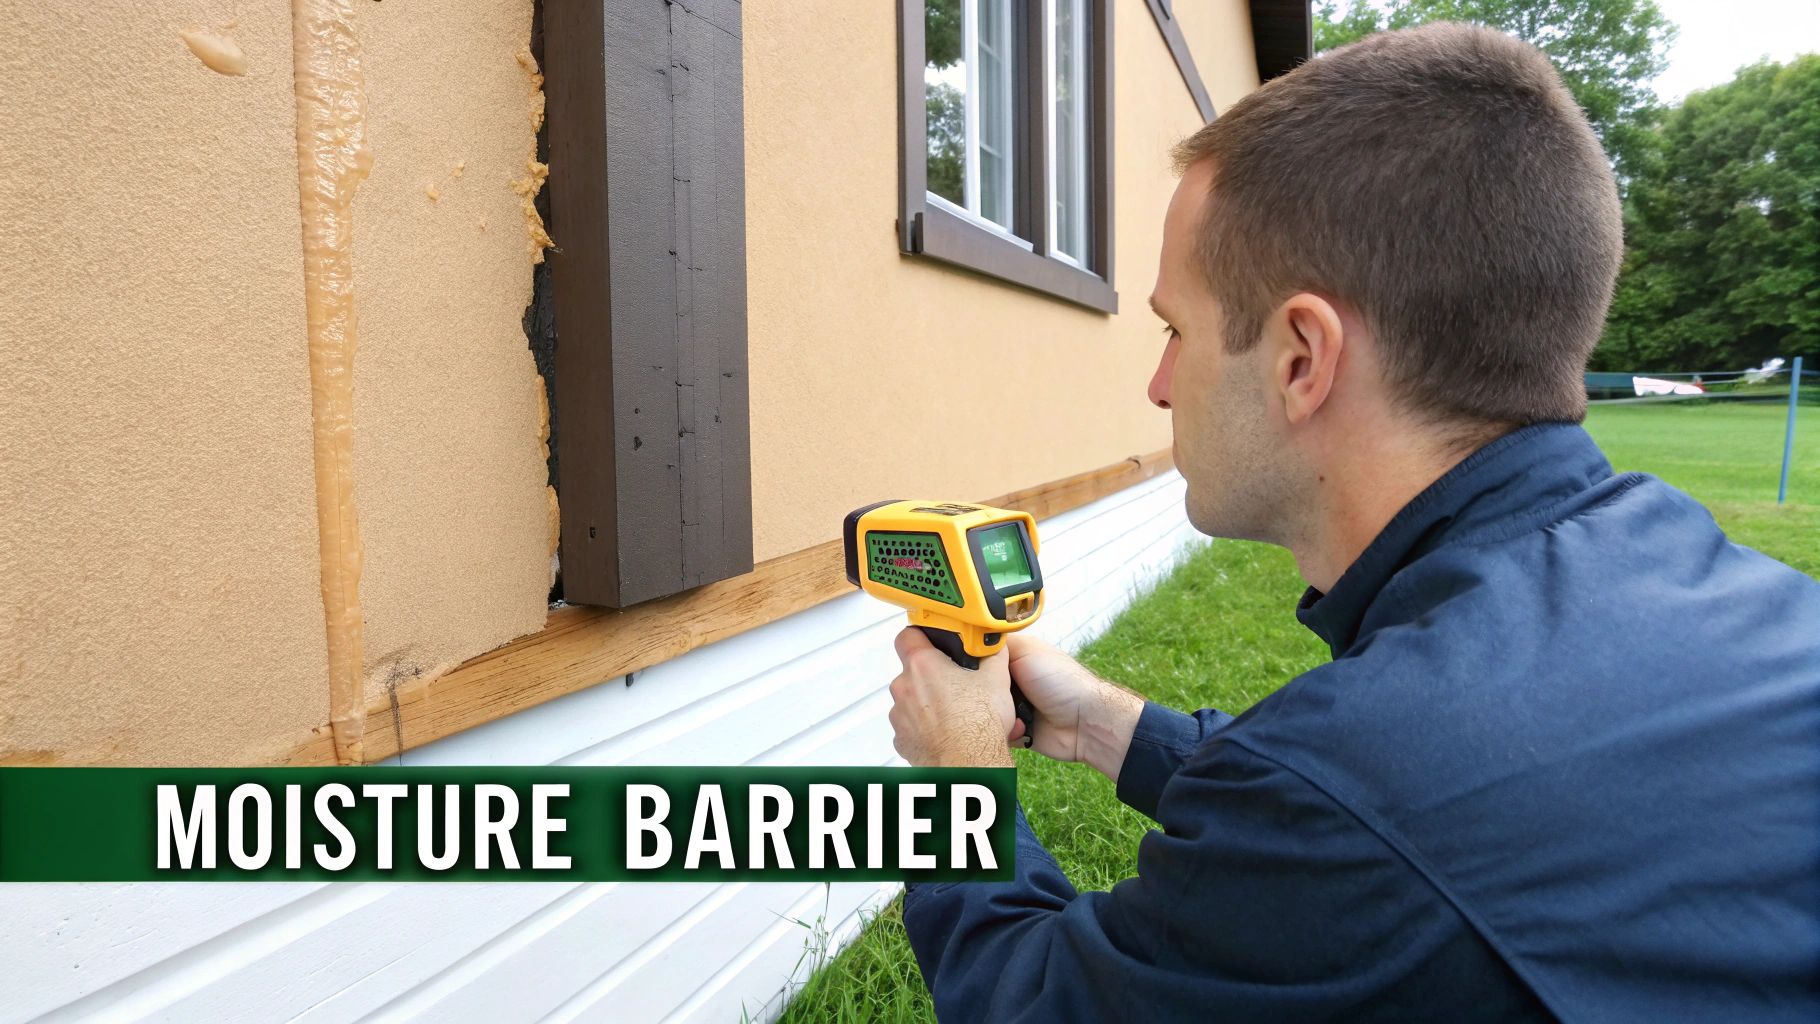
This verification process protects the owner’s investment by ensuring the building performs as designed, reducing operational costs, and preventing costly future repairs. For high-performance green buildings or structures in regions with extreme weather, a meticulously sealed and waterproofed envelope is a fundamental requirement driven by building codes and sustainability standards like LEED. For a comprehensive quality control plan, understanding detailed roofing inspection practices is crucial for ensuring the integrity of the building envelope.
Key Testing Procedures
Verification combines visual inspections with standardized performance tests, often guided by standards from the Air Barrier Association of America (ABAA) and ASTM International.
- Visual Inspection and Continuity Checks: Before and after cladding is installed, inspectors visually verify that all barrier materials are installed per manufacturer specifications. This includes checking for complete coverage, proper lapping of seams, and correct flashing and sealing around all penetrations like windows, doors, and MEP conduits.
- Water Penetration Testing (ASTM E1105): This field test is commonly performed on window installations and curtain wall systems. A calibrated spray rack delivers a uniform stream of water at a specified pressure against a section of the building facade while a negative air pressure differential is created inside, simulating wind-driven rain.
- Whole-Building Air Leakage Test (ASTM E779): Often called a "blower door test," this procedure depressurizes or pressurizes the entire building using large, calibrated fans. It measures the total air leakage rate, which is then compared against the project's specified air tightness requirements (e.g., a certain CFM per square foot of envelope area).
Implementation and Best Practices
Effective building envelope verification requires coordination between multiple trades, including framers, window installers, roofers, and MEP contractors. It is often managed by a third-party building enclosure consultant who can provide unbiased oversight and testing.
Key Insight: Treat the air and moisture barrier as a single, continuous, and monolithic system. A small, unsealed pipe penetration can compromise the performance of the entire wall assembly, negating the investment in high-quality materials.
To effectively integrate this into your workflow:
- Hold Pre-Installation Meetings: Gather all relevant trades to review sequencing, detailing, and compatibility of different barrier products before work begins.
- Document with Photos: Take detailed photographs of all flashing, seals, and membrane laps before they are covered by subsequent layers like brick or siding. This creates a permanent record of quality.
- Test Early and Re-Test: Conduct water penetration tests on mock-ups or the first few installed window units. If deficiencies are found, they can be corrected before the entire building is completed, preventing rework. If a test fails, a documented corrective action must be implemented and the area must be re-tested until it passes.
8-Point Construction Quality Control Comparison
| Item | Implementation Complexity 🔄 | Resource Requirements ⚡ | Expected Outcomes 📊 | Ideal Use Cases 💡 | Key Advantages ⭐ |
|---|---|---|---|---|---|
| Concrete Quality Testing and Strength Verification | Moderate — scheduled sampling, lab and NDT procedures | High — laboratory access, curing space, trained technicians | Reliable compressive strength verification; code compliance; documented batches | High-rise, bridges, commercial pours, projects requiring certified strength | ⭐ Very high structural assurance; prevents failures; strong documentation |
| Structural Steel Inspection and Material Certification | Moderate–High — mill report review, dimensional checks, NDT | High — NDT equipment, certified inspectors, supplier coordination | Verified material grade, weld quality, and traceability | Skyscrapers, bridges, industrial facilities, government contracts | ⭐ Ensures material authenticity and capacity; reduces collapse risk |
| Formwork and Shoring Safety Verification | High — engineered design review, installation inspection, load testing | High — structural engineers, monitoring tools, temporary systems | Safe temporary support; reduced collapse and injury risk; protected schedule | Multi‑story formwork, heavy beams, bridge decks, OSHA‑regulated sites | ⭐ Prevents collapse; improves safety and concrete finish |
| Rebar Placement and Installation Verification | Moderate — detailed pre‑pour visual and measurement checks | Moderate — experienced inspectors, measuring tools, photo documentation | Correct reinforcement placement, adequate cover, splice compliance | High‑rise, bridges, marine structures, government projects | ⭐ Ensures reinforcement accuracy; enables early correction pre‑pour |
| Electrical Installation and Safety Compliance Inspection | Moderate — circuit, grounding, continuity and load testing | Moderate — certified electricians, electrical test gear, documentation | NEC compliance; reduced fire/electrical hazard risk; occupancy approval | Commercial buildings, hospitals, data centers, industrial facilities | ⭐ Prevents electrical hazards; ensures code compliance and safety |
| Masonry Quality Control and Bond Testing | Moderate — mortar/prism testing, visual workmanship inspection | Moderate–High — lab testing, skilled masons, time for prism curing | Verified bond strength, durability, moisture resistance | Historic restoration, facades, multi‑story masonry, heritage projects | ⭐ Ensures durability and weather resistance; prevents infiltration |
| Welding Quality Inspection and Certification | High — welder qualification, visual and advanced NDT (RT/UT), destructive tests | High — NDT specialists, radiography/UT equipment, testing labs | Verified weld integrity; detection of internal flaws; code compliance | High‑rise steel connections, pressure vessels, bridges, pipelines | ⭐ Detects critical flaws; verifies welder competence; prevents failures |
| Building Envelope and Moisture Barrier Verification | Moderate — visual, spray/water penetration testing, thermal imaging | Moderate — moisture/spray equipment, thermal cameras, dry conditions | Reduced water intrusion; improved energy efficiency; longer lifespan | Commercial facades, high‑performance buildings, renovations | ⭐ Prevents water damage and mold; improves energy performance |
From Checklist to Certainty: Embedding Quality into Your Project DNA
The journey from architectural vision to a completed, high-performing structure is paved with thousands of critical details. As we've explored through the eight essential stages, from pre-construction planning to final commissioning, a construction quality control checklist is far more than a simple document. It is the operational framework for excellence, the practical tool that transforms abstract quality goals into tangible, verifiable results on the job site. This isn't about ticking boxes; it's about embedding a culture of precision and accountability into the very DNA of your project.
Moving beyond a reactive, "catch-it-when-it's-broken" mindset is the single most impactful shift a project team can make. A proactive approach, underpinned by the detailed checkpoints we've outlined, prevents errors before they occur. It stops a small discrepancy in rebar placement from becoming a significant structural concern, and it ensures a minor gap in the building envelope doesn't lead to major moisture intrusion issues years down the line. This proactive diligence is the foundation of risk management, cost control, and schedule adherence.
The True ROI of a Rigorous Quality Control Process
The immediate benefits of a robust quality control program are clear: reduced rework, fewer change orders, and a smoother path to project completion. However, the long-term value extends far beyond the construction phase.
- Asset Longevity: Quality construction directly translates to a more durable, resilient building with lower lifecycle maintenance costs. Every verified weld, properly installed moisture barrier, and correctly commissioned MEP system contributes to the asset's long-term performance and value.
- Reputation and Trust: For developers, contractors, and owners, a reputation for delivering high-quality projects is invaluable. It builds trust with investors, attracts premium tenants, and secures future opportunities. A comprehensive construction quality control checklist is your proof of commitment to this standard.
- Occupant Safety and Satisfaction: Ultimately, buildings are for people. Rigorous adherence to structural, electrical, and fire safety codes is non-negotiable. Quality finishes and functional systems create a positive, reliable environment for occupants, enhancing satisfaction and tenant retention.
From Document to Dynamic Strategy
The power of a checklist lies in its consistent and diligent application. It must be a living document, integrated into daily workflows, site meetings, and project reporting. It requires clear ownership, with every team member understanding their role in the quality chain, from the subcontractor installing masonry to the project manager verifying material submittals.
This process is especially crucial in the nuanced fields of adaptive reuse and historic preservation. These projects introduce unique variables, from integrating modern MEP systems into historic structures to matching new materials with original building fabric. A generic checklist falls short here; a tailored, expert-guided quality control plan is essential to navigate these complexities and honor the building's character while ensuring modern performance and safety standards.
Key Takeaway: A construction quality control checklist is not a static document but a dynamic management system. Its purpose is to create a predictable, repeatable process for achieving an exceptional outcome, protecting your investment and solidifying your reputation for excellence. By embracing this systematic approach, you move from hoping for quality to ensuring it with certainty.
Navigating the complexities of commercial construction, particularly in adaptive reuse and historic preservation projects, requires specialized expertise. A robust construction quality control checklist is your roadmap, but an experienced architect is your expert guide. The team at Sherer Architects, LLC excels in creating and implementing these detailed quality frameworks to ensure your vision is realized with precision and integrity.
To see how their dedicated approach can safeguard your next project's success, visit Sherer Architects, LLC today.
