
When we talk about integrating a building into its landscape, we're really talking about starting a conversation between the structure and its surroundings. This goes way beyond simple aesthetics. It’s about forging a deep, respectful connection with the environment. The real secret to success is taking it step-by-step, from first learning to read the land's unique story to finally choosing materials that echo the natural world around you.
Harmonizing Structures with Their Environment
The best architecture never feels forced. It settles into its context, looking as if it has always been there. This sense of harmony isn’t some happy accident; it’s the result of a very deliberate process that puts the relationship between the built and natural worlds first. The whole point is to design buildings that complement the landscape, not dominate it.
Getting this balance right is more critical now than ever. The global construction market was valued at roughly $15.78 trillion and is only expected to grow. That number highlights the massive footprint new structures have on our planet, making thoughtful, environmentally-aware design an absolute necessity.
The Core Phases of Integration
Successfully integrating a building into its environment starts long before anyone breaks ground. It's a sequence of careful observation, thoughtful planning, and precise execution, with each phase building on the one before it. This ensures the final structure truly feels like it belongs.
This process can be broken down into a few key stages, each with a clear purpose.
Here’s a quick overview of how these phases work together to achieve a seamless integration.
Key Phases of Landscape Integration
| Phase | Purpose | Key Actions |
|---|---|---|
| Site Analysis | To understand the unique character of the land. | Study topography, climate, local ecology, and existing views. |
| Orientation & Siting | To position the building for optimal performance and minimal impact. | Align with sun paths, wind patterns, and natural contours. |
| Material Selection | To choose materials that reflect the local environment. | Source local stone, wood, and other regional materials. |
| Sustainable Design | To create a structure that works with nature, not against it. | Implement green roofs, rainwater harvesting, and passive heating/cooling. |
Following these steps ensures that every decision, from the big picture down to the small details, contributes to the final harmony.
The chart below visualizes how these stages flow from initial analysis to the finished design, creating a building that truly belongs.
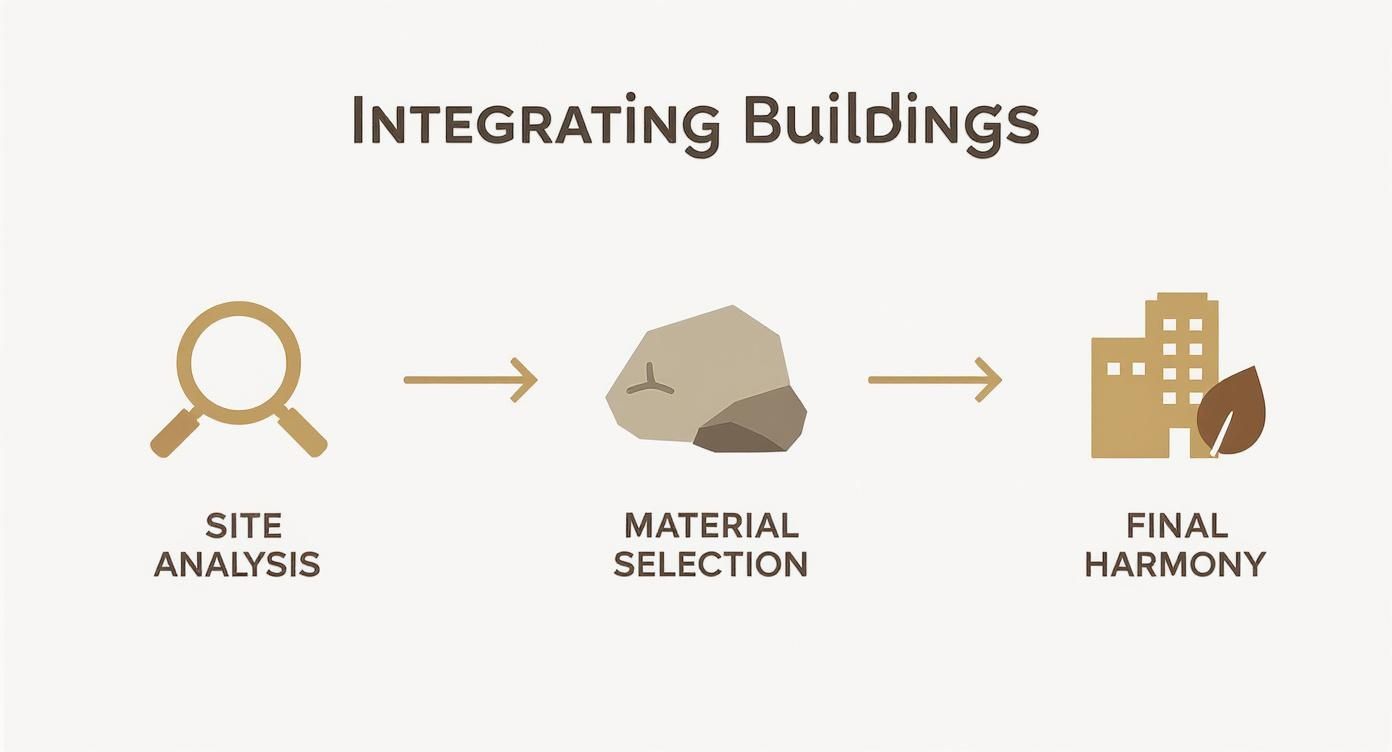
As you can see, a thorough site analysis is the foundation. It directly informs how you orient the building and which materials you choose, leading to a design that feels completely at home in its setting.
Beyond Aesthetics to Connection
Forging a genuine connection means doing more than just matching colors or using local stone. You have to go deeper by understanding the site's ecology, its specific climate, and even its history. Think about a mountain retreat designed to follow the natural contours of a slope. It doesn't just look good—it minimizes excavation and preserves the land's original form.
To really blend structures with their surroundings, we can get creative. Exploring stone design trends in biophilic design, for example, is a great way to bring natural elements indoors and blur the lines between inside and out.
A building should appear to grow easily from its site and be shaped to harmonize with its surroundings if Nature is manifest there.
– Frank Lloyd Wright
This philosophy is what turns a building from a static object into an active participant in the landscape. It’s how you create spaces that feel both protected and completely connected to the world outside.
Reading the Land Before You Build
Before a single shovel hits the dirt, the land itself tells a story. The best architecture listens. It doesn't just sit on a piece of property; it has a conversation with it. This first, crucial phase is all about "reading the land"—getting to know its quirks, its strengths, and the natural systems already at play.
This isn't just a nice idea; it's a critical responsibility. In just over a decade, global building floorspace ballooned from about 200 billion to over 260 billion square meters. That’s a staggering amount of construction, and it highlights just how important it is to build with intention. When we get it right, we treat the site as a partner in the design process, not just a platform.
Decoding the Topography
Every site has its own unique fingerprint, etched by its slopes, ridges, and valleys. The first step is to really understand this shape—to work with the land, not against it.
A steep hill isn't a problem to be bulldozed flat; it's an opportunity. Think of it as a natural prompt for a multi-level design that could open up incredible views while dramatically cutting down on expensive and destructive excavation.
Imagine a home on a sloped lot. Instead of carving out a massive, flat pad and building a huge retaining wall, we can study the contours. By stepping the foundation along the natural grade, we reduce our impact, prevent the kind of unnatural water runoff that causes erosion, and save a small fortune in earthmoving costs. To get a handle on what this involves, it’s worth checking out this expert guide to site preparation excavation to see how the pros approach it.

Following the Sun and Wind
The sun and wind are invisible forces, but they should have a very visible impact on your design. Think of them as free, renewable sources of energy and comfort, just waiting for you to tap into them.
- Solar Paths: Spend time on the site. Watch how the sun moves across it not just from morning to evening, but also from season to season. This knowledge dictates everything—where to place windows for passive solar heating in winter, and where to use overhangs or trees for shade in the summer.
- Prevailing Winds: Figure out where the dominant breezes come from. This simple observation can help you orient the building for fantastic natural ventilation. Placing windows on opposite sides of a room creates a cross-breeze, providing passive cooling that can slash your reliance on air conditioning.
When you start by observing these natural patterns, you're doing more than just designing a structure. You're creating an environment that feels better, costs less to run, and is truly connected to the world around it.
Understanding Water Flow
Water is the lifeblood of a landscape, and it's also one of its most powerful sculptors. You absolutely have to understand how water moves across, through, and under your site if you want a lasting design.
Look for the subtle clues: natural drainage channels, low spots where water might collect, and signs of the broader watershed.
Even on a lot that looks perfectly flat, a slight dip or swale could be the primary path for stormwater after a heavy rain. If you build right on top of that, you're asking for a damp basement or, worse, foundation issues. A smarter approach is to see that swale not as a problem, but as an asset. You can turn it into a rain garden or a landscaped bio-swale, creating a beautiful feature that manages water sustainably. That's how you build things that last.
Orienting Your Building for Performance and Views
How you place a building on its site is one of the most powerful—and cheapest—design decisions you'll ever make. It's a choice that costs nothing extra upfront but can pay you back for decades in energy savings and pure, simple enjoyment. Getting the orientation right is all about striking a balance between performance, like thermal efficiency, and the simple pleasure of a perfectly framed view.
This isn't some niche concept for custom homes; it's fundamental to every project. The top 100 global construction firms recently pulled in revenues of around $1.978 trillion, and every single one of those projects started with a decision about where to point the building. If you're curious about the scale of the global construction market, Deloitte's detailed report offers some fantastic insights.
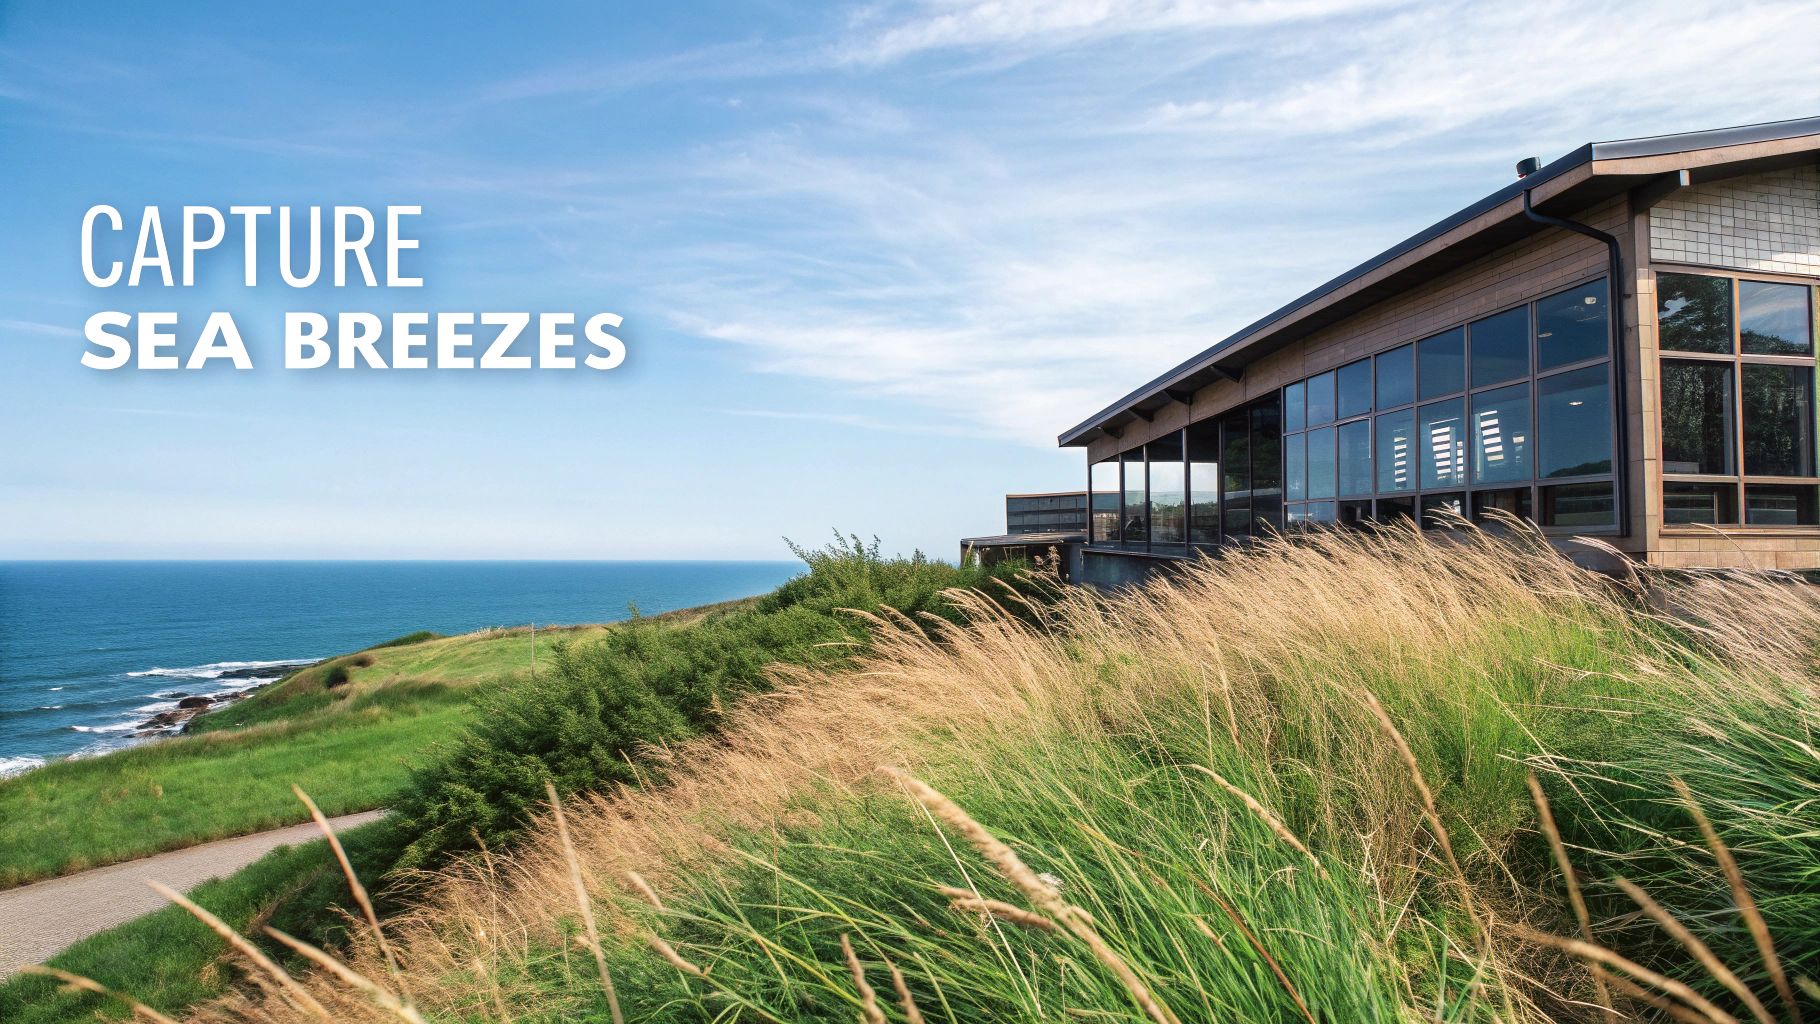
Balancing the Sun and the Scenery
Here’s the classic architect's dilemma: a site with a stunning westward view over the ocean or a mountain range. Your first instinct is to install a massive wall of glass to capture it all. But you know that the intense afternoon sun will turn the inside of that building into an oven, sending your cooling costs through the roof.
This is where smart orientation becomes a puzzle worth solving.
Instead of facing the view head-on, think about angling the structure just slightly. A small shift, a subtle pivot, can keep the primary view while deflecting the harshest solar heat. This simple move can make a world of difference in both comfort and energy bills.
I remember a coastal research center project that nailed this. The design team angled the main laboratory wing to frame panoramic ocean vistas and catch the prevailing sea breezes. That orientation allowed for natural ventilation, which dramatically cut down the need for air conditioning in a hot, humid climate.
Tools for Predicting Light and Shadow
Thankfully, you don't have to guess how the sun will move across your property. Modern tools give us the power to predict its path with incredible accuracy, so your design can work with nature all year long.
-
Sun-Path Simulators: Digital software is a game-changer here. We can create a 3D model of your building on its site and simulate the sun's movement for any day of the year. You see exactly where shadows will fall and where sunlight will stream in, helping you place windows, overhangs, and even patios for the best effect.
-
Simple On-Site Models: Never underestimate the power of a physical model. Seriously. A basic cardboard or foam-core model placed on the actual site can be incredibly revealing. Watching it at different times of the day gives you a real-world feel for light and shadow that no computer screen can ever fully replicate.
Smart orientation is about making the sun your ally, not your enemy. When you understand its path, you can use it to warm your home in the winter, keep it cool in the summer, and fill your rooms with beautiful, natural light.
Thinking Beyond the Building Itself
Great orientation work also considers everything around the building. Existing trees, a neighbor’s house, even small hills can all be used to your advantage.
That huge old oak on the west side of a property? It’s a natural asset. It provides a dense canopy of shade in the summer but lets warming sunlight pass through its bare branches in the winter.
By mapping these features during your initial site analysis, you can position the building to work with them. Thoughtful placement transforms the landscape from a pretty backdrop into an active part of your building’s performance system. That's how you get a truly integrated and sustainable design.
Choosing Materials That Belong To The Landscape
Materials are the skin and bones of any building, yet they do more than hold up walls. They anchor a design in its surroundings—geology, ecology and local history all come into play. When you really study the earth beneath your feet, you begin to see a palette waiting to be built into.
Selecting resources nearby does more than cut down on transport emissions. It taps you into the unique character of a place. A farmhouse built from quarried stone just a few miles away will feel like it’s always belonged there.
Connecting With Local And Sustainable Sources
Nothing beats materials pulled directly from your region. By using what’s available—be it stone, native timber or even earth—you create a building that’s of the land, not merely on it. Plus, local tradespeople gain work and transport energy falls dramatically.
Here are a few options I often recommend on site visits:
- Local Stone: Granites, limestones or sandstones harvested close by bring unmatched durability and a timeless link to the terrain.
- Sustainable Timber: Wood from responsibly managed forests, especially native species, adds warmth and renewability.
- Rammed Earth: An age-old method of compacting soil, sand and clay delivers solid walls that feel sculpted from the site itself.
In one desert project, we rammed earth directly from the build site. The walls matched the dunes’ ochre tone perfectly—and their thermal mass kept the interior cool by day, warm by night.
By choosing materials on-site, the building becomes not just part of the landscape but a living extension of it.
Evaluating A Material’s Full Lifecycle
A smart material choice means thinking beyond the purchase price. Every step—from quarrying or harvesting through manufacturing, shipping, installation and eventual disposal—carries an environmental cost. That embodied carbon can add up.
Consider this lifecycle illustration:
It’s a reminder to weigh maintenance needs, long-term emissions and end-of-life options alongside upfront expenses. Materials like concrete and steel aren’t off-limits, but they demand efficient use and thoughtful detailing.
When you vet a material, ask:
- Where does it come from? Prioritize nearby quarries, forests or reclaimed sources.
- How is it manufactured? Seek low-energy processes with minimal waste.
- What’s its lifespan? Durability in your specific climate beats trendy finishes.
- How does it retire? Can it be reused, recycled or safely returned to the earth?
A true lifecycle approach means you’re investing in both the building’s health and the planet’s.
Comparing Sustainable Building Materials
Before you make a final call, it helps to see how different options stack up at a glance:
Here’s a quick overview to help you weigh material options:
| Material | Sustainability Rating | Average Cost | Thermal Performance |
|---|---|---|---|
| Local Stone | 8/10 | $$$ | High |
| Sustainable Timber | 9/10 | $$ | Medium |
| Rammed Earth | 9/10 | $$ | Very High |
| Straw Bale | 10/10 | $ | Extremely High |
This snapshot highlights the trade-offs between environmental impact, budget and thermal properties. Use it as a starting point when narrowing down your material list.
By digging into local geology, scrutinizing each product’s lifecycle and comparing real performance data, you’ll choose materials that feel rooted and perform beautifully for years to come.
Sustainable Strategies for a Living Design
True integration goes beyond just looks. It’s about creating a living, breathing system where your building becomes an active participant in the landscape's ecological cycles. Instead of designing a static object dropped into nature, we can create structures that are dynamic contributors, supporting the very environment they inhabit. We're aiming for buildings in the landscape, not just on it.
Think of the building not as a sealed-off box, but as a porous, interactive membrane. When we weave living systems into our designs, we end up with buildings that are more resilient, more efficient, and deeply connected to their place. These strategies aren't just for show; they often solve multiple practical problems while adding incredible ecological value.

Embracing Living Roofs and Walls
One of the most powerful ways to physically merge a structure with its environment is to quite literally cover it in plant life. Green roofs and living walls are far more than just a pretty facade; they are hardworking systems that deliver a surprising number of environmental and financial perks.
Take a green roof, for example. It acts as a thick blanket of insulation, which can slash a building's heating and cooling energy needs by up to 25%. It also acts like a giant sponge, absorbing stormwater that would otherwise overwhelm municipal drains. In dense urban areas, it even creates a brand-new habitat for pollinators and birds where green space is almost nonexistent.
Managing Water Naturally on Site
Conventional development typically treats rainwater as a nuisance—something to be piped away as fast as possible. A more thoughtful approach sees it for what it is: a valuable resource to be captured and put to work right where it falls. This is the core idea behind low-impact development (LID) techniques.
- Permeable Paving: Forget impermeable asphalt or concrete. Using permeable surfaces for driveways, paths, and parking lots lets rainwater soak directly into the ground. This simple switch recharges groundwater, filters out pollutants, and prevents the erosive runoff that plagues so many developed areas.
- Rainwater Harvesting: Funneling roof runoff into cisterns or rain barrels provides a free, ready-to-use water source for irrigating the landscape. Even a basic setup can make a huge dent in your reliance on treated municipal water, which saves both money and a critical natural resource.
Picture a downtown office building that, instead of sending its runoff to the sewer, directs it all into a large underground cistern. That collected water is then used to irrigate the native plant gardens and street trees surrounding the property. The result is a self-sustaining urban oasis that needs zero city water for its landscape.
A Practical Implementation Checklist
Putting these strategies into practice isn't something you do on a whim; it requires some upfront planning. Before you even think about breaking ground, you need to weigh the costs and benefits and get a handle on any local regulations. Here’s a quick rundown of what to consider:
- Assess Your Site: What’s your local climate like? How much rain do you get, and when? What kind of soil are you working with? The answers will point you toward the strategies that will give you the most bang for your buck.
- Run the Numbers: It's not just about the installation cost. Factor in the long-term savings from lower energy and water bills, potential tax incentives, and the boost to your property value.
- Find the Right People: Team up with landscape architects or engineers who have real-world experience with green infrastructure. Their expertise is crucial for getting the design and installation right the first time.
- Navigate the Red Tape: Check in with your local planning and building departments. They’ll tell you about any specific permits or requirements for things like green roofs or large-scale rainwater harvesting systems.
When you adopt these living design strategies, you’re creating more than just a place to live or work. You’re building something that actively contributes to the health and vitality of the landscape around it.
Answering Your Top Site Design Questions
When you move from the drawing board to the actual building site, theory quickly gives way to practical questions. I've seen it time and again—navigating the complexities of site surveys, trying to balance a budget with sustainable goals, it can be a lot. Getting these questions answered early on is the key to a project that feels like it belongs, rather than one that's fighting its surroundings.
Let's walk through some of the most common hurdles that pop up. Clearing these up from the start will save you a world of headaches (and money) down the line.
What Site Surveys Do I Really Need?
Every piece of land has its own story, but a few surveys are absolutely non-negotiable. Don't look at these as just ticking boxes; they're the bedrock of your entire project, the data that stops small issues from becoming catastrophic, expensive fixes.
You can't really get started without these three:
- Topographical Survey: This is your 3D map of the land, showing every slope, dip, and contour. Without it, you’re just guessing on how to place the building, manage water runoff, or even design the driveway. It’s fundamental.
- Geotechnical Report: This is where we learn what’s happening under the ground. A geotechnical engineer will test the soil to understand how stable it is and how much weight it can support. This report directly dictates your foundation design—it's a matter of safety and long-term stability.
- Boundary Survey: This is the legal map. It clearly marks your property lines, identifies any easements (like a utility company's right of way), and defines your setbacks. Getting this done first ensures your design is compliant from day one.
How Do I Get a Great View Without Roasting in the Sun?
Ah, the classic design dilemma. You have that perfect west-facing view, but a wall of glass pointed that way means your AC will be running non-stop every afternoon. The trick isn't to pick one over the other; it's about being clever with the design.
My favorite strategy is to orient the building just slightly off-axis from that perfect view. A small rotation of even 15 or 20 degrees can keep the visual connection strong while deflecting the most intense solar heat gain.
Then, you layer in other solutions. Think deep roof overhangs that cast long shadows in the summer, exterior louvers or screens, or high-performance windows with a low solar heat gain coefficient (SHGC). These elements work together to frame that million-dollar view without the thousand-dollar energy bill.
Is Sustainable Design Only for Big Budgets?
Not at all. It's a common misconception that "green" always means expensive. While some features like a geothermal system have a higher upfront cost, many of the most impactful sustainable strategies are about smart, thoughtful design—not pricey technology.
This is where passive design shines. Orienting a building to capture winter sun and block summer heat costs nothing extra at the planning stage, but it pays you back in lower utility bills for the life of the building.
Here’s where you can find some real savings:
- Use local materials: Sourcing stone, timber, or other materials from nearby suppliers dramatically cuts down on transportation costs and carbon emissions.
- Phase your approach: You don't have to install every green feature on day one. A great start is a super-insulated, airtight building shell. You can always plan to add solar panels or a rainwater catchment system a few years down the road.
- Look for grants and incentives: There are often local, state, and even federal programs that offer tax credits or rebates for building an energy-efficient home. These can seriously offset your initial investment.
Bringing all the pieces of site design together is what we do best. At Sherer Architects, LLC, we've spent decades helping clients navigate these decisions, from the first walk of the property to the final touches. We focus on creating buildings that are not only beautiful but also truly sustainable and built to last. Learn more about our architectural services and let’s talk about how to bring your vision to life.